AWS have service called Lambda for serverless application. Lambda can run code without provisioning or managing servers. Lambda runs your code on a high-availibilty compute infrastructure and manage all the computing resources, including servers and operating systems maintenance, capacity provisioning, automatic scaling & loging.
Reference :
- https://docs.aws.amazon.com/lambda/latest/dg/welcome.html
All source code stored : https://github.com/ngurah-bagus-trisna/aws-vpc-iaac
When using lambda, you are responsible only for code. Lambda mange the compute and other resources to run your code. In this journey, i want to create lambda for reporting access to database RDS and run simple SELECT NOW();, then put to S3 bucket by serializing result to JSON.
This is a squel to yersterday's article, about RDS & Serverless Foundations. You may want to visit that article before continue
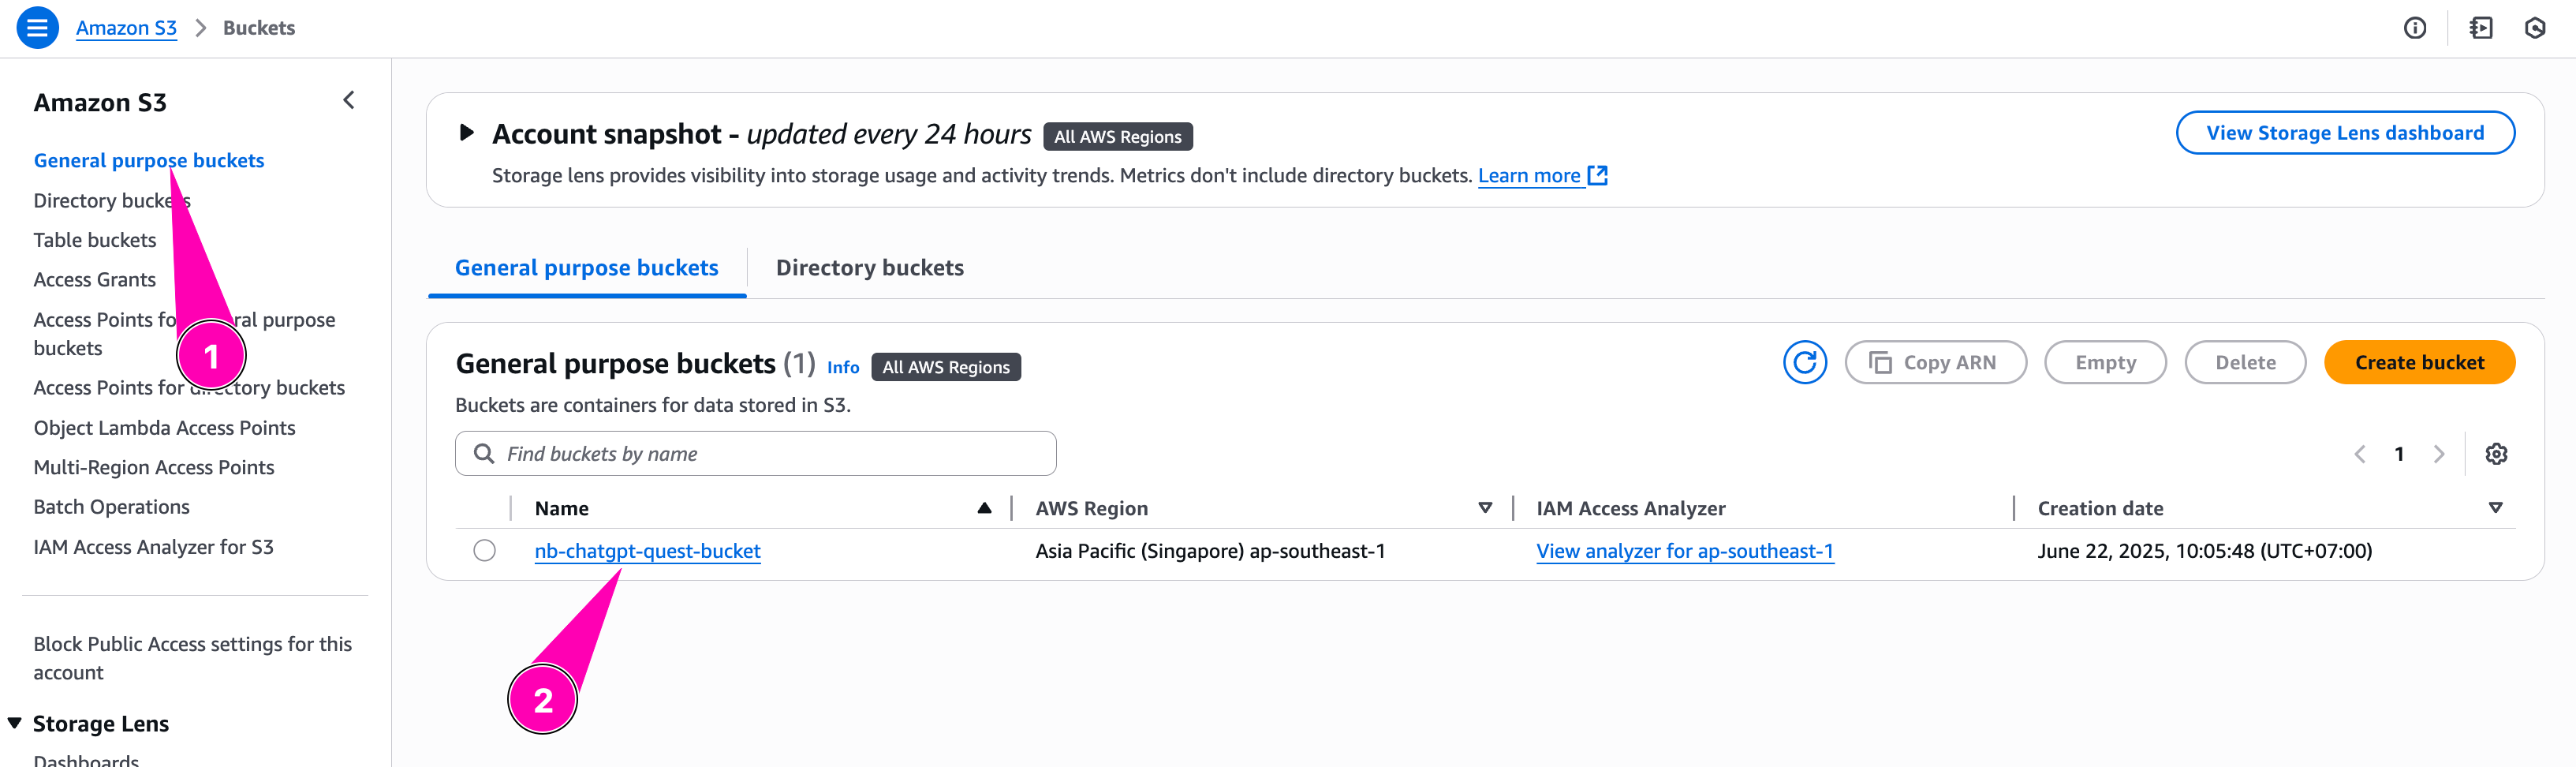
- Create bucket resource in
s3.tf
This terraform resources, provisoning bucket called nb-quest-reports and attach public_access_block to deny all acl, policy & securing access to bucket
resource "aws_s3_bucket" "nb-quest-reports" {
  bucket = "nb-quest-reports"
  tags = {
    "Name" = "nb-quest-report"
  }
}

resource "aws_s3_bucket_public_access_block" "nb-quest-deny-access" {
  bucket = aws_s3_bucket.nb-quest-reports.id

  block_public_acls       = true
  block_public_policy     = true
  ignore_public_acls      = true
  restrict_public_buckets = true
}
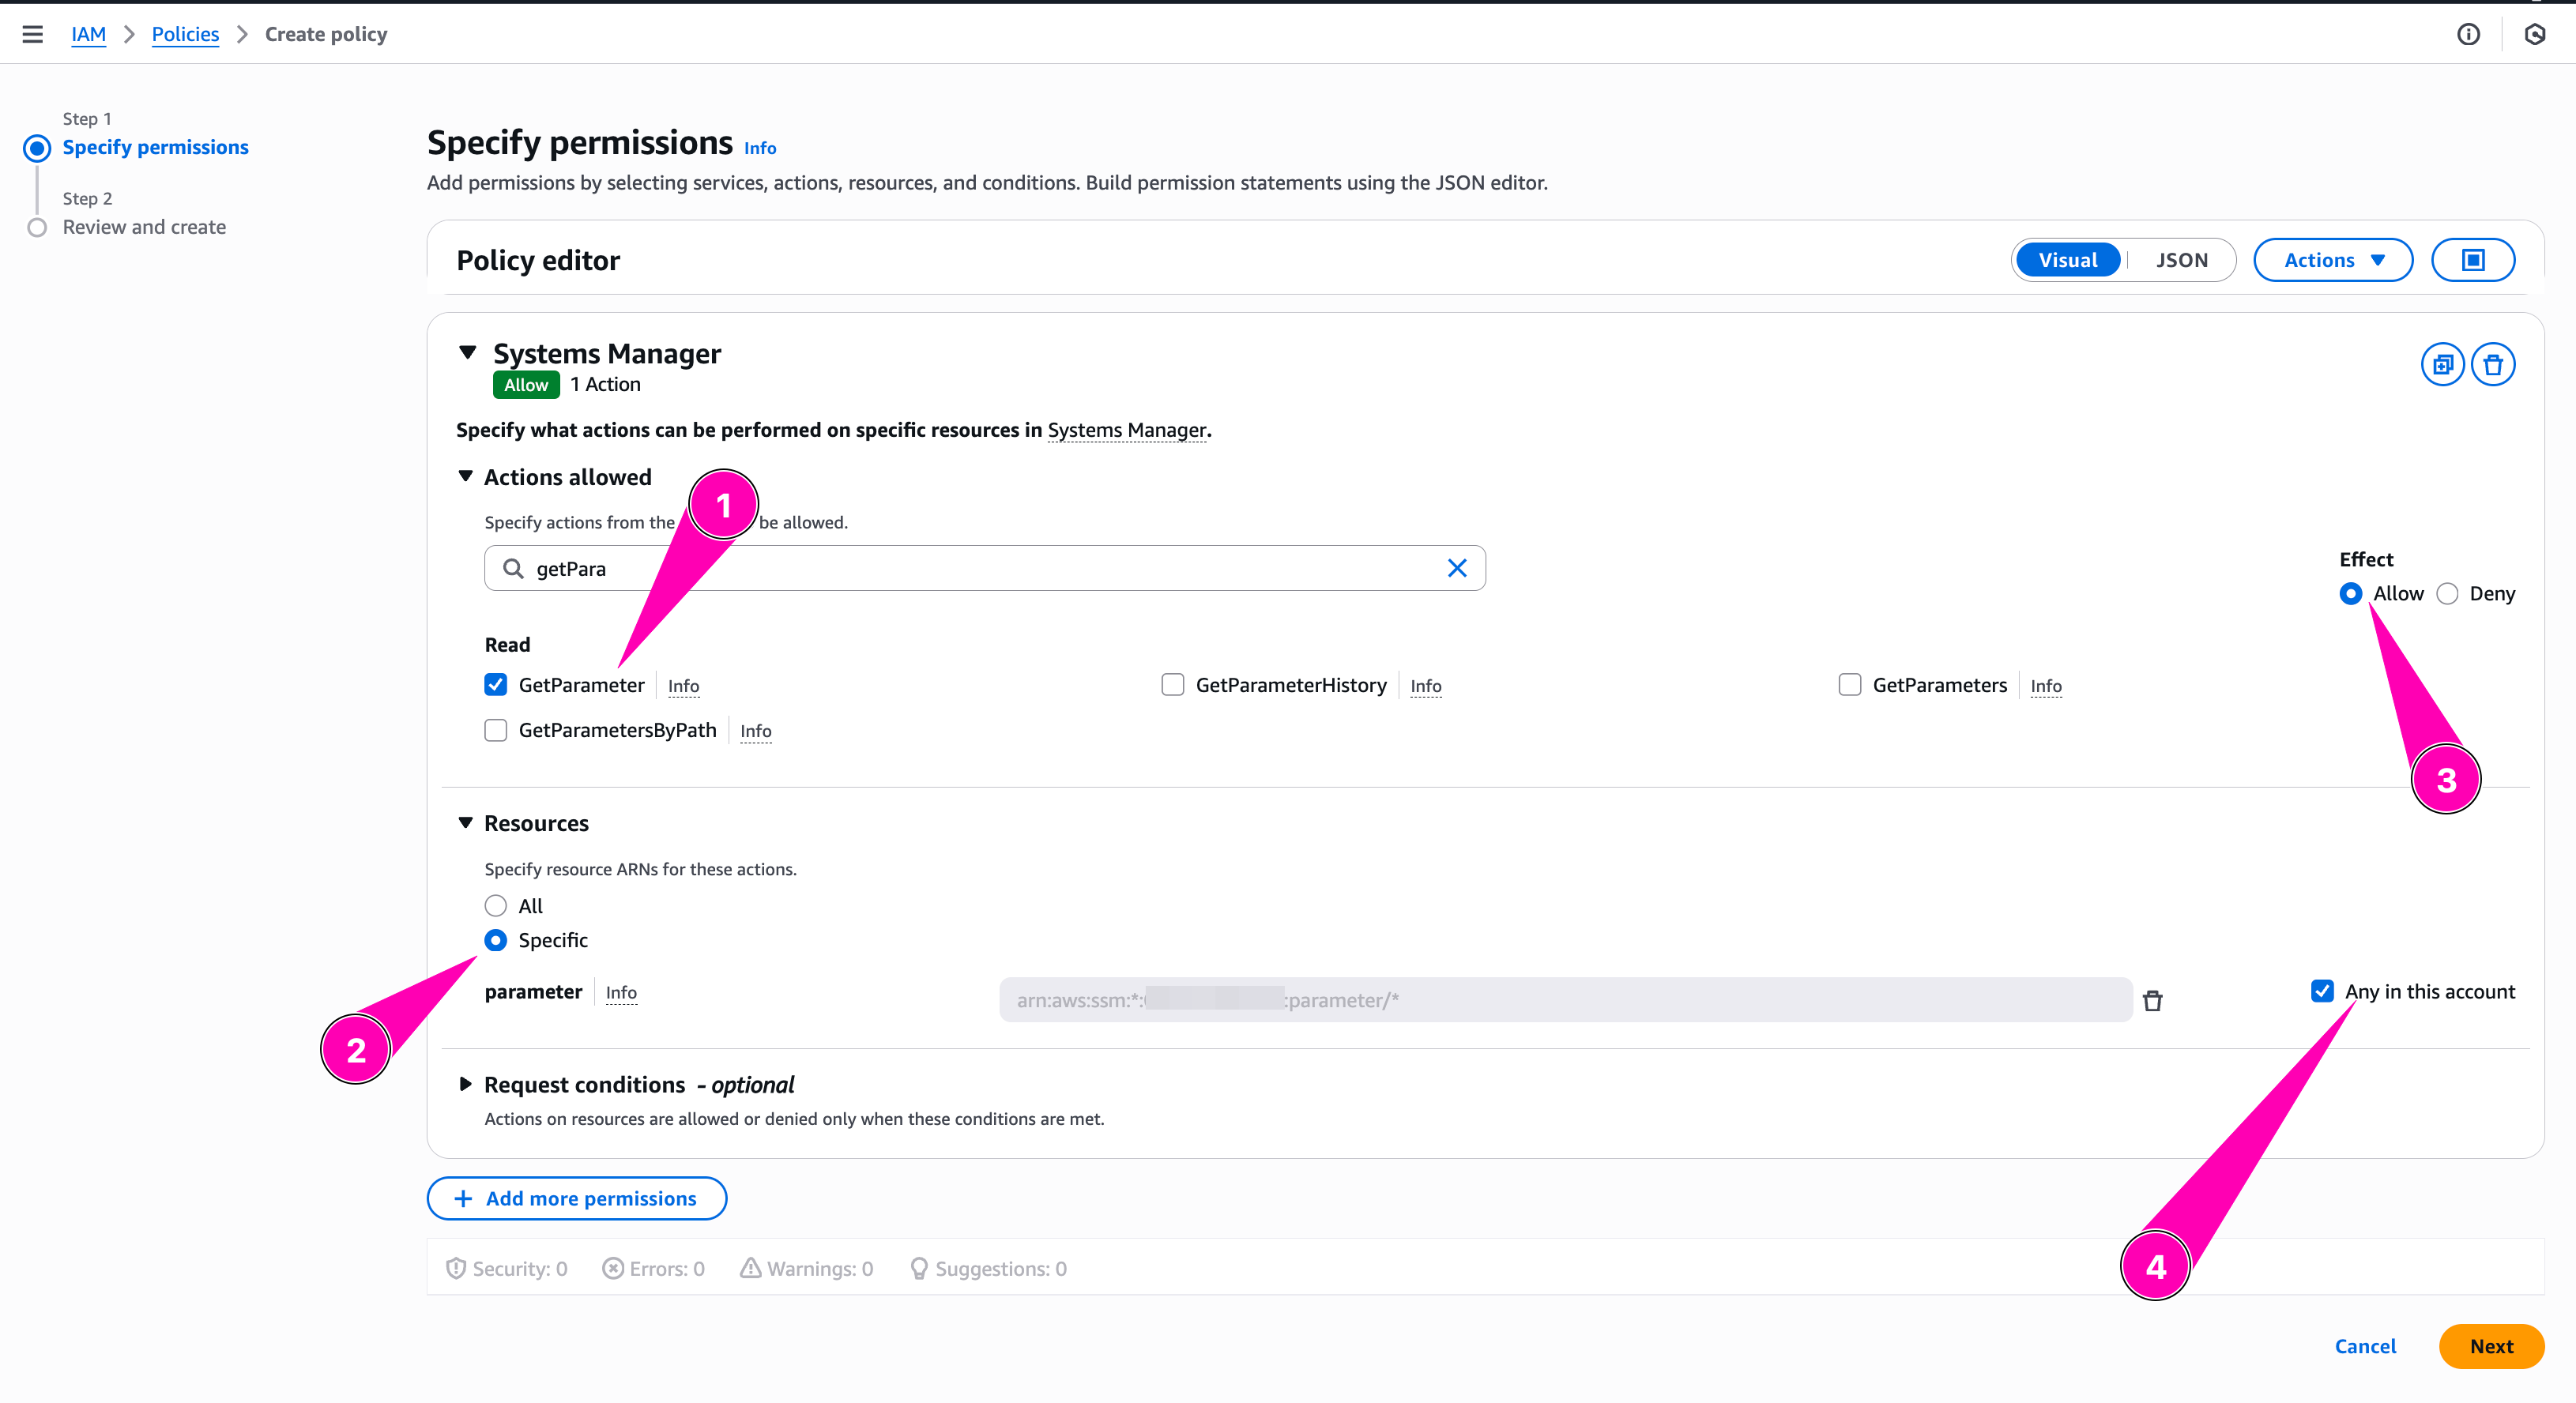
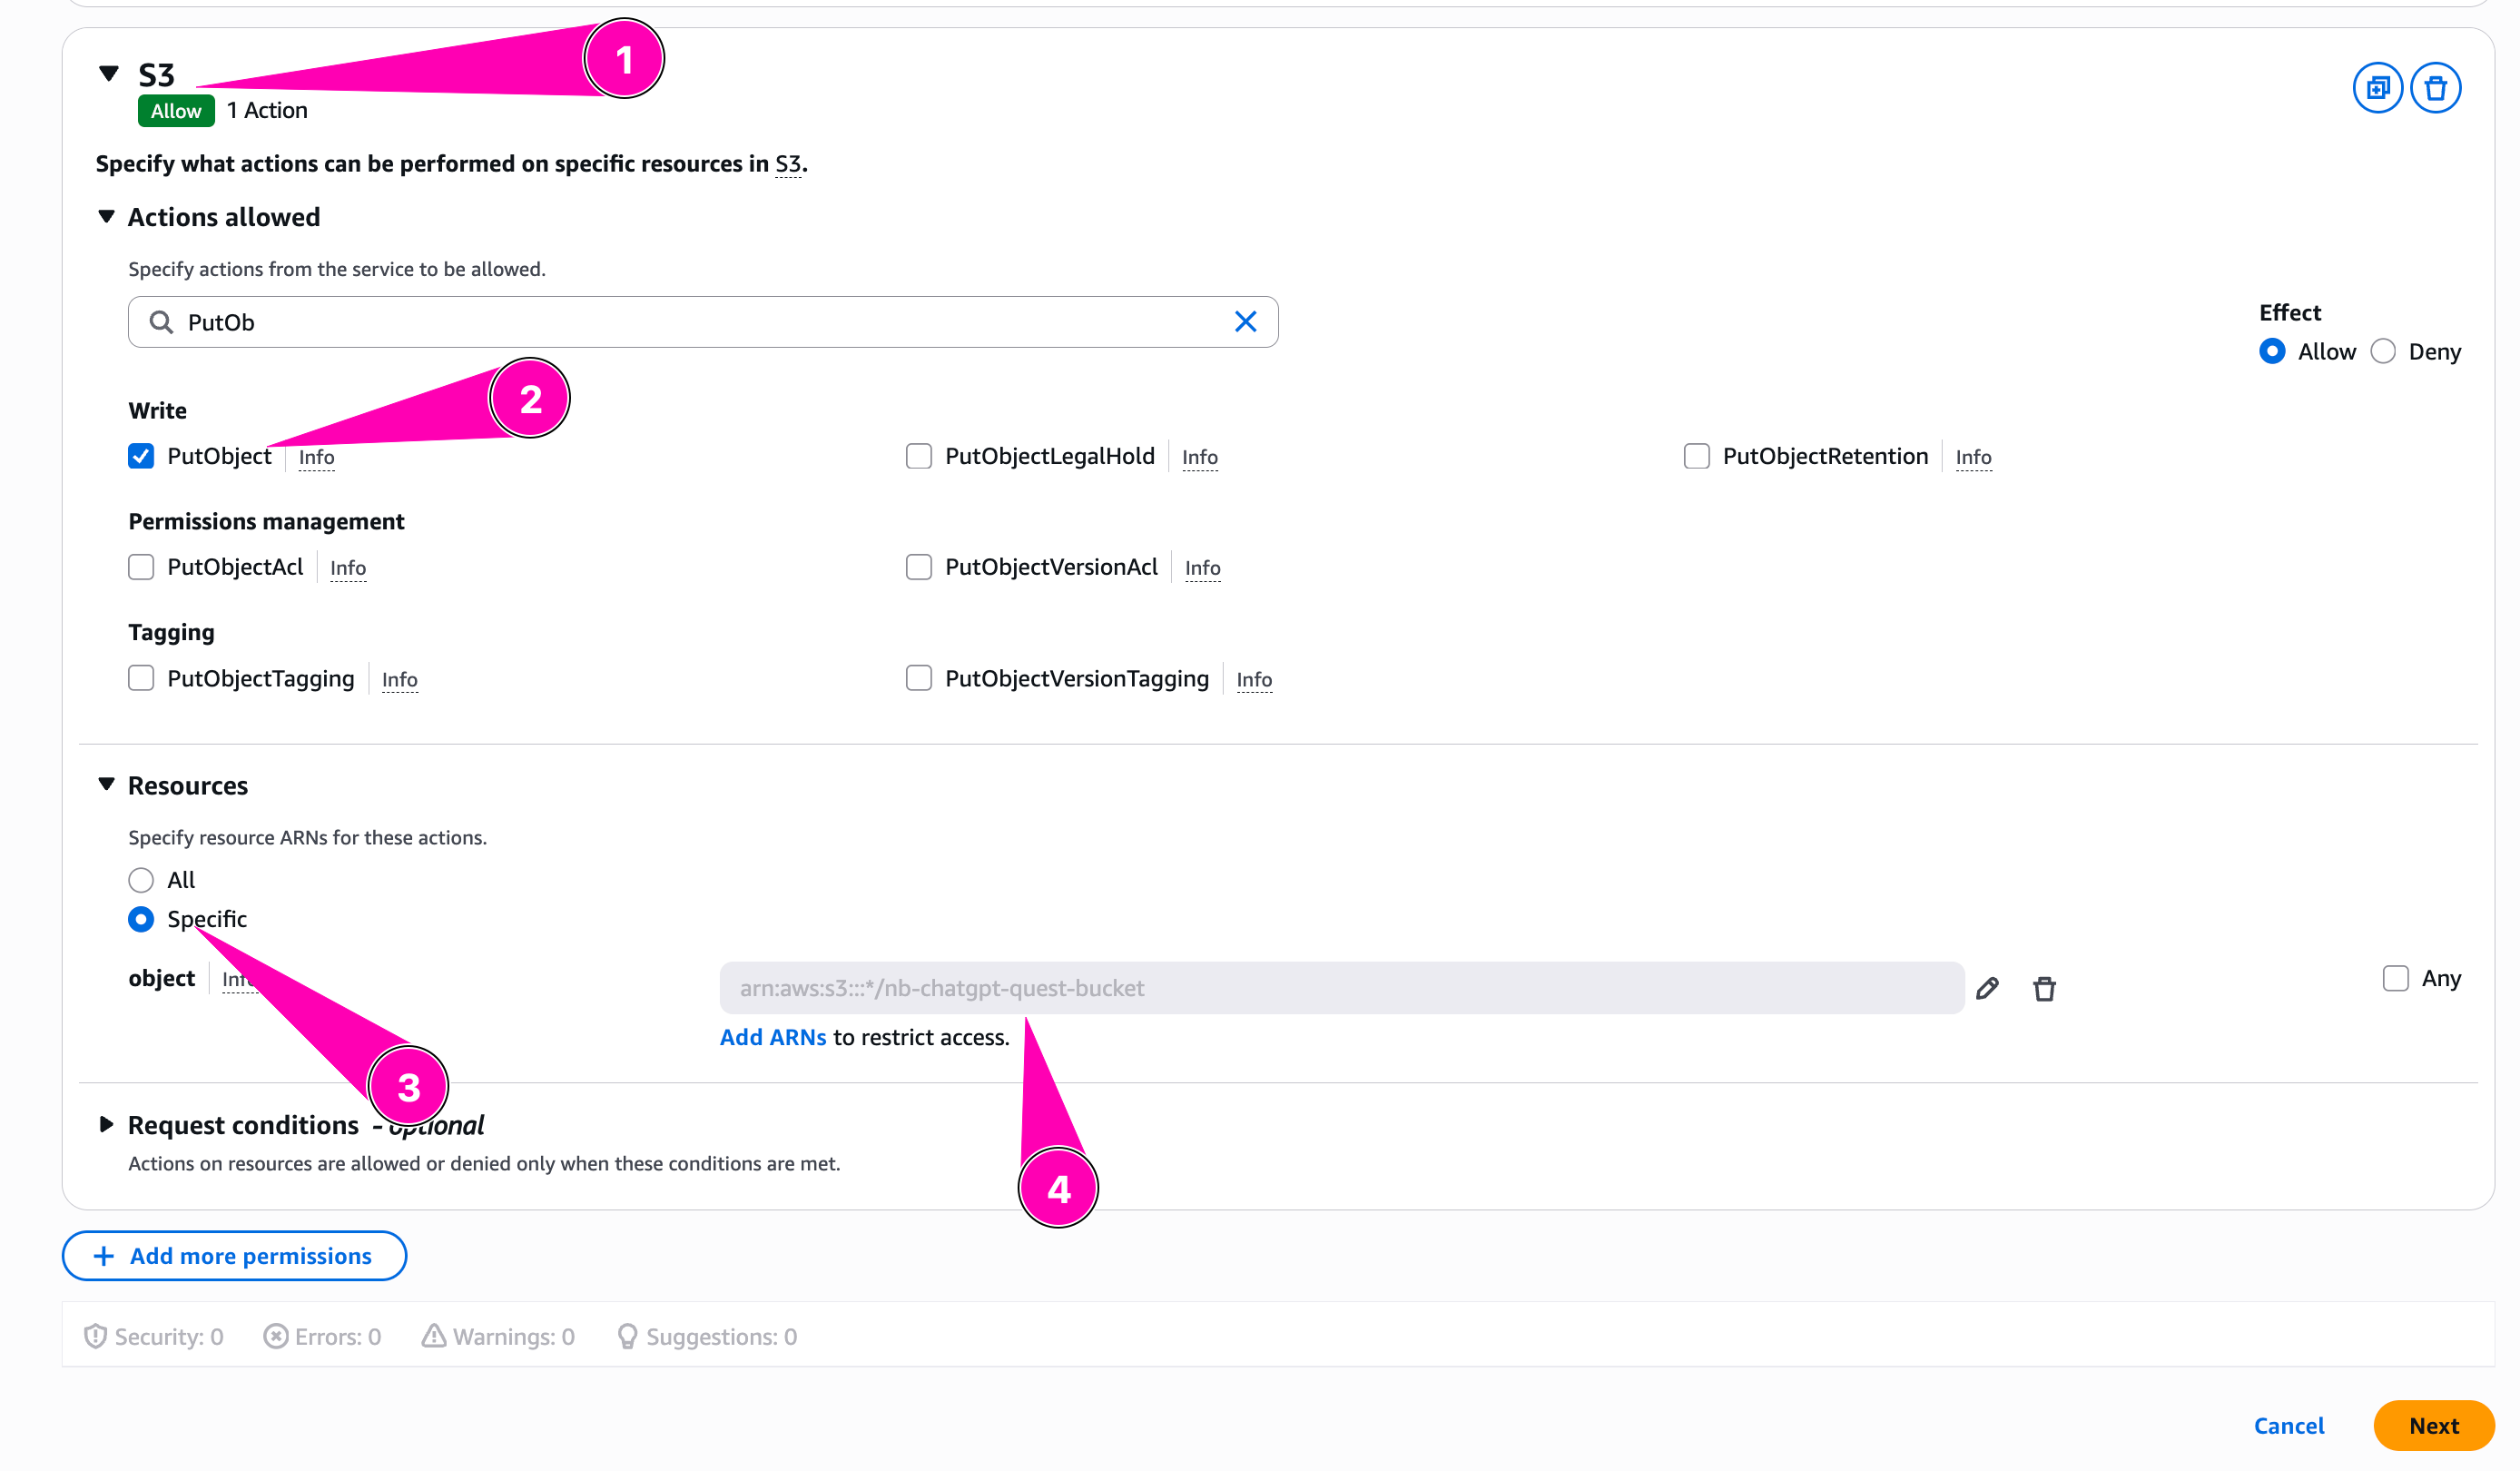
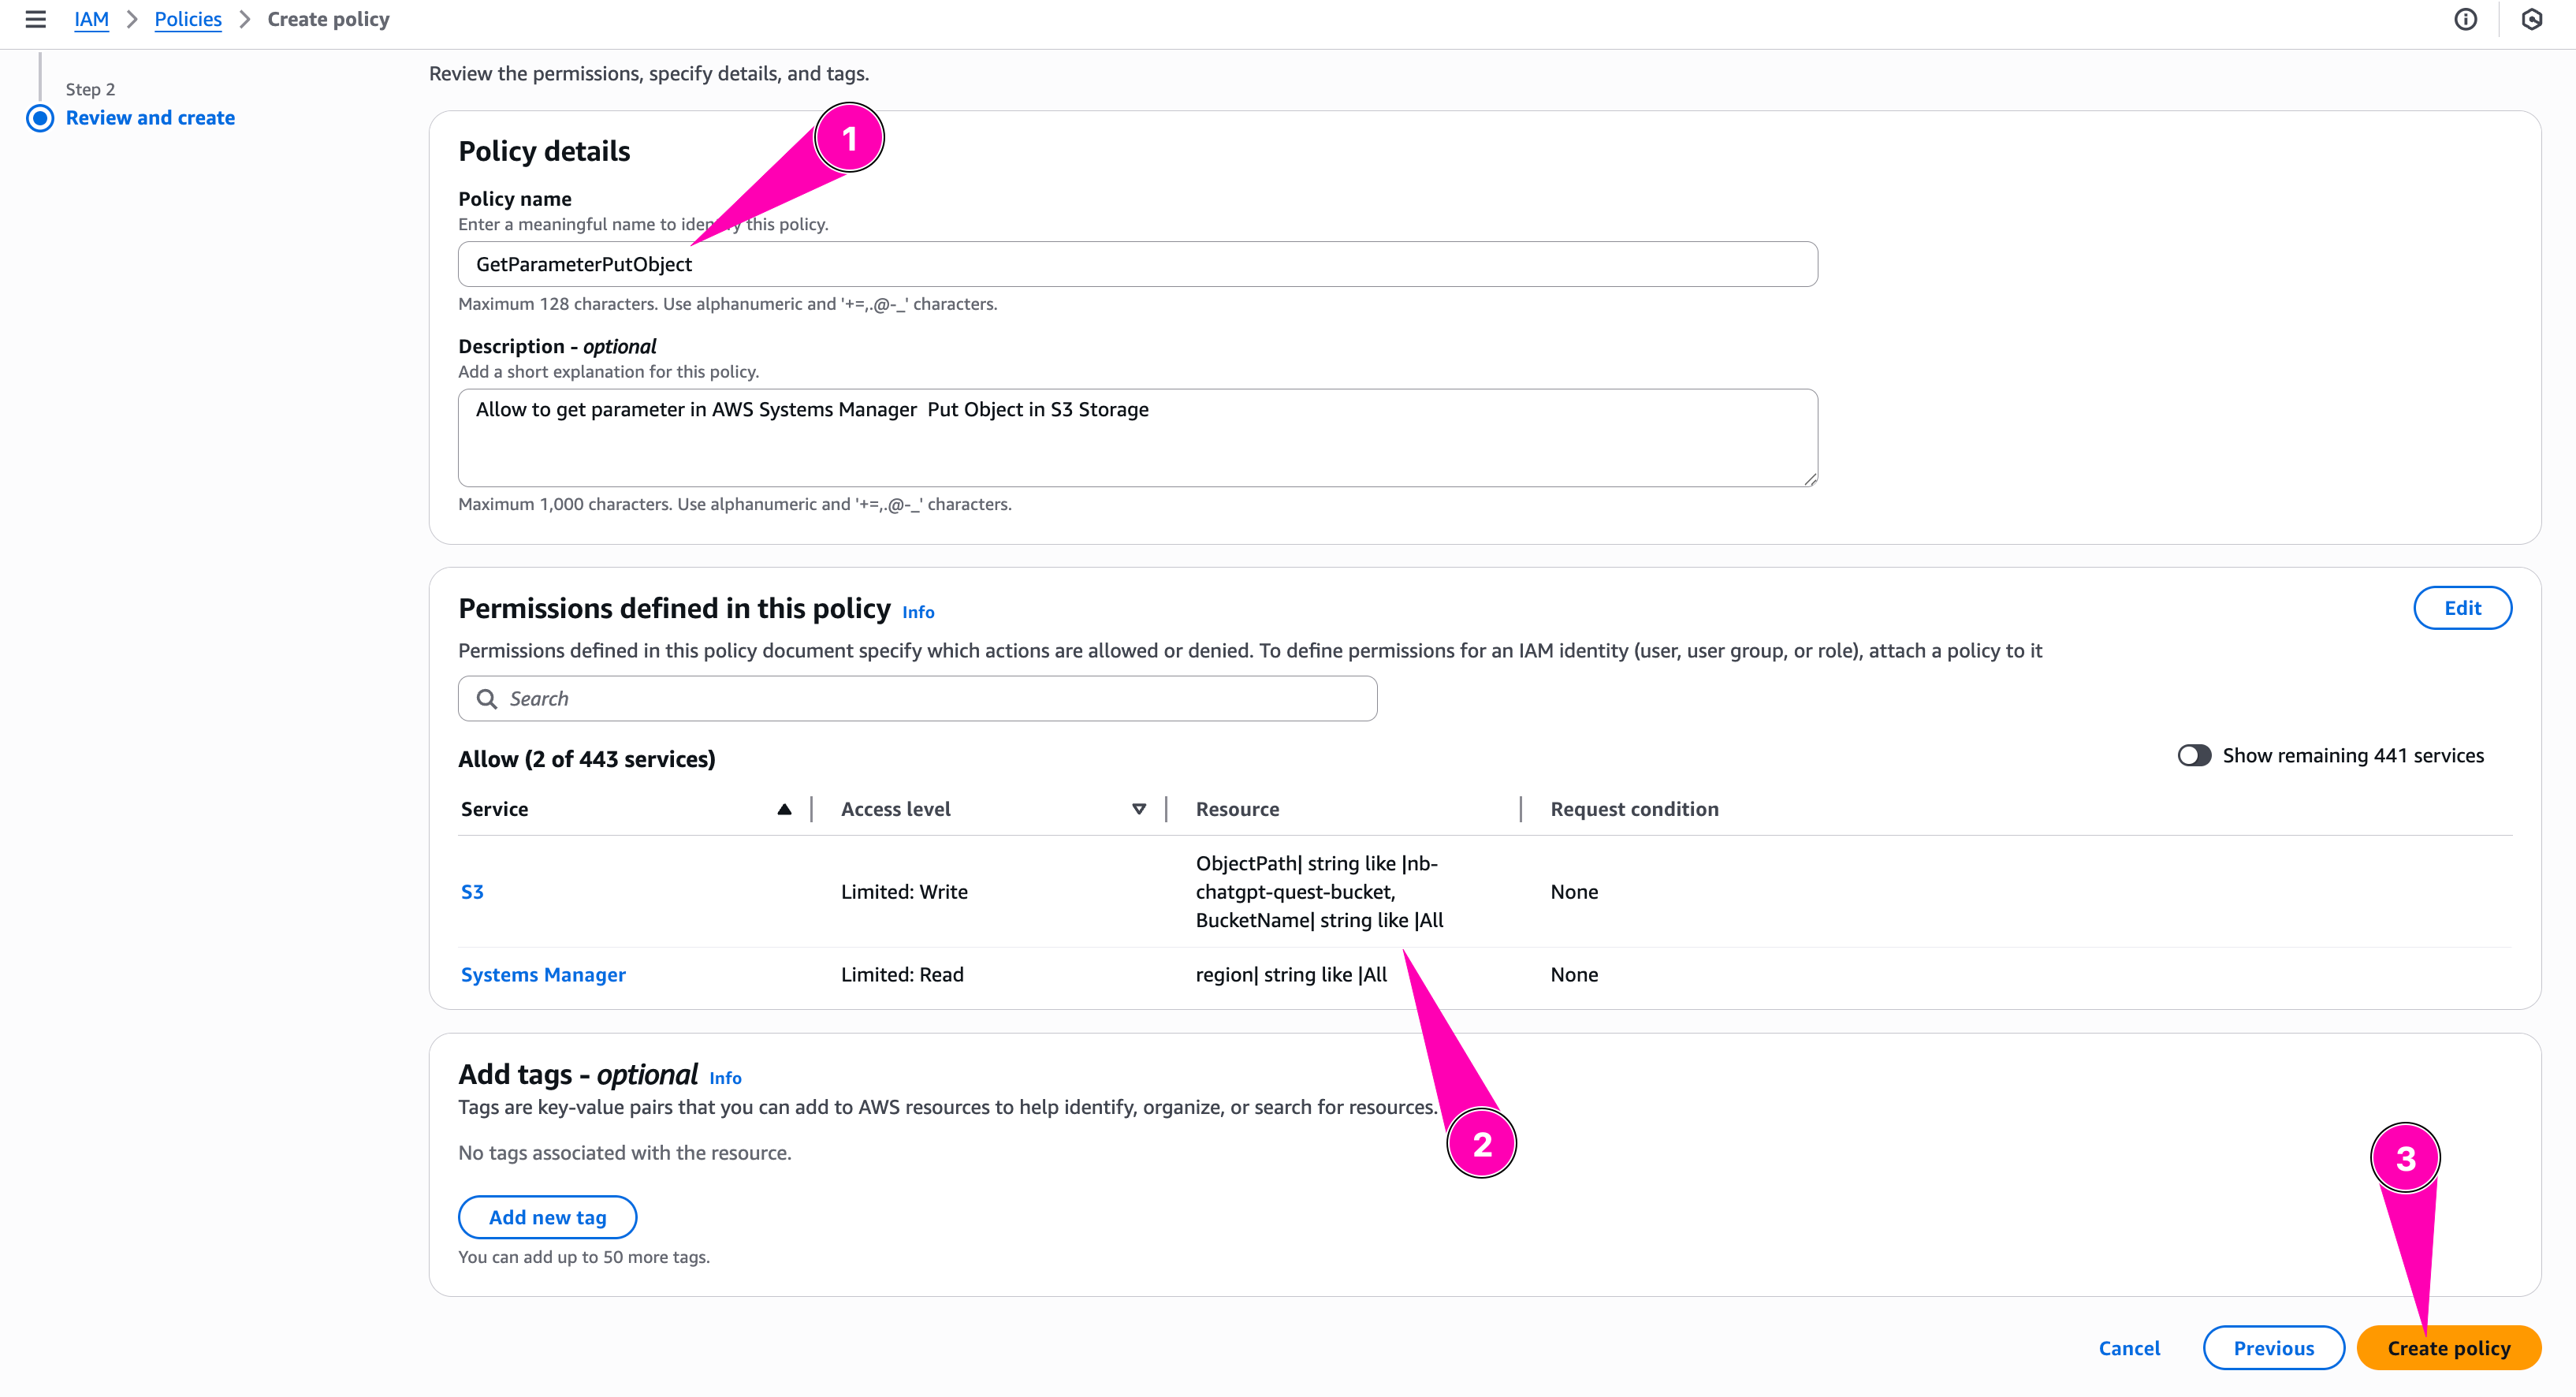
- Define IAM policy for lambda, allowing to access
ssm:GetParameter, ands3:PutObject. Write intolambda.tf
First create an aws_iam_poicy called lambdaPolicy, that allows following actions :
- Put object to AWS S3 storage
- Allow get parameter from AWS System Manager
- Allow get secret from AWS Secrets Manager.
After policy created, create role with effect Allows only Lambda service can use this role. Then attach new policy to role.
resource "aws_iam_policy" "lambda-policy" {
  name        = "lambdaPolicy"
  path        = "/"
  description = "Allow write to S3 and read System Parameter"

  policy = jsonencode({
    "Version" = "2012-10-17",
    "Statement" = [
      {
        "Sid"    = "AllowPutObject",
        "Effect" = "Allow",
        "Action" = [
          "s3:PutObject"
        ],
        "Resource" = [
          "*"
        ]
      },
      {
        "Sid"    = "AllowGetParameterSSM",
        "Effect" = "Allow",
        "Action" = [
          "ssm:GetParameter"
        ],
        "Resource" = [
          "*"
        ]
      },
      {
        "Sid"    = "AllowGetSecretValue",
        "Effect" = "Allow",
        "Action" = [
          "secretsmanager:GetSecretValue"
        ],
        "Resource" = [
          "*"
        ]
      },
      {
        "Sid": "AllowManageENI",
        "Effect": "Allow",
        "Action": [
          "ec2:CreateNetworkInterface",
          "ec2:DescribeNetworkInterfaces",
          "ec2:DeleteNetworkInterface"
        ],
        "Resource": "*"
      },
      {
        "Sid": "AllowCloudWatchLogs",
        "Effect": "Allow",
        "Action": [
          "logs:CreateLogGroup",
          "logs:CreateLogStream",
          "logs:PutLogEvents"
        ],
        "Resource": "*"
      }
    ]
    }
  )
}

resource "aws_iam_role" "reporting_lambda_role" {
  depends_on = [aws_iam_policy.lambda-policy]
  name       = "ReportingLambdaRole"
  assume_role_policy = jsonencode({
    Version = "2012-10-17",
    Statement = [
      {
        Effect = "Allow"
        Principal = {
          Service = "lambda.amazonaws.com"
        },
        Action = "sts:AssumeRole"
      }
    ]
  })
}

resource "aws_iam_role_policy_attachment" "lambda_policy_attachment" {
  depends_on = [
    aws_iam_policy.lambda-policy,
    aws_iam_role.reporting_lambda_role
  ]
  role       = aws_iam_role.reporting_lambda_role.name
  policy_arn = aws_iam_policy.lambda-policy.arn
}

resource "aws_lambda_function" "db_to_s3_lambda" {
  depends_on = [
    aws_db_instance.nb-db,
    aws_s3_bucket.nb-quest-reports,
    aws_iam_role_policy_attachment.lambda_policy_attachment
  ]
  function_name    = "dbToS3Lambda"
  handler          = "app.lambda_handler"
  runtime          = "python3.12"
  filename         = "${path.module}/lambda.zip"
  role             = aws_iam_role.reporting_lambda_role.arn
  source_code_hash = filebase64sha256("${path.module}/lambda.zip")
  timeout          = 10

  vpc_config {
    subnet_ids = [aws_subnet.nb-subnet["private-net-1"].id]
    security_group_ids = [aws_security_group.rds-sg.id, aws_security_group.web-sg.id]
  }

  environment {
    variables = {
      SECRET_NAME = aws_db_instance.nb-db.master_user_secret[0].secret_arn
      BUCKET_NAME = aws_s3_bucket.nb-quest-reports.id
      DB_HOST     = aws_db_instance.nb-db.address
      DB_USER     = aws_db_instance.nb-db.username
      DB_NAME     = aws_db_instance.nb-db.db_name
    }
  }
}
- Create Lambda function.
In this section i use python to create function with the following action :
- Read DB credentials (from Env / SSM / Secrets Manager)
- Connect to the RDS endpoint
- Run a simple
SELECT NOW();query - Serialize the result to JSON and
PUTit into your S3 bucket
import boto3
import pymysql
import os
import json
import time
from datetime import datetime
from botocore.exceptions import ClientError
def lambda_handler(event, context):
print("🚀 Lambda started.")
# Step 1: Load env vars
try:
secret_name = os.environ['SECRET_NAME']
bucket_name = os.environ['BUCKET_NAME']
db_host = os.environ['DB_HOST']
db_user = os.environ['DB_USER']
db_name = os.environ['DB_NAME']
print(f"✅ Env vars loaded:\n DB_HOST={db_host}\n DB_USER={db_user}\n DB_NAME={db_name}\n BUCKET={bucket_name}")
except KeyError as e:
print(f"❌ Missing environment variable: {str(e)}")
return {"statusCode": 500, "body": "Missing environment variable"}
# Step 2: Get DB password from Secrets Manager
try:
secrets_client = boto3.client('secretsmanager')
print("🔍 Fetching password from Secrets Manager...")
start_time = time.time()
secret_value = secrets_client.get_secret_value(SecretId=secret_name)
password = json.loads(secret_value['SecretString'])['password']
print(f"✅ Password fetched in {round(time.time() - start_time, 2)}s")
except ClientError as e:
print(f"❌ Failed to get secret: {e.response['Error']['Message']}")
return {"statusCode": 500, "body": "Failed to get DB password"}
except Exception as e:
print(f"❌ Unexpected error getting secret: {str(e)}")
return {"statusCode": 500, "body": "Error while retrieving secret"}
# Step 3: Connect to DB
try:
print("🔌 Connecting to DB...")
start_time = time.time()
conn = pymysql.connect(
host=db_host,
user=db_user,
password=password,
db=db_name,
connect_timeout=5
)
print(f"✅ Connected to DB in {round(time.time() - start_time, 2)}s")
except Exception as e:
print(f"❌ DB connection failed: {str(e)}")
return {"statusCode": 500, "body": "Failed to connect to database"}
# Step 4: Run SELECT NOW()
try:
print("📡 Executing query...")
start_time = time.time()
with conn.cursor() as cursor:
cursor.execute("SELECT NOW();")
result = cursor.fetchone()
conn.close()
print(f"✅ Query result: {result[0]} in {round(time.time() - start_time, 2)}s")
except Exception as e:
print(f"❌ Query failed: {str(e)}")
return {"statusCode": 500, "body": "DB query failed"}
# Step 5: Upload to S3
try:
print("☁️ Uploading to S3...")
start_time = time.time()
s3_client = boto3.client('s3')
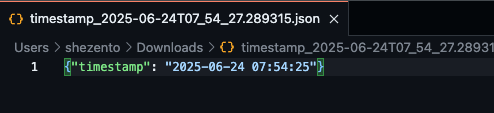
payload = json.dumps({"timestamp": str(result[0])})
filename = f"timestamp_{datetime.utcnow().isoformat()}.json"
s3_client.put_object(
Bucket=bucket_name,
Key=filename,
Body=payload
)
print(f"✅ Uploaded to S3: {filename} in {round(time.time() - start_time, 2)}s")
except Exception as e:
print(f"❌ Failed to upload to S3: {str(e)}")
return {"statusCode": 500, "body": "S3 upload failed"}
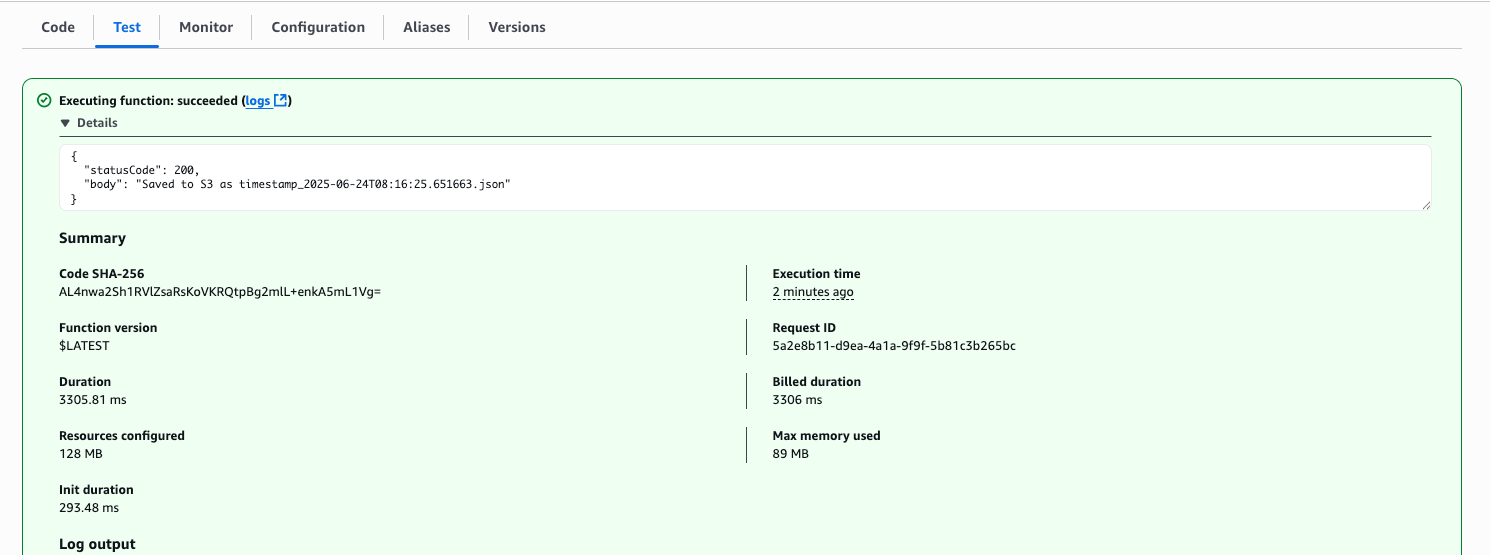
return {
"statusCode": 200,
"body": f"Saved to S3 as {filename}"
}
- Plan + Provisioning to AWS
tofu plan
tofu apply
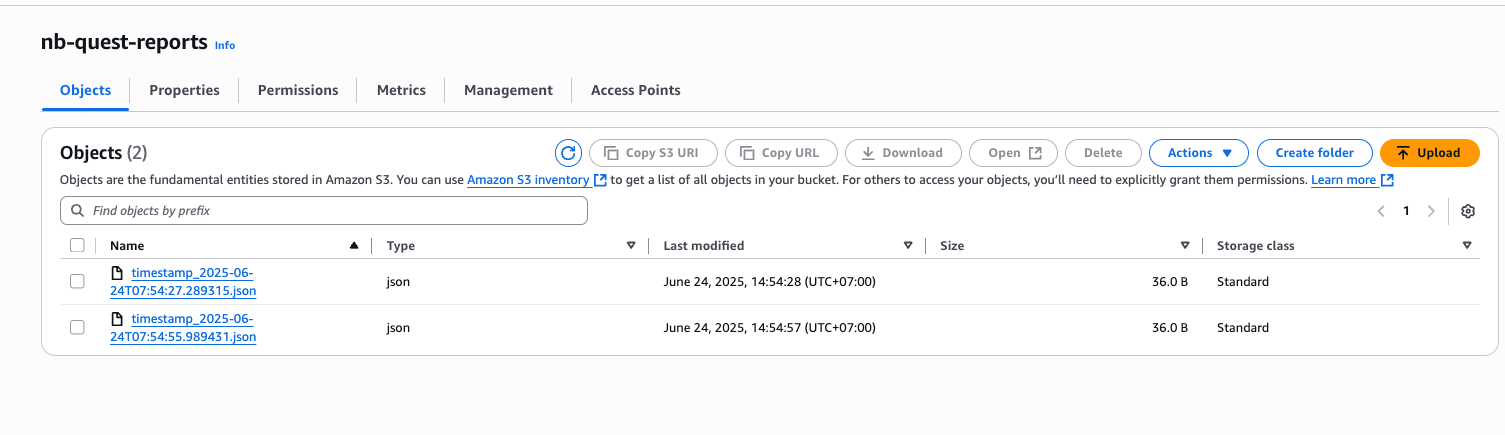
Result
Test in AWS Lambda dashboard
Done fetch data from DB to S3 Storage
Amazon RDS (Relational Database Service) is a web service that makes it easier to setup, operate, and scale a relational database in the AWS Cloud. AWS have feature to run code without provisioning and managing server. It's callled Lambda for serverless services. So today i learn to provisioning infrastructure App Server on EC2, MySQL RDS, and reporting using lambda write result an S3 Bucket

Reference :
- https://docs.aws.amazon.com/AmazonRDS/latest/UserGuide/Welcome.html
- https://docs.aws.amazon.com/lambda/latest/dg/welcome.html
Skenario : Build VPC and IAM mastery by standing up a private RDS database and a serverless reporting Lambda—glued together with least-privilege IAM.
All source code stored in :
- https://github.com/ngurah-bagus-trisna/aws-vpc-iaac
- Create
provider.tf
This file store about provider/extention for resources needed. In this i'm using provider from hashicorp/aws
terraform {
  required_providers {
    aws = {
      source  = "hashicorp/aws"
      version = "~> 5.0"
    }
  }
}

# Configure the AWS Provider
provider "aws" {
  region = "ap-southeast-1"
}
- Create
variable.tffor mapping variable and data type for value stored on variable.
variable "vpc_cidr" {
  type = string
}

variable "subnet" {
  type = map(object({
    subnet_range      = string
    availability_zone = string
    type              = string
  }))
}

variable "natgw_name" {
  type = string
}

variable "route_tables" {
  type = map(
    object({
      cidr_source       = string
      route_destination = string
    })
  )
}

variable "db_credentials" {
  type = object({
    username = string
    password = string
  })
  sensitive = true
}

variable "instance" {
  type = map(object({
    ami           = string
    instance_type = string
    subnet        = string
  }))
}
- Create
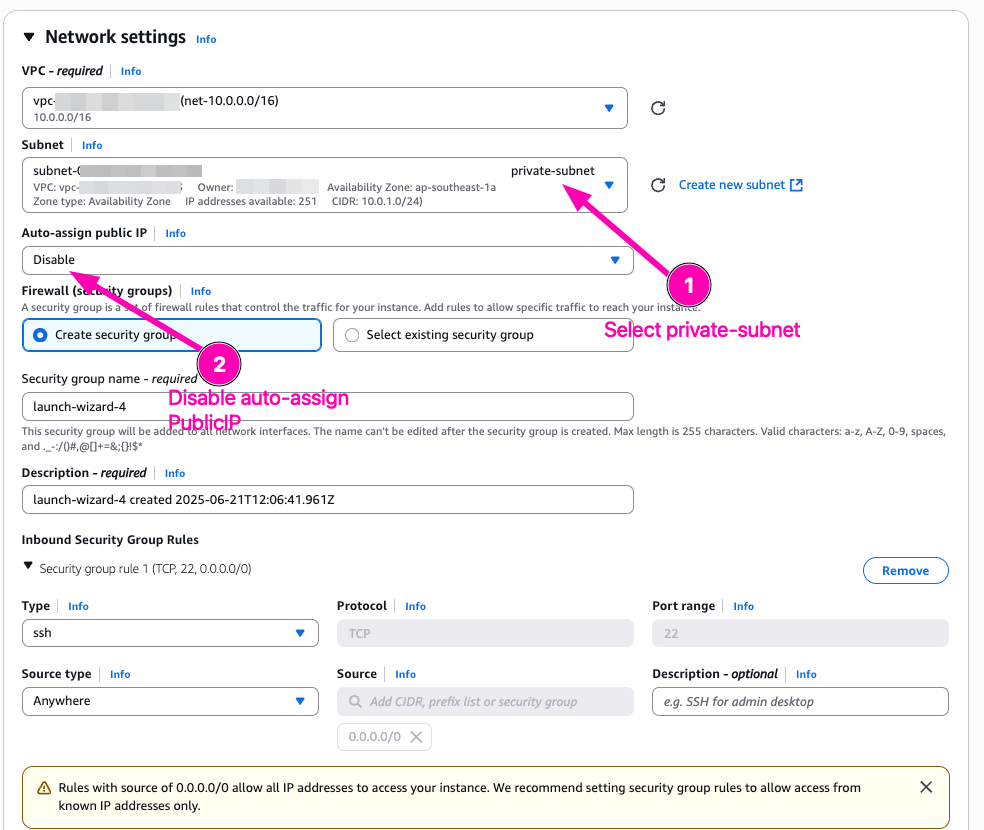
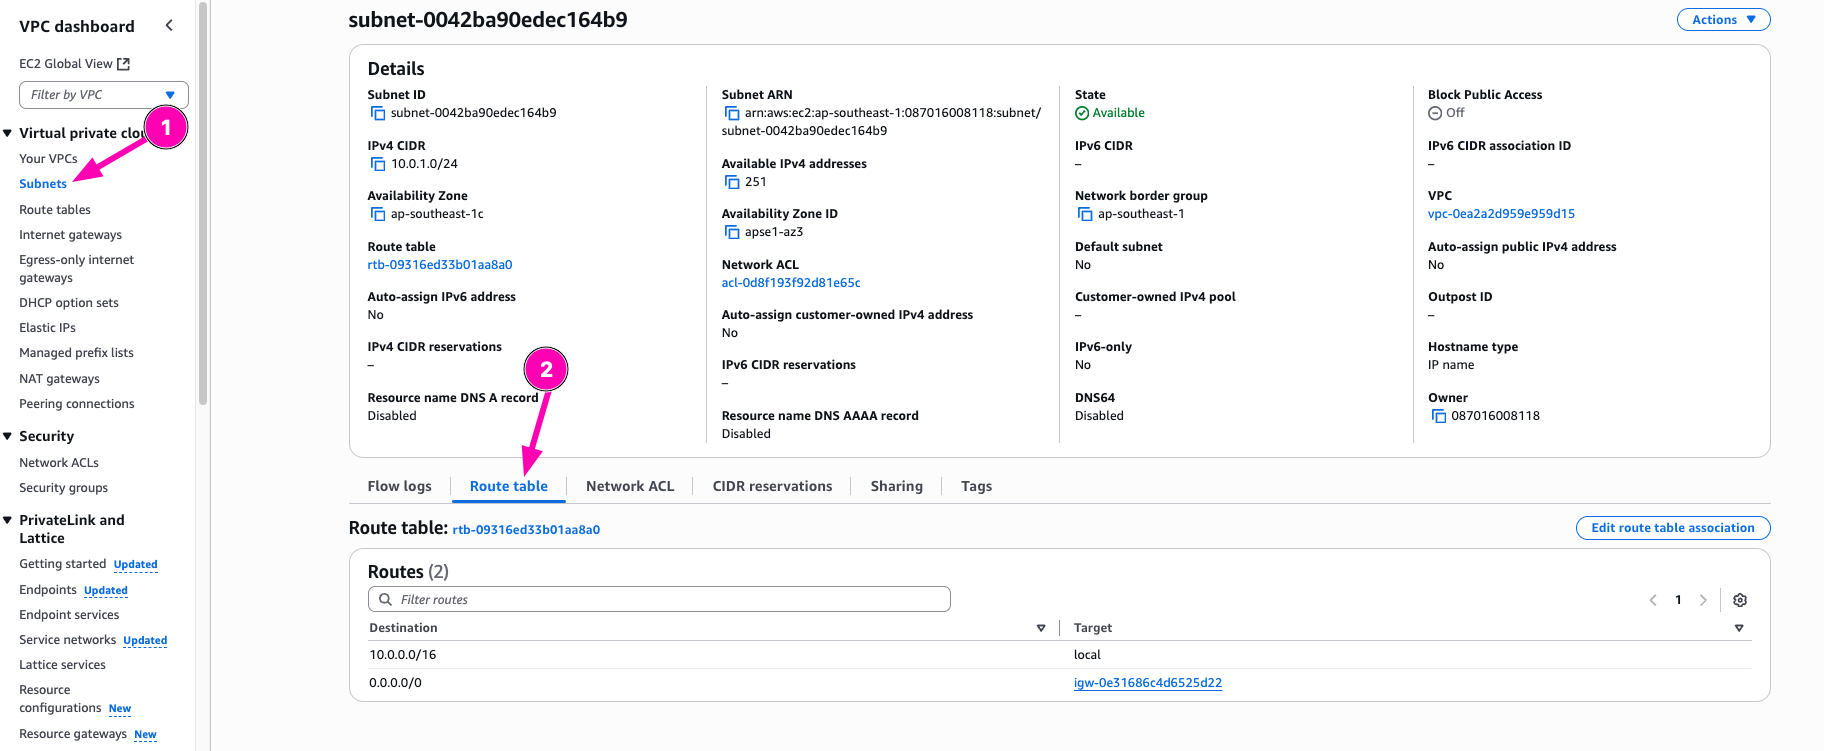
vpc.tffile. This file contain VPC (Virtual Private Cloud) infrasturcture resource want to create. Resources i want to create :
- VPC with subnet
10.0.0.0/16 - 1 Public subnet, with range ip
10.0.1.0/24 - 3 Private subnet, with range ip
10.0.2.0/24, 10.0.3.0/24, 10.0.4.0/24with different availibilty zone - 1 AWS Nat Gateway for Private Subnet
- 1 AWS ElasticIP for eggress Nat Gateway
- 1 AWS Internet Gateway, for public subnet
- 2 Routing, each for public subnet and private subnet
- 2 Security group, one for ingress port
22, and second to ingressrds/database subnet
resource "aws_vpc" "nb-chatgpt-vpc" {
  cidr_block = var.vpc_cidr
  tags = {
    "Name" = "nb-chatgpt-vpc"
  }
}

resource "aws_subnet" "nb-subnet" {
  depends_on = [aws_vpc.nb-chatgpt-vpc]
  vpc_id     = aws_vpc.nb-chatgpt-vpc.id
  for_each   = var.subnet

  cidr_block              = each.value.subnet_range
  availability_zone       = each.value.availability_zone
  map_public_ip_on_launch = each.key == "public-net" ? true : false
  tags = {
    "Name" = each.key
    "Type" = each.value.type
  }
}

resource "aws_internet_gateway" "nb-inet-gw" {
  depends_on = [aws_vpc.nb-chatgpt-vpc]
  vpc_id     = aws_vpc.nb-chatgpt-vpc.id

  tags = {
    Name = "nb-inet-gw"
  }
}

resource "aws_eip" "nb-eip-nat-gw" {
  depends_on = [aws_internet_gateway.nb-inet-gw]
  tags = {
    "Name" = "nb-eip-nat-gw"
  }
}


resource "aws_nat_gateway" "nb-nat-gw" {
  depends_on        = [aws_eip.nb-eip-nat-gw]
  allocation_id     = aws_eip.nb-eip-nat-gw.id
  subnet_id         = aws_subnet.nb-subnet["public-net"].id
  connectivity_type = "public"
  tags = {
    "Name" : var.natgw_name
  }
}


resource "aws_route_table" "public" {
  vpc_id = aws_vpc.nb-chatgpt-vpc.id

  route {
    cidr_block = "0.0.0.0/0"
    gateway_id = aws_internet_gateway.nb-inet-gw.id
  }

  tags = {
    Name = "public-rt"
  }
}

resource "aws_route_table_association" "public" {
  subnet_id      = aws_subnet.nb-subnet["public-net"].id
  route_table_id = aws_route_table.public.id
}


resource "aws_route_table" "private" {
  vpc_id = aws_vpc.nb-chatgpt-vpc.id

  route {
    cidr_block     = "0.0.0.0/0"
    nat_gateway_id = aws_nat_gateway.nb-nat-gw.id
  }

  tags = {
    Name = "private-rt"
  }
}

resource "aws_route_table_association" "private" {
  for_each = {
    for key, subnet in var.subnet :
    key => subnet
    if subnet.type == "private"
  }

  subnet_id      = aws_subnet.nb-subnet[each.key].id
  route_table_id = aws_route_table.private.id
}

resource "aws_security_group" "web-sg" {
  depends_on = [aws_subnet.nb-subnet]

  name        = "web-sg"
  description = "Security group to allow access port 22"
  vpc_id      = aws_vpc.nb-chatgpt-vpc.id

  tags = {
    "Name" : "web-server-sg"
  }
}

resource "aws_vpc_security_group_ingress_rule" "allow-access-ssh" {
  depends_on = [aws_security_group.web-sg]

  security_group_id = aws_security_group.web-sg.id
  cidr_ipv4         = "0.0.0.0/0"
  to_port           = 22
  from_port         = 22
  ip_protocol       = "tcp"
}
- Create
rds.tffor RDS / Database infrastructure.
First i create resource aws_db_subnet_group for mapping subnet allowed access from rds, and tell what subnet using for instance_db. Second i create security group for accessing rds from private subnet. Last i created resource aws_db_instance for provisioning one RDS
resource "aws_db_subnet_group" "nb-db-subnet" {
  depends_on = [aws_subnet.nb-subnet]
  name       = "nb-db-subnet"
  subnet_ids = [
    for key, subnet in var.subnet : aws_subnet.nb-subnet[key].id
    if subnet.type == "private"
  ]

  tags = {
    "Name" = "Private DB Subnet Group"
  }
}


resource "aws_security_group" "rds-sg" {
  depends_on  = [aws_subnet.nb-subnet]
  name        = "rds-sg"
  description = "Security group to allow access rds-subnet from private subnets"
  vpc_id      = aws_vpc.nb-chatgpt-vpc.id

  tags = {
    Name = "rds-server-sg"
  }
}

resource "aws_vpc_security_group_ingress_rule" "allow-access-rds" {
  depends_on        = [aws_security_group.rds-sg]
  security_group_id = aws_security_group.rds-sg.id
  cidr_ipv4         = aws_subnet.nb-subnet["private-net-1"].cidr_block
  from_port         = 3306
  to_port           = 3306
  ip_protocol       = "tcp"
}

resource "aws_db_instance" "nb-db" {
  depends_on             = [aws_security_group.rds-sg, aws_vpc_security_group_ingress_rule.allow-access-rds]
  allocated_storage      = 10
  db_name                = "nbdb"
  engine                 = "mysql"
  instance_class         = "db.t3.micro"
  username               = var.db_credentials.username
  password               = var.db_credentials.password
  publicly_accessible    = false
  vpc_security_group_ids = [aws_security_group.rds-sg.id]
  db_subnet_group_name   = aws_db_subnet_group.nb-db-subnet.name
  skip_final_snapshot    = true
}
- Create EC2 Instance for public-web
First create aws_network_interface for instance created. Then provisioning instance with aws_instance resources.
resource "aws_network_interface" "instance-interface" {
  depends_on      = [aws_subnet.nb-subnet]
  for_each        = var.instance
  subnet_id       = aws_subnet.nb-subnet[each.value.subnet].id
  security_groups = [aws_security_group.web-sg.id]

  tags = {
    "Name" = "interface ${each.key}"
  }
}

resource "aws_instance" "nb-instance" {
  for_each   = var.instance
  depends_on = [aws_network_interface.instance-interface]

  ami           = each.value.ami
  instance_type = each.value.instance_type
  key_name      = "nb-key"

  network_interface {
    network_interface_id = aws_network_interface.instance-interface[each.key].id
    device_index         = 0
  }

  tags = {
    "Name" = "Instance - ${each.key}"
  }
}
- Create value file called
dev.tfvarsfor storing all value needed in terraform file
vpc_cidr = "10.0.0.0/16"
subnet = {
  "public-net" = {
    subnet_range      = "10.0.1.0/24"
    availability_zone = "ap-southeast-1a"
    type              = "public"
  },
  "private-net-1" = {
    subnet_range      = "10.0.2.0/24"
    availability_zone = "ap-southeast-1c"
    type              = "private"
  },
  "private-net-2" = {
    subnet_range      = "10.0.3.0/24"
    availability_zone = "ap-southeast-1b"
    type              = "private"
  },
  "private-net-3" = {
    subnet_range      = "10.0.4.0/24"
    availability_zone = "ap-southeast-1a"
    type              = "private"
  }
}

natgw_name = "nb-natgw"

route_tables = {
  "private" = {
    cidr_source       = "0.0.0.0/0"
    route_destination = "nat"
  },
  "public" = {
    cidr_source       = "0.0.0.0/0"
    route_destination = "igw"
  }
}

instance = {
  "web-public" = {
    ami           = "ami-02c7683e4ca3ebf58"
    instance_type = "t2.micro"
    subnet        = "public-net"
  }
}
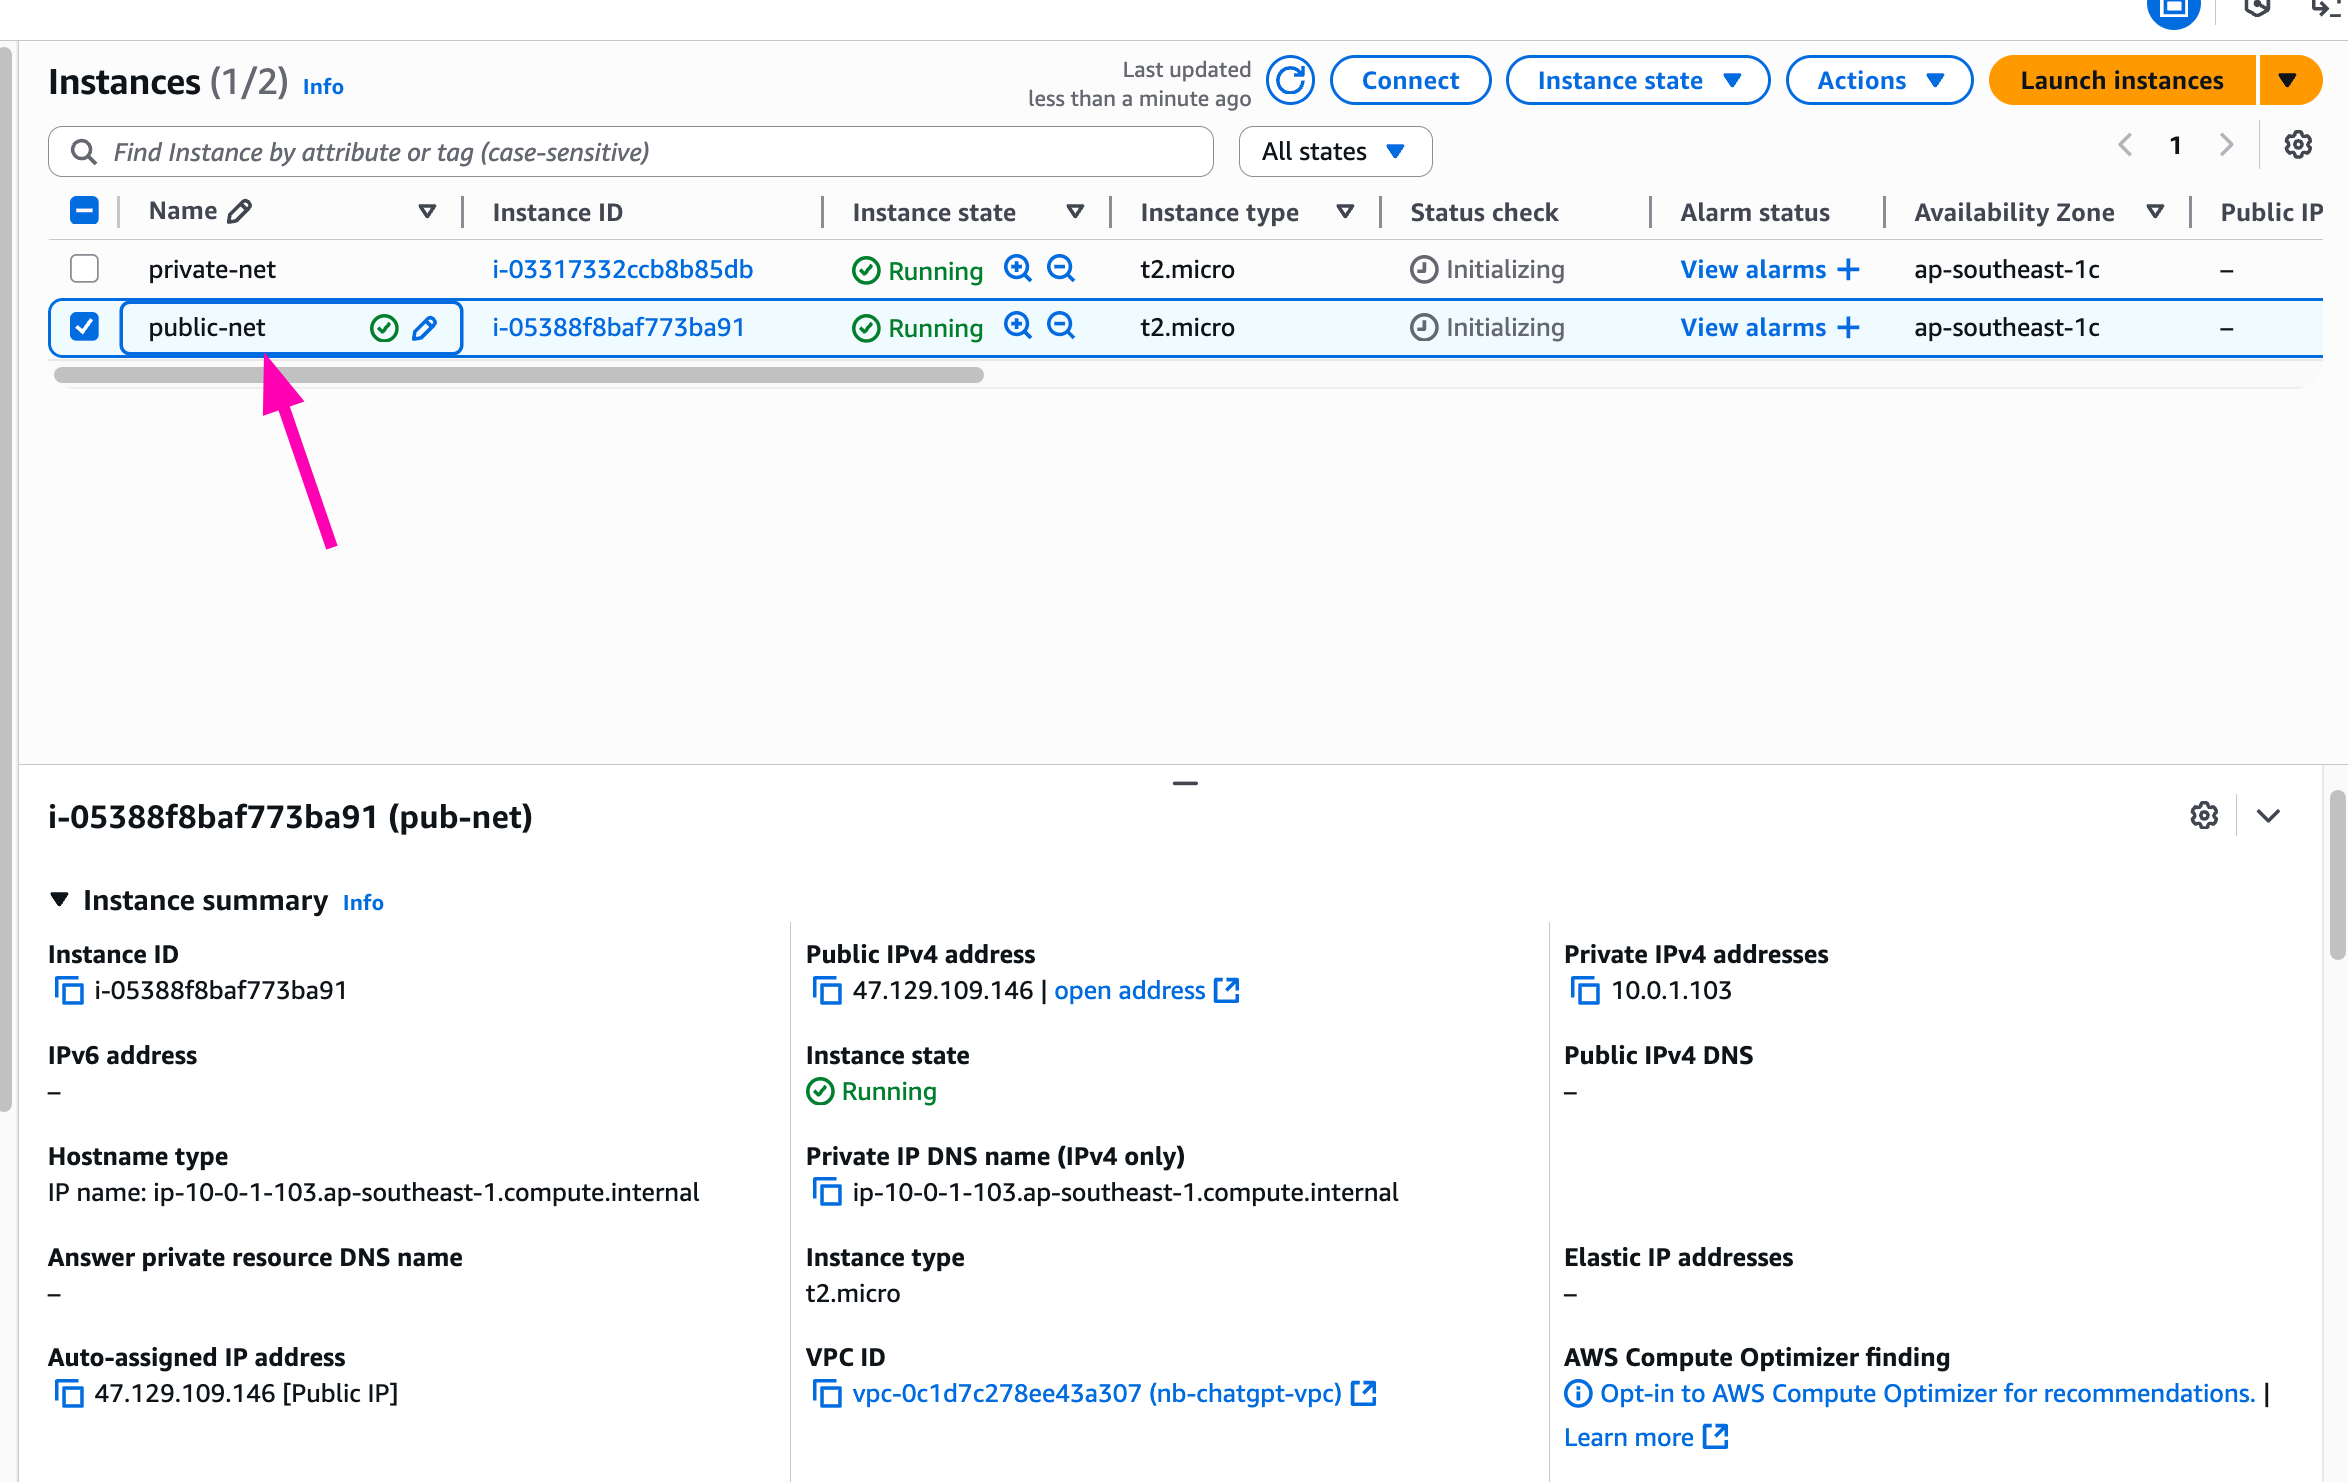
Result
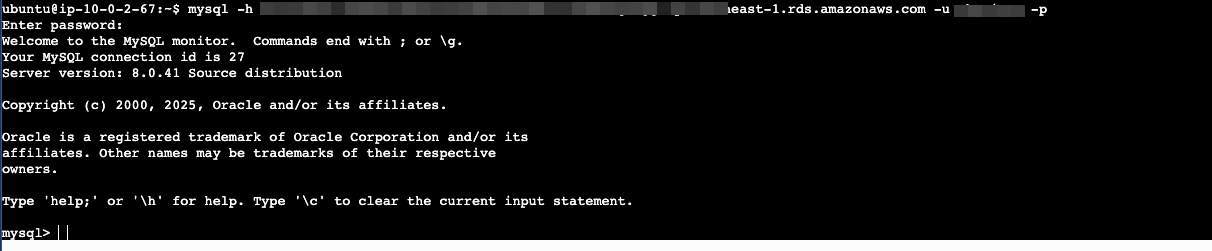
For today, i only test to hit RDS from private instance.
# installing mysql-client
sudo apt install mysql-client

# testing to login rds
mysql -h <endpoint-rds> -u <user> -p
Result, can connect to rds from private subnet.
Application that run on EC2 Instance must include AWS credentials in AWS API request. You could have developers to uplaod credentials directly to instances, but developer need to check again the credential can securely access AWS API and update each amaszon credential when time will come. It's painfull workflow.

Instead you can add should use IAM role to manage temporary credentials for application that run on EC2 instance. When use a role, you don't have to distribute long-term credentials (like sign-in credentials or access keys).
Reference :
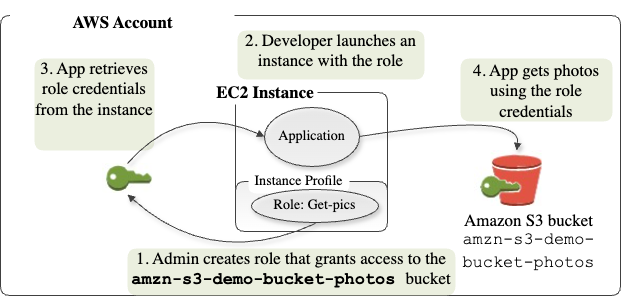
Real world usecase : A web server running on EC2 needs to fetch secrets on AWS System Manager Parameter Store (SSM) and upload logs to S3 bucket-without embedding long-lived api keys in your AMI
Skenario : Design IAM Role WebServerRole that allows only ssm:GetParameter, s3:PutObject.
Create role WebServerRole, with policy allows ssm:GetParameter, s3:PutObject to one bucket prefix
S3 Bukcet
Amazon S3 is an object storage service that offers industry-leading scalability, data availability, security, and performance
To create bucket first navigate to S3
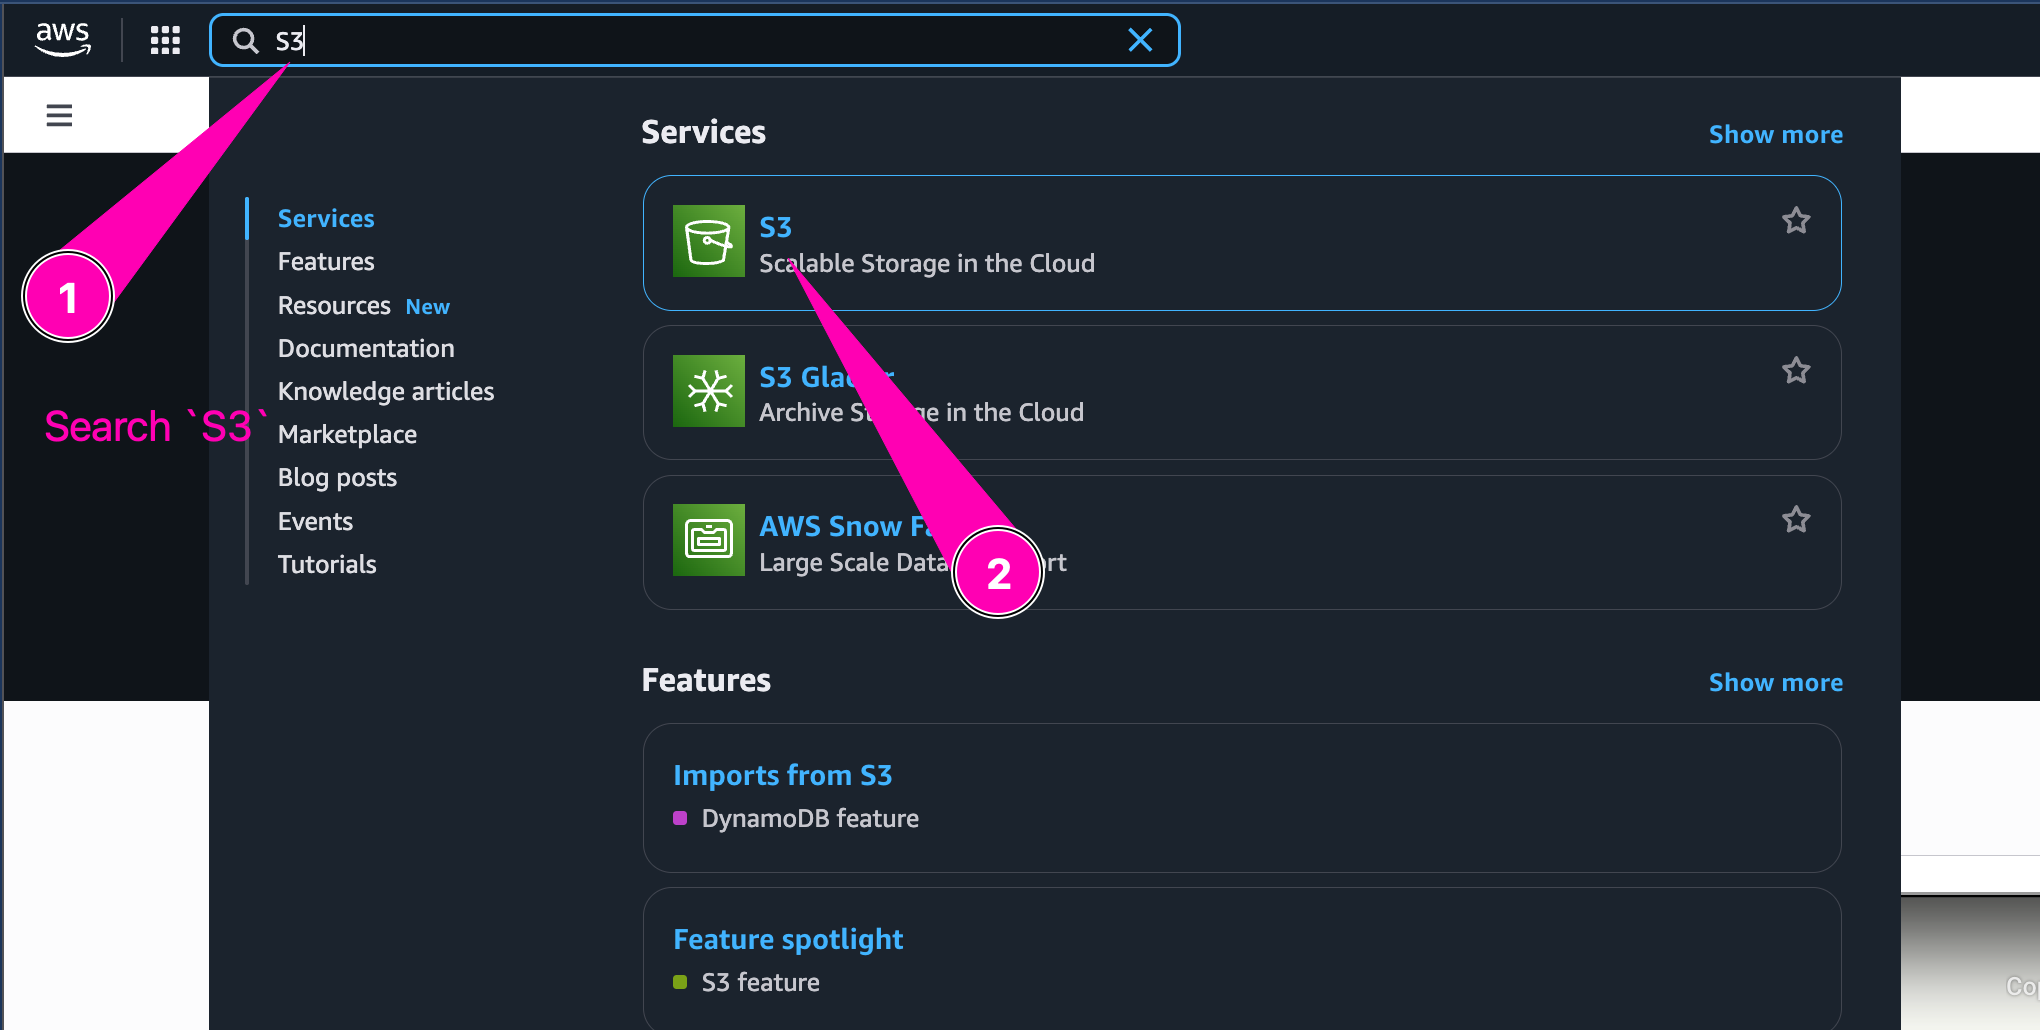
Click Create S3
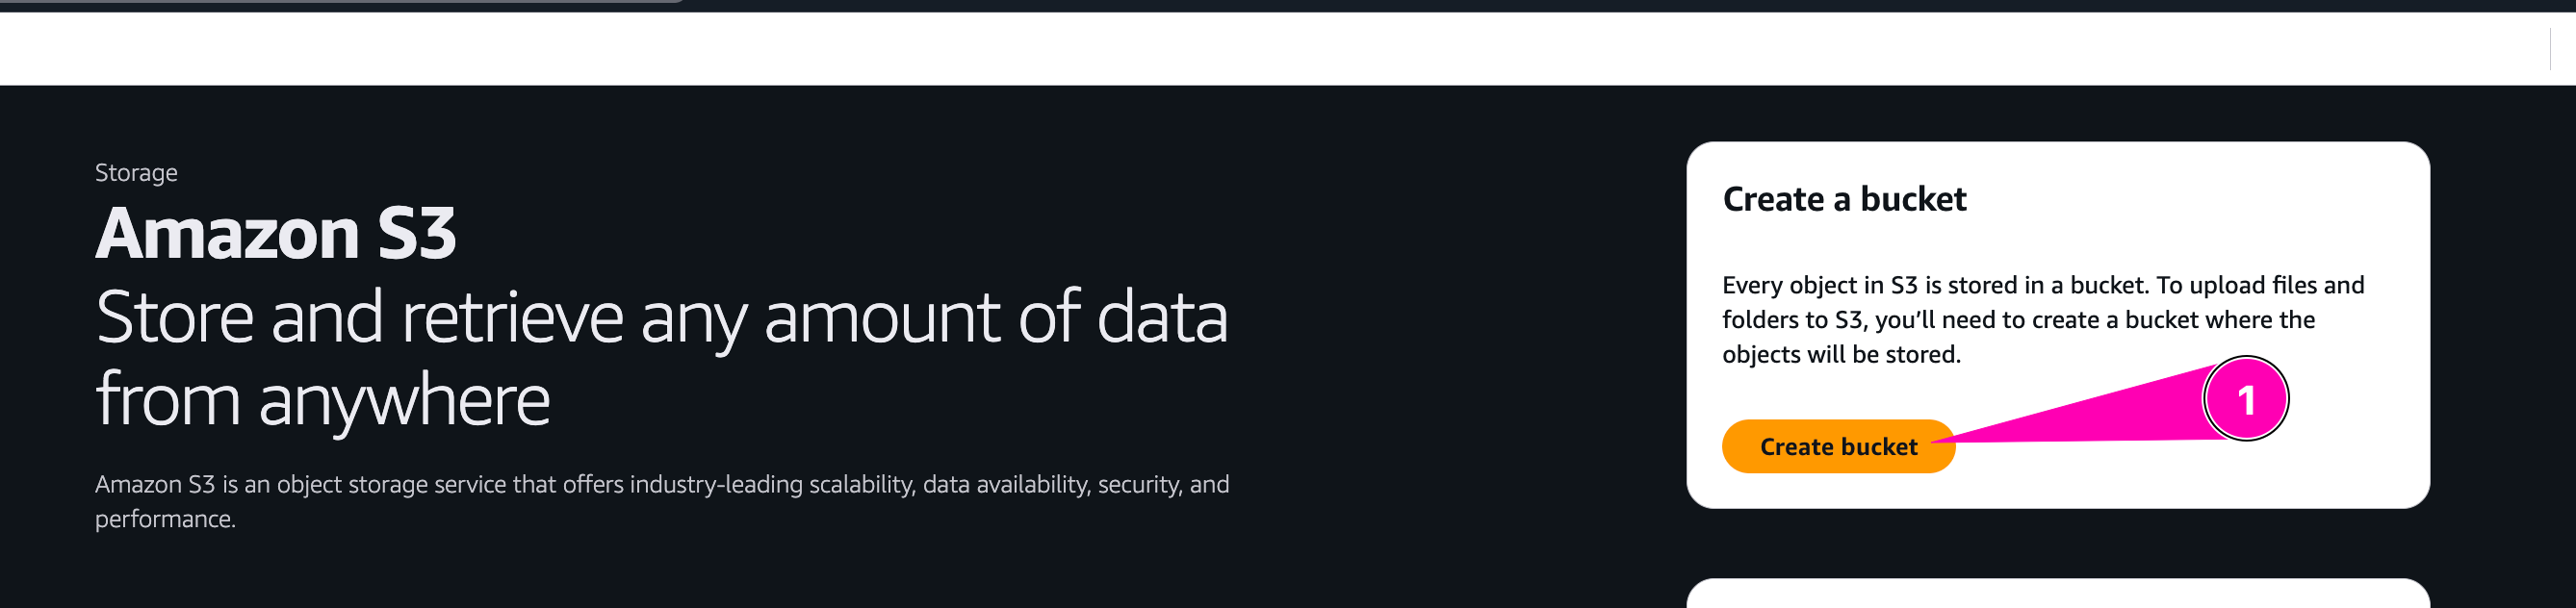
Begin to setup new bucket
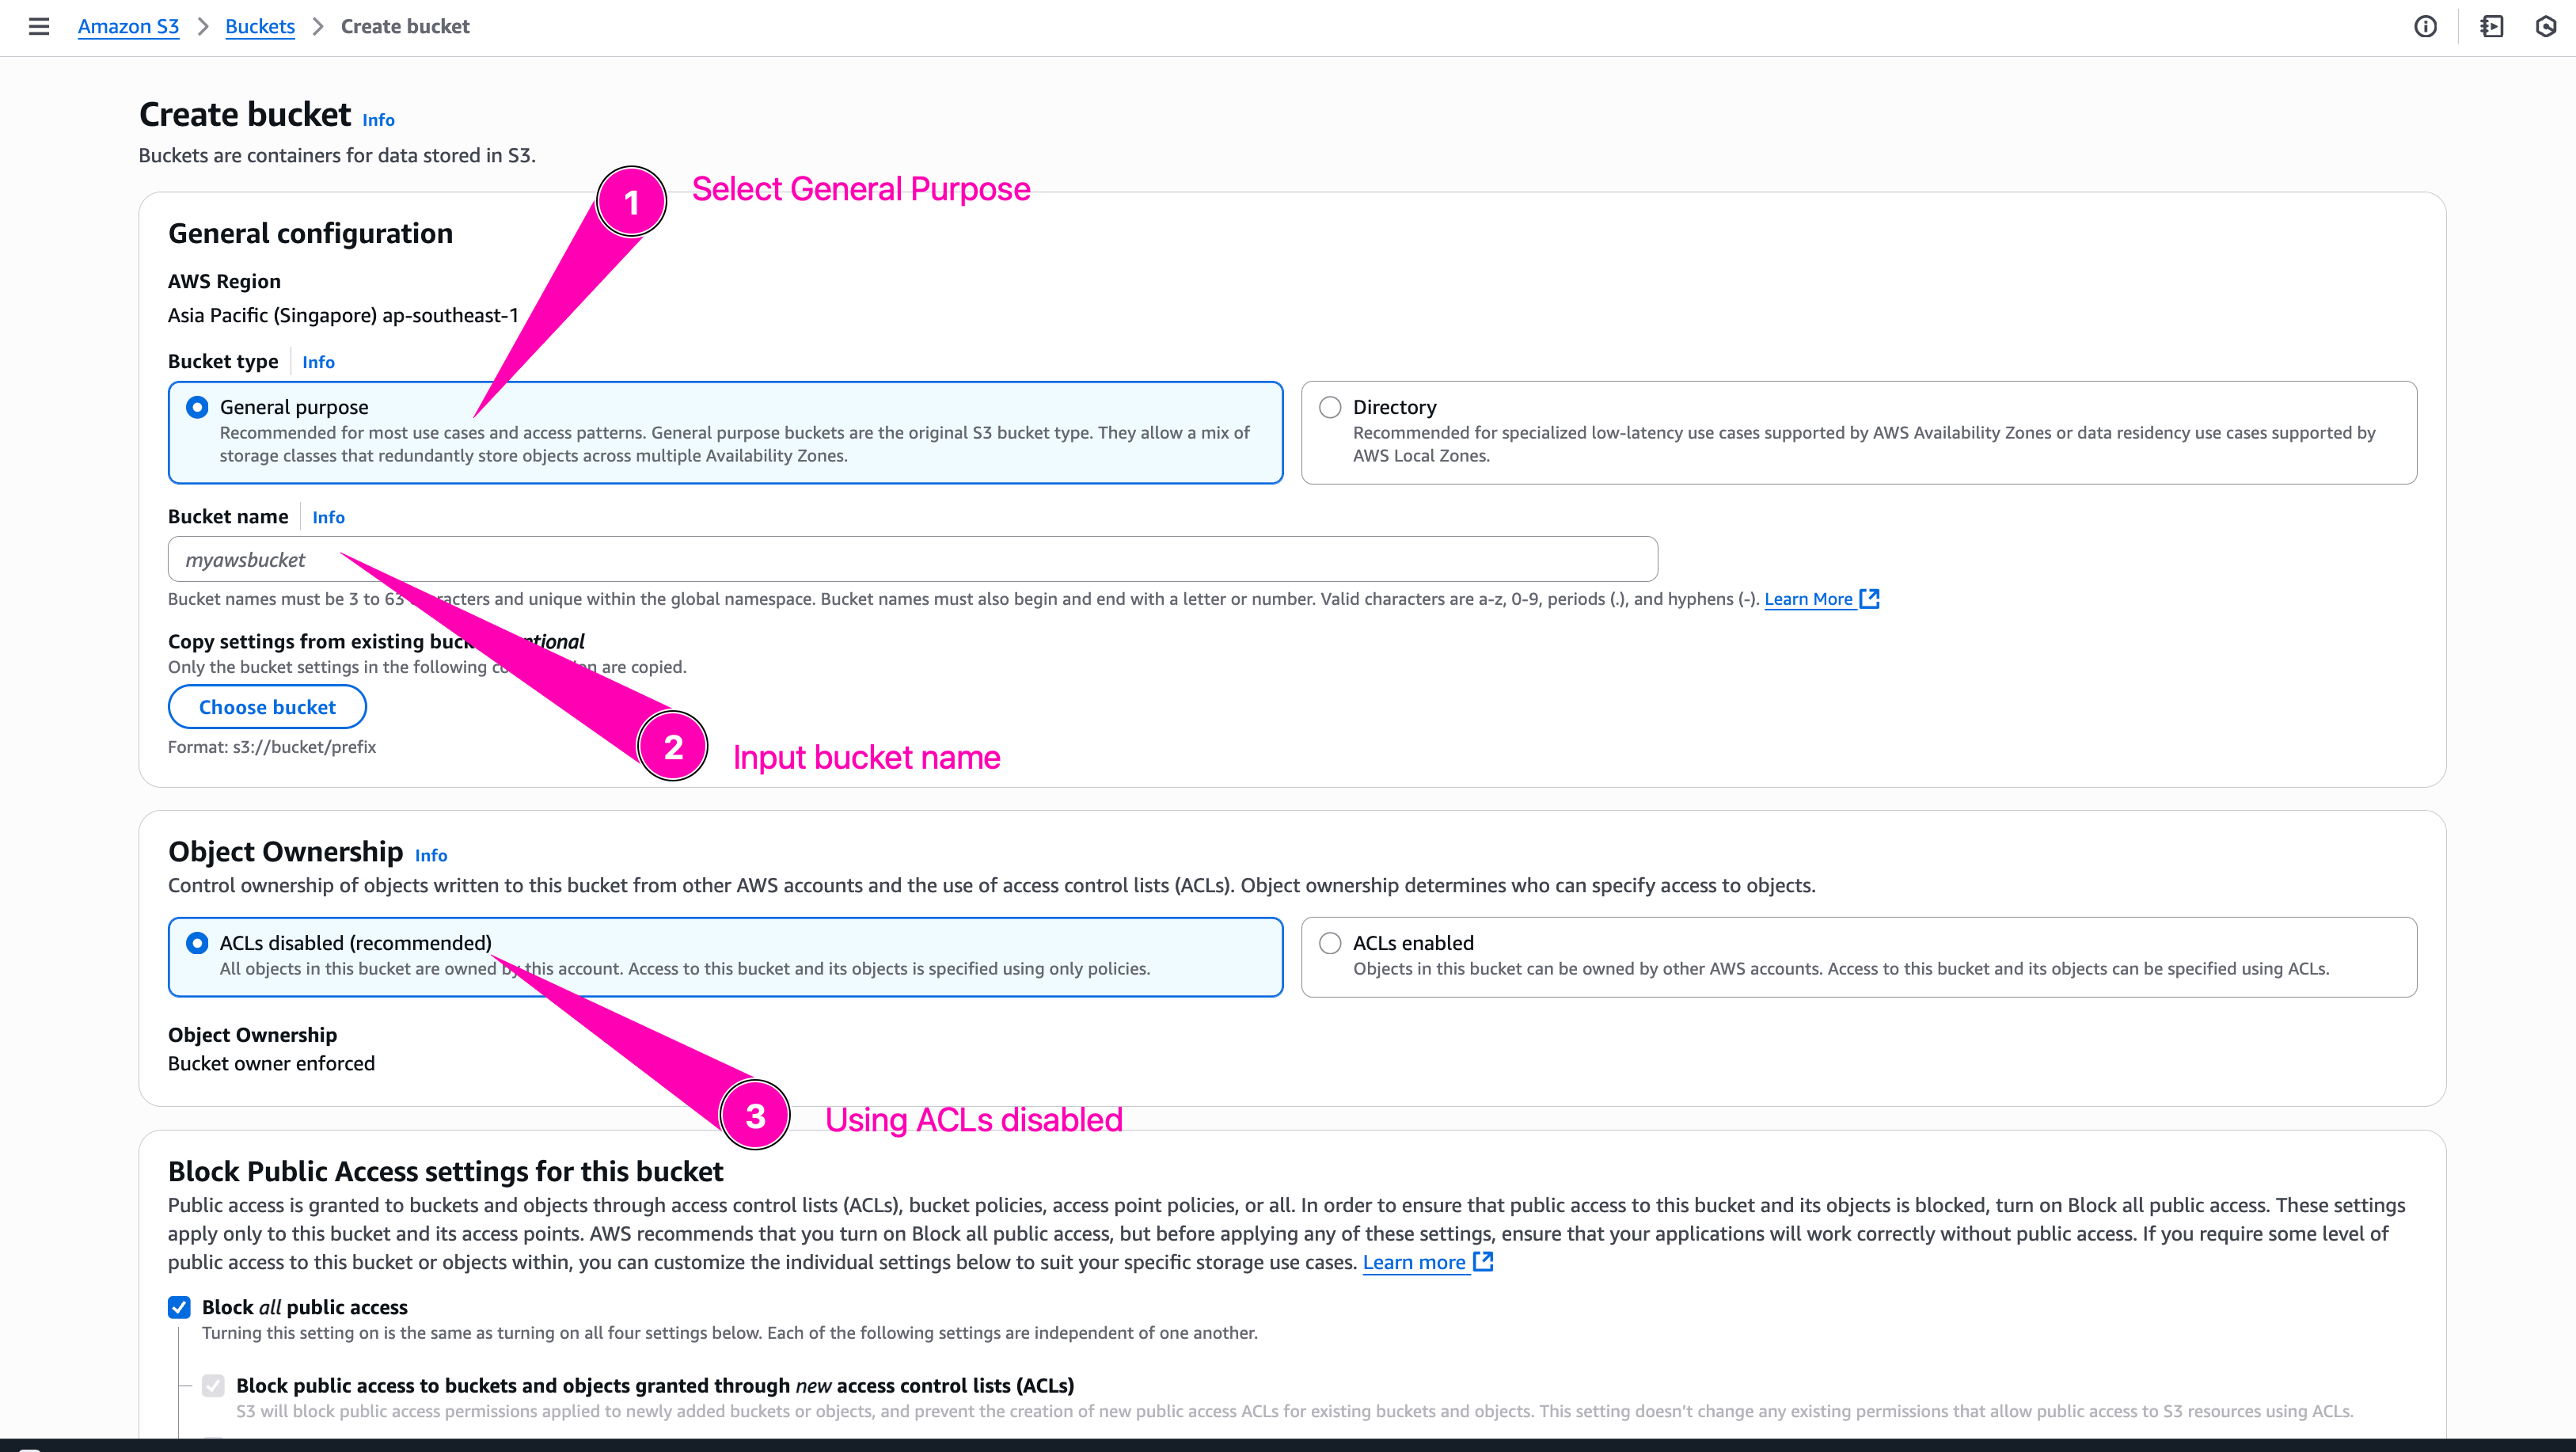
Bucket name must uniqe becaus after a bucket is created, the name of that bucket cannot be used by another AWS account in any AWS Region until the bucket is deleted
Leave everything with default configuration, and click Create Bucket

Bucket created.
Role
Create an IAM Role WebServerRole that's allows only ssm:GetParameter, s3:PutObject.
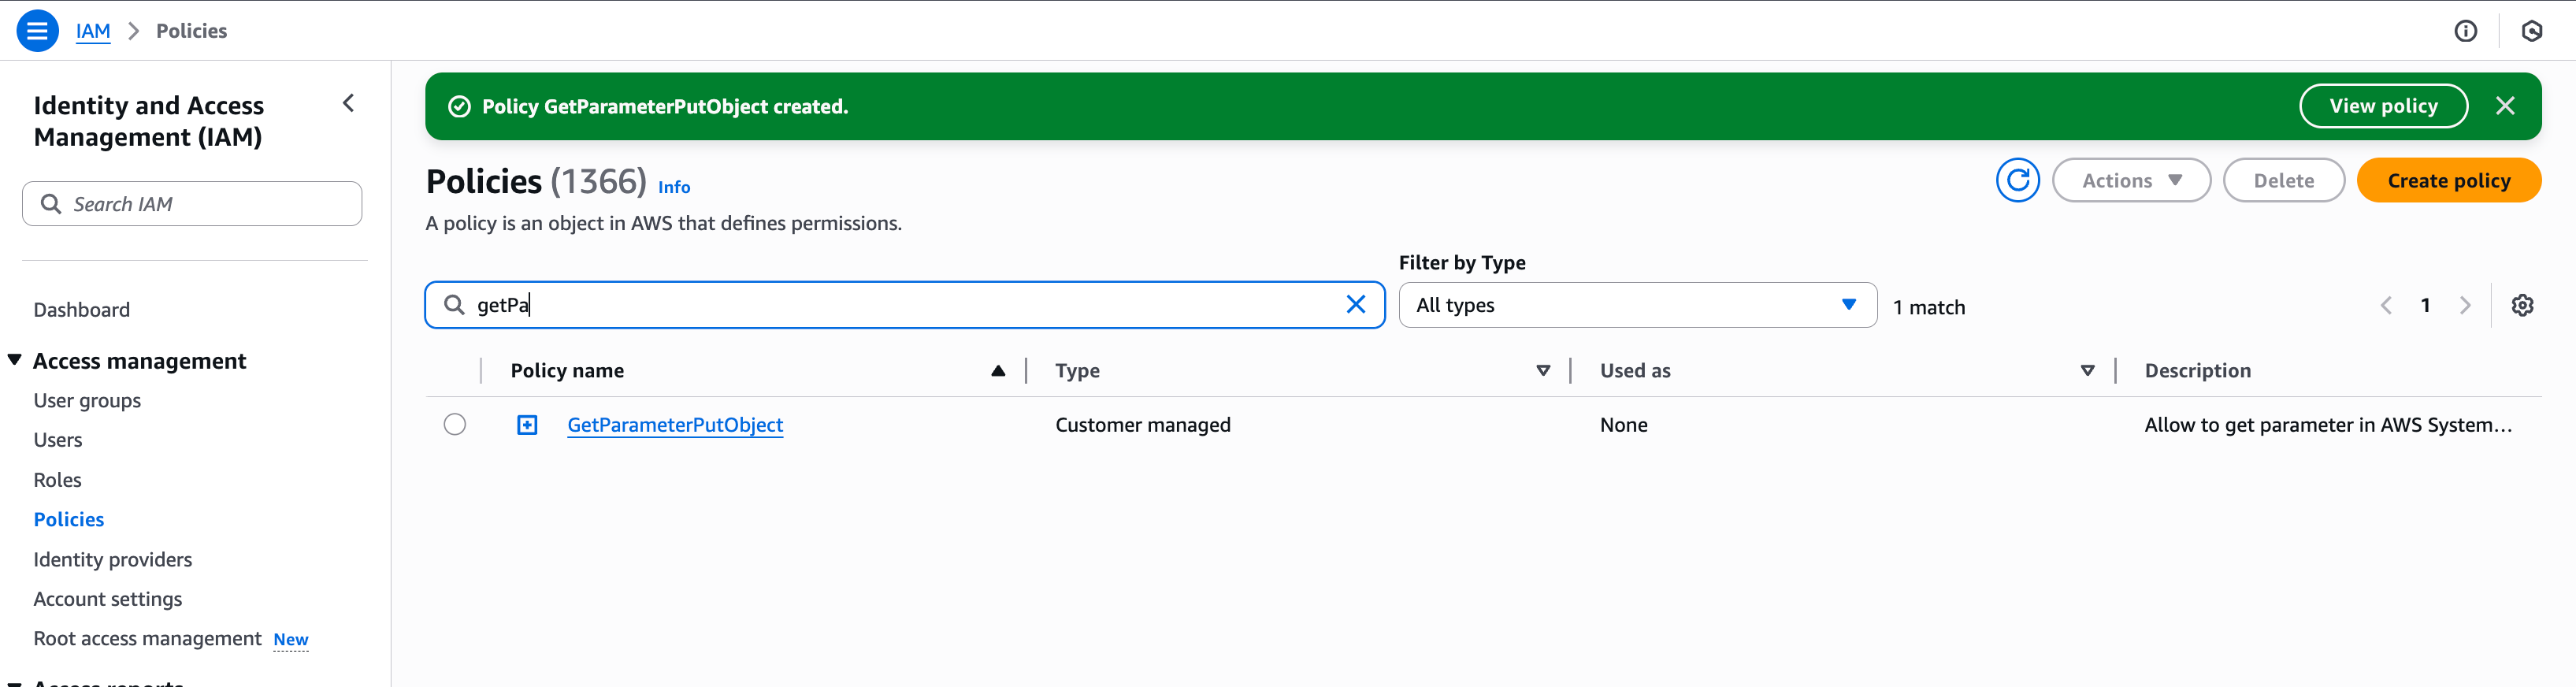
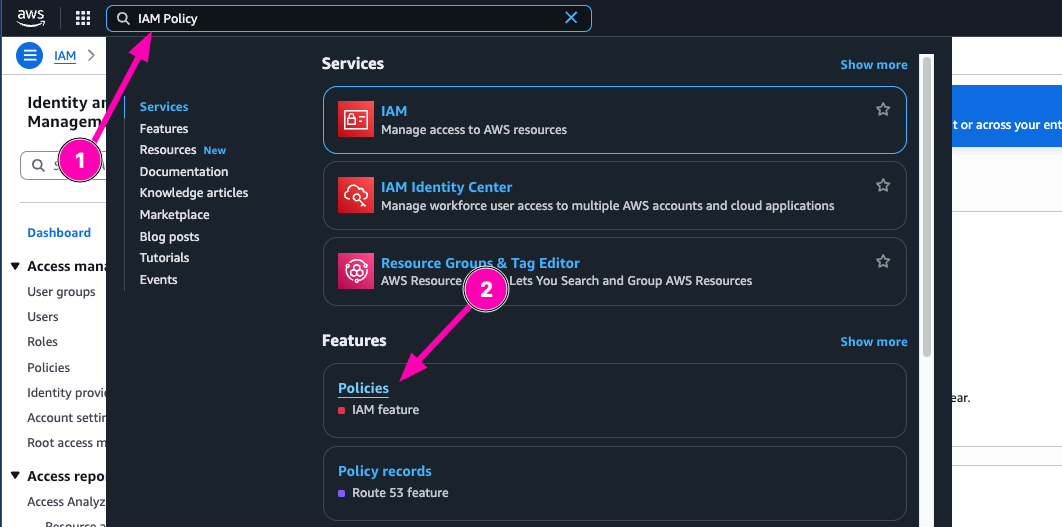
Create policy first, with name GetParameterPutObject. Navigate to Identity and Access Management (IAM) > Policies > Create Policies

We configure policy to allow GetParameter on spesific parameter store path on any region
Then we add allow S3:PutObject to spesific bucket we created
Review all, when seems correct, begin to create policy
Policy created
Then we assign new policy to role WebServerRole. Navigate to Identity and Access Management (IAM) > Roles > Create Role
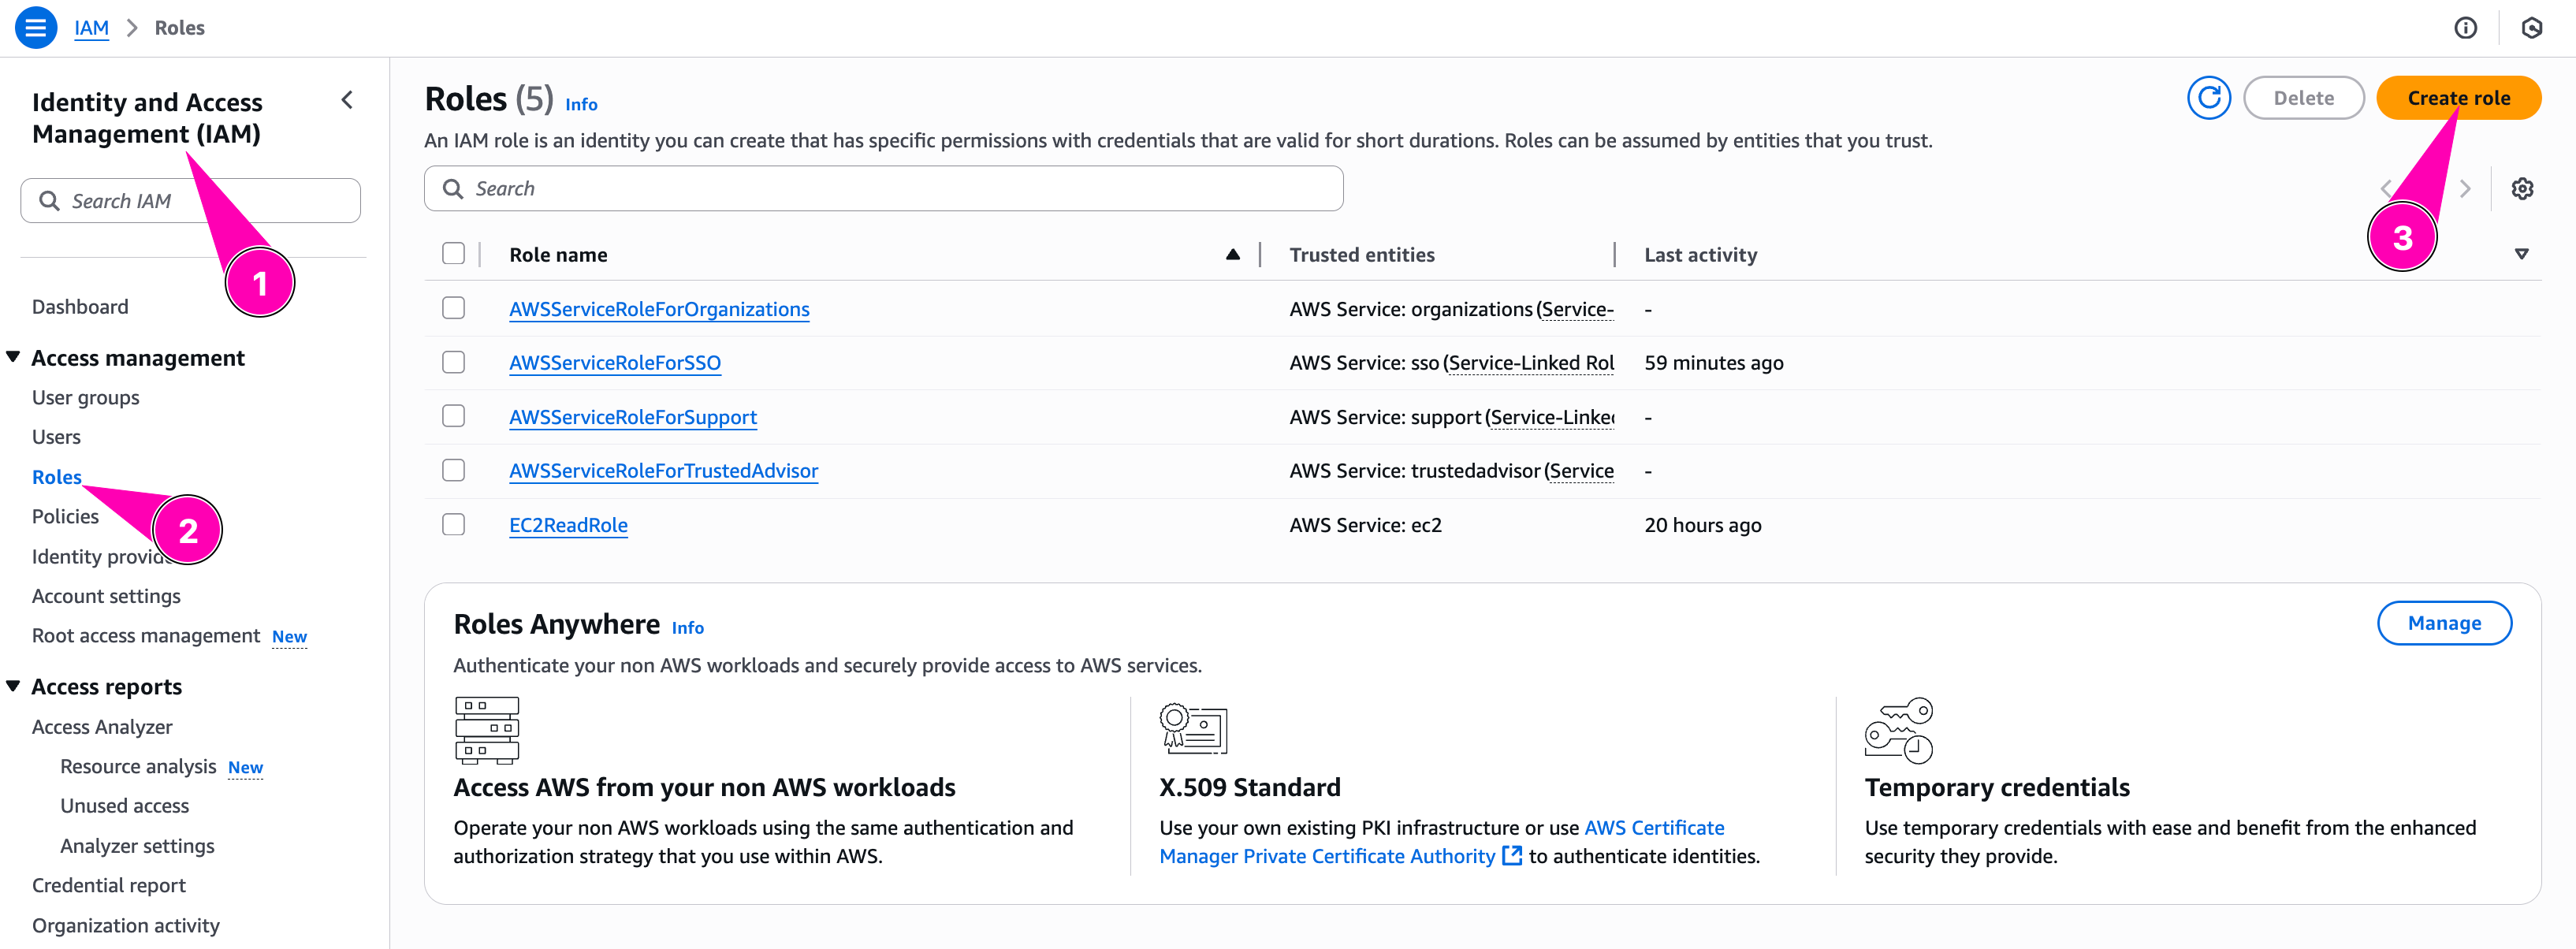
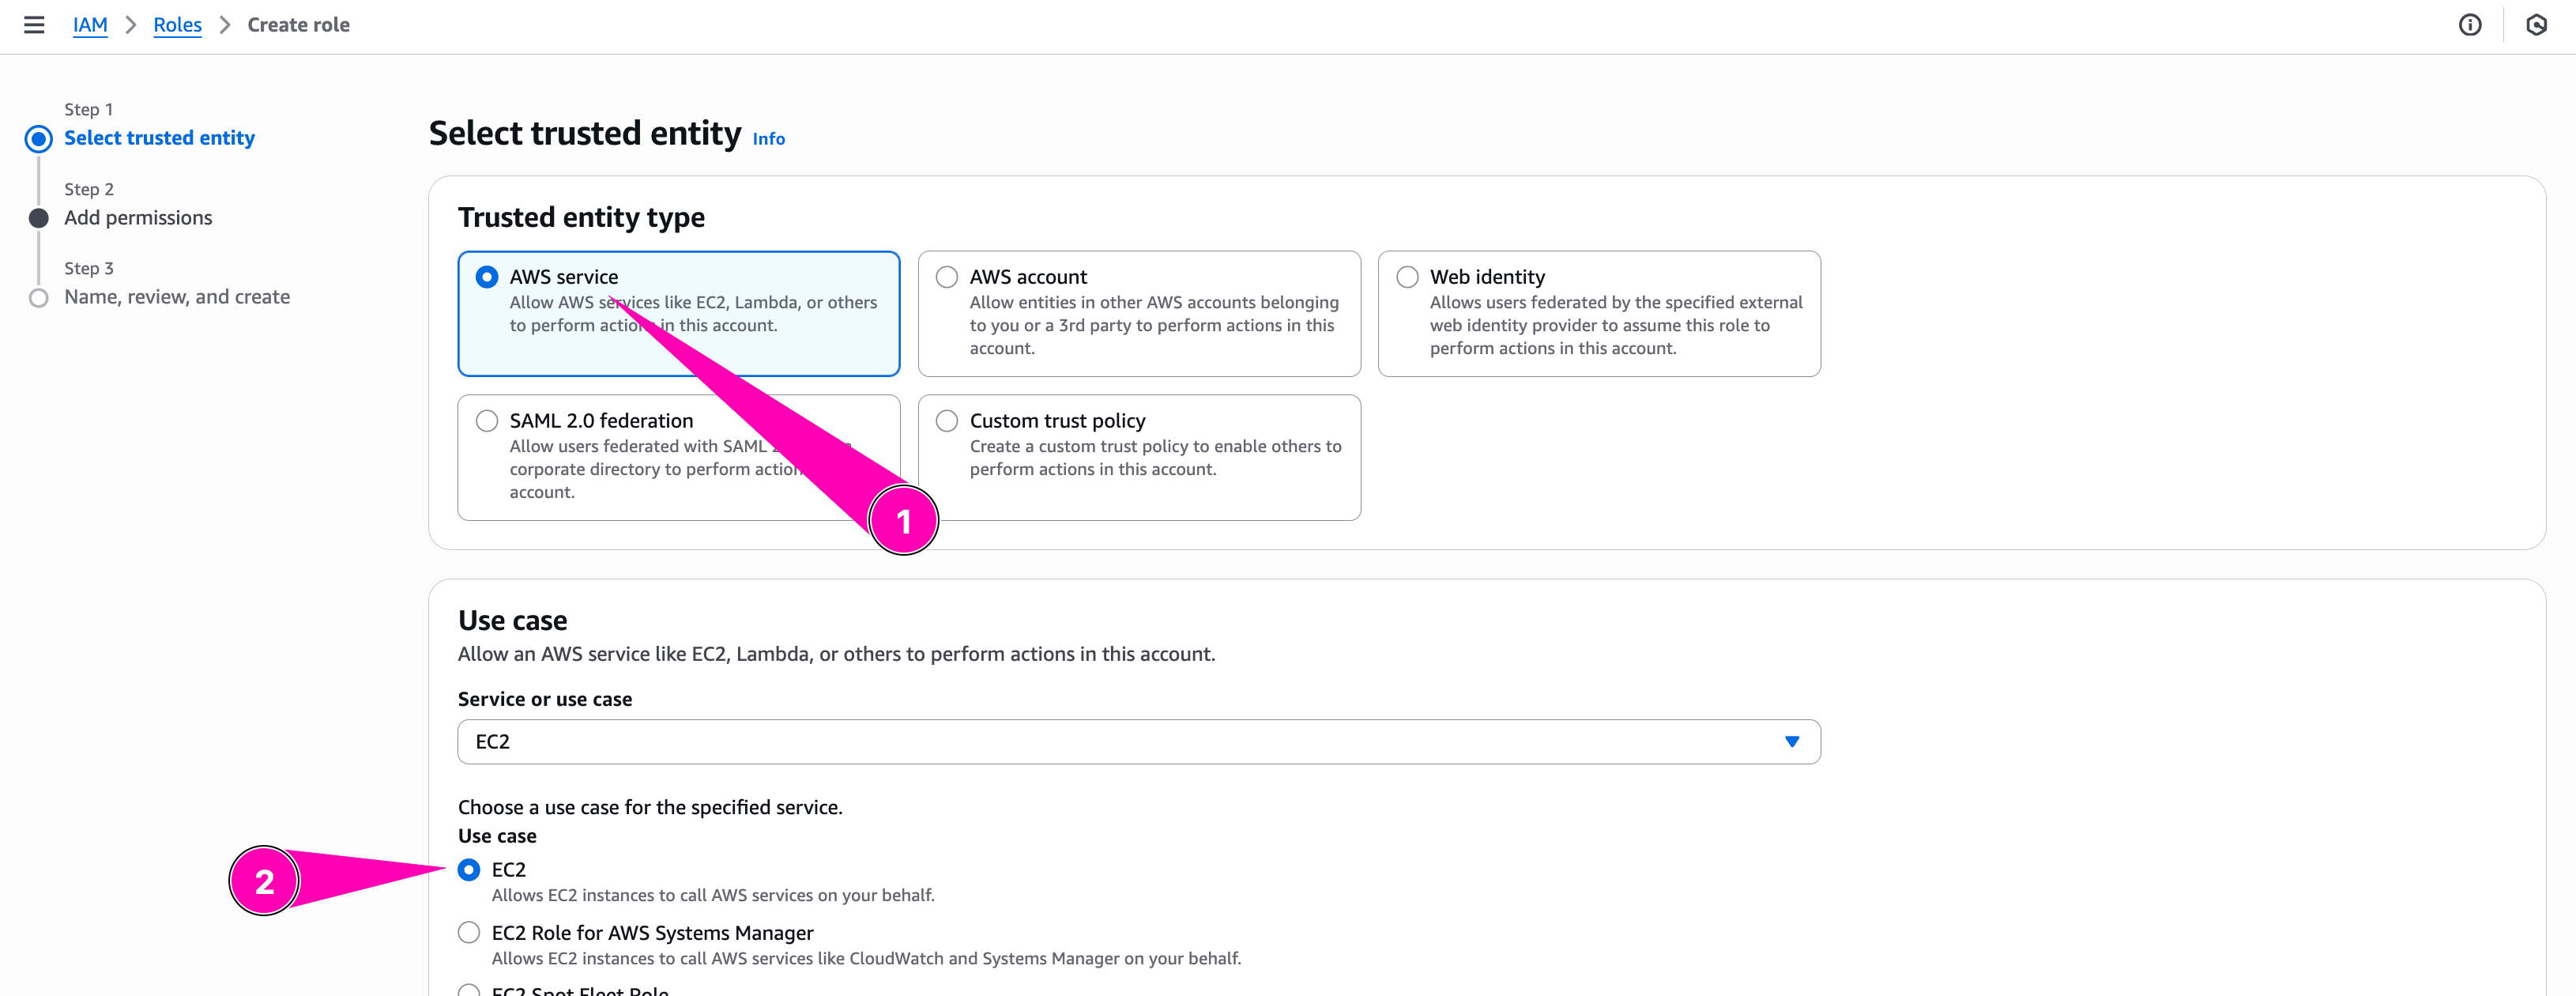
Configure trusted entity type to Aws Service, and select EC2. Because this role attached to EC2 Instances
We need to checklist policy we want to attached to role
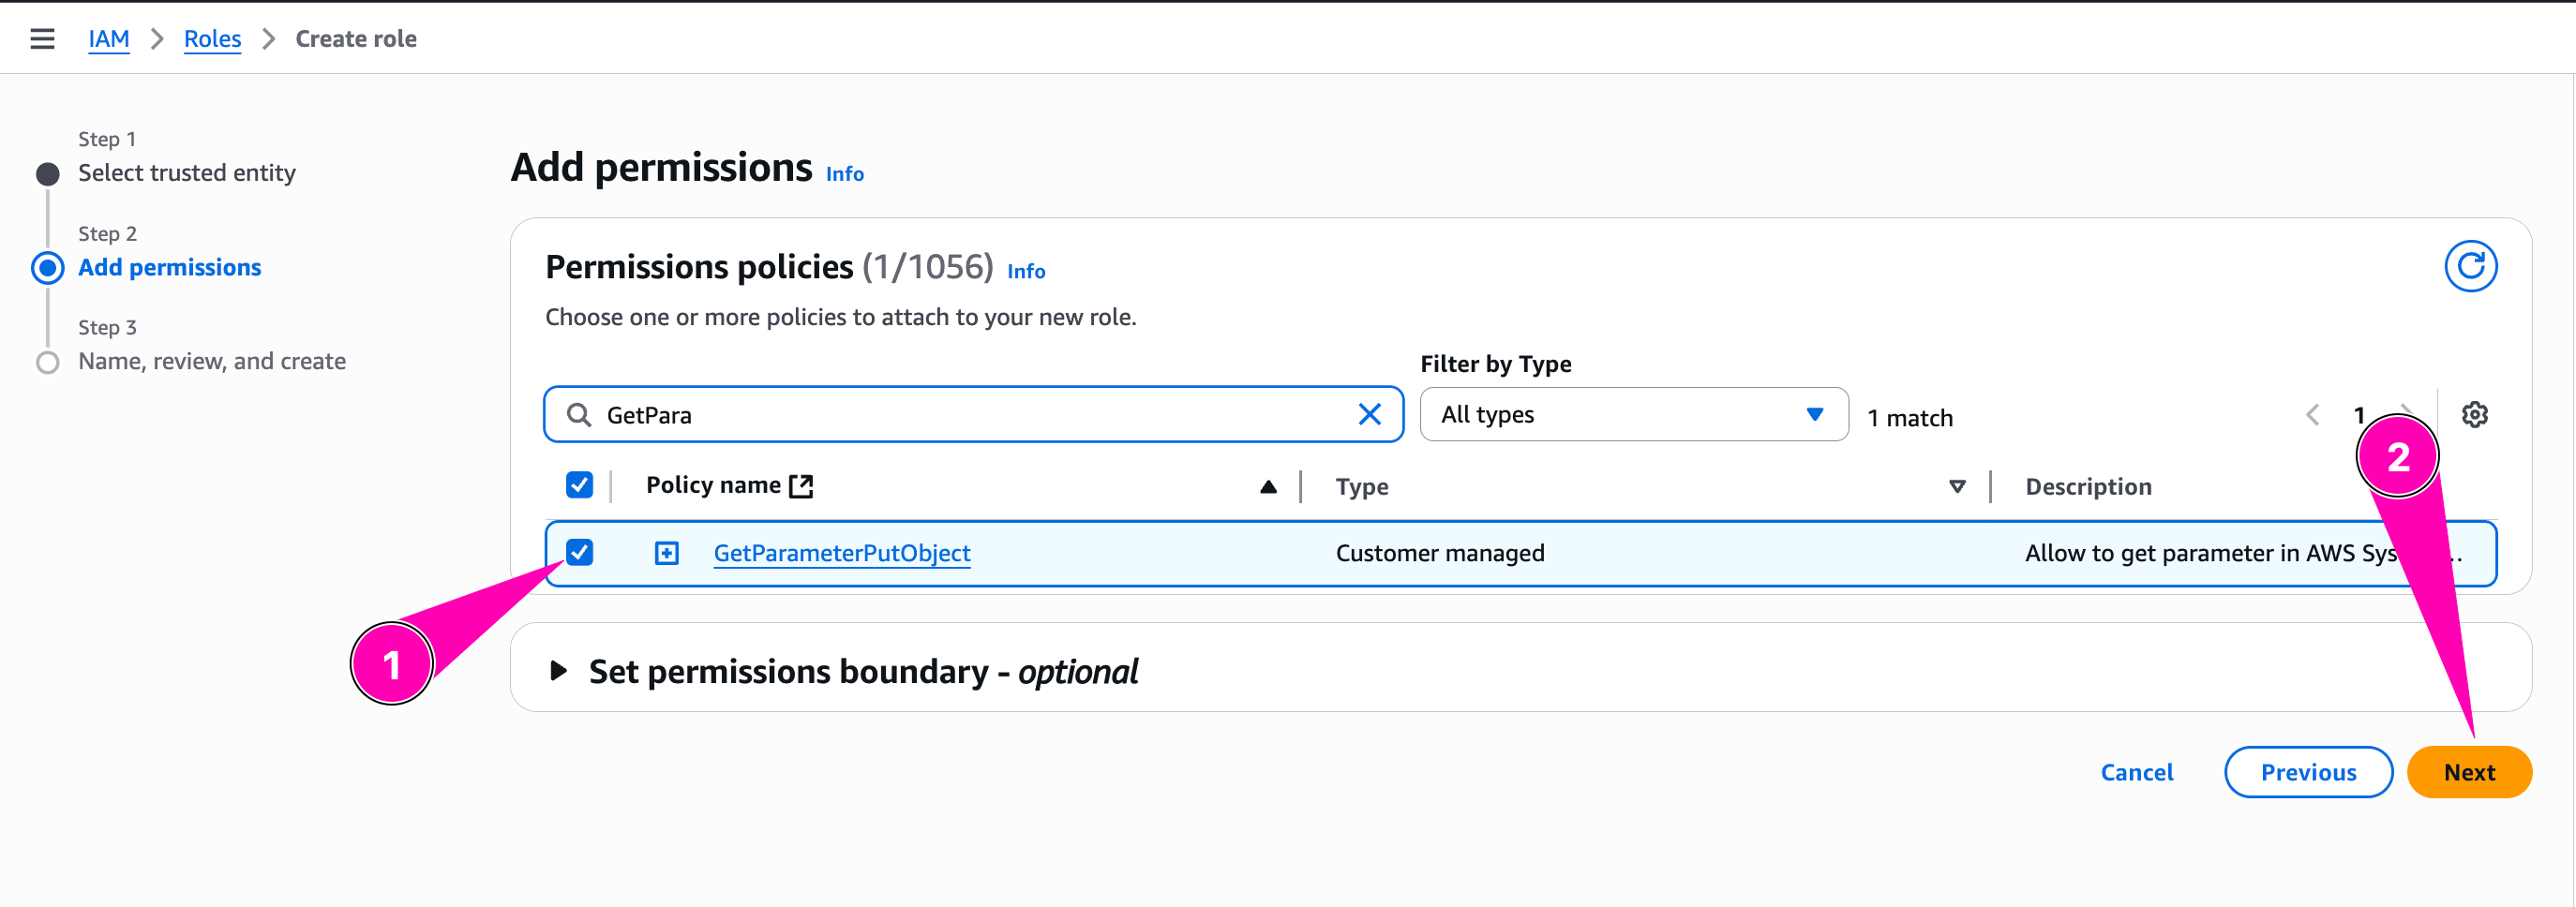
Review again, if all corrected, begin to create role
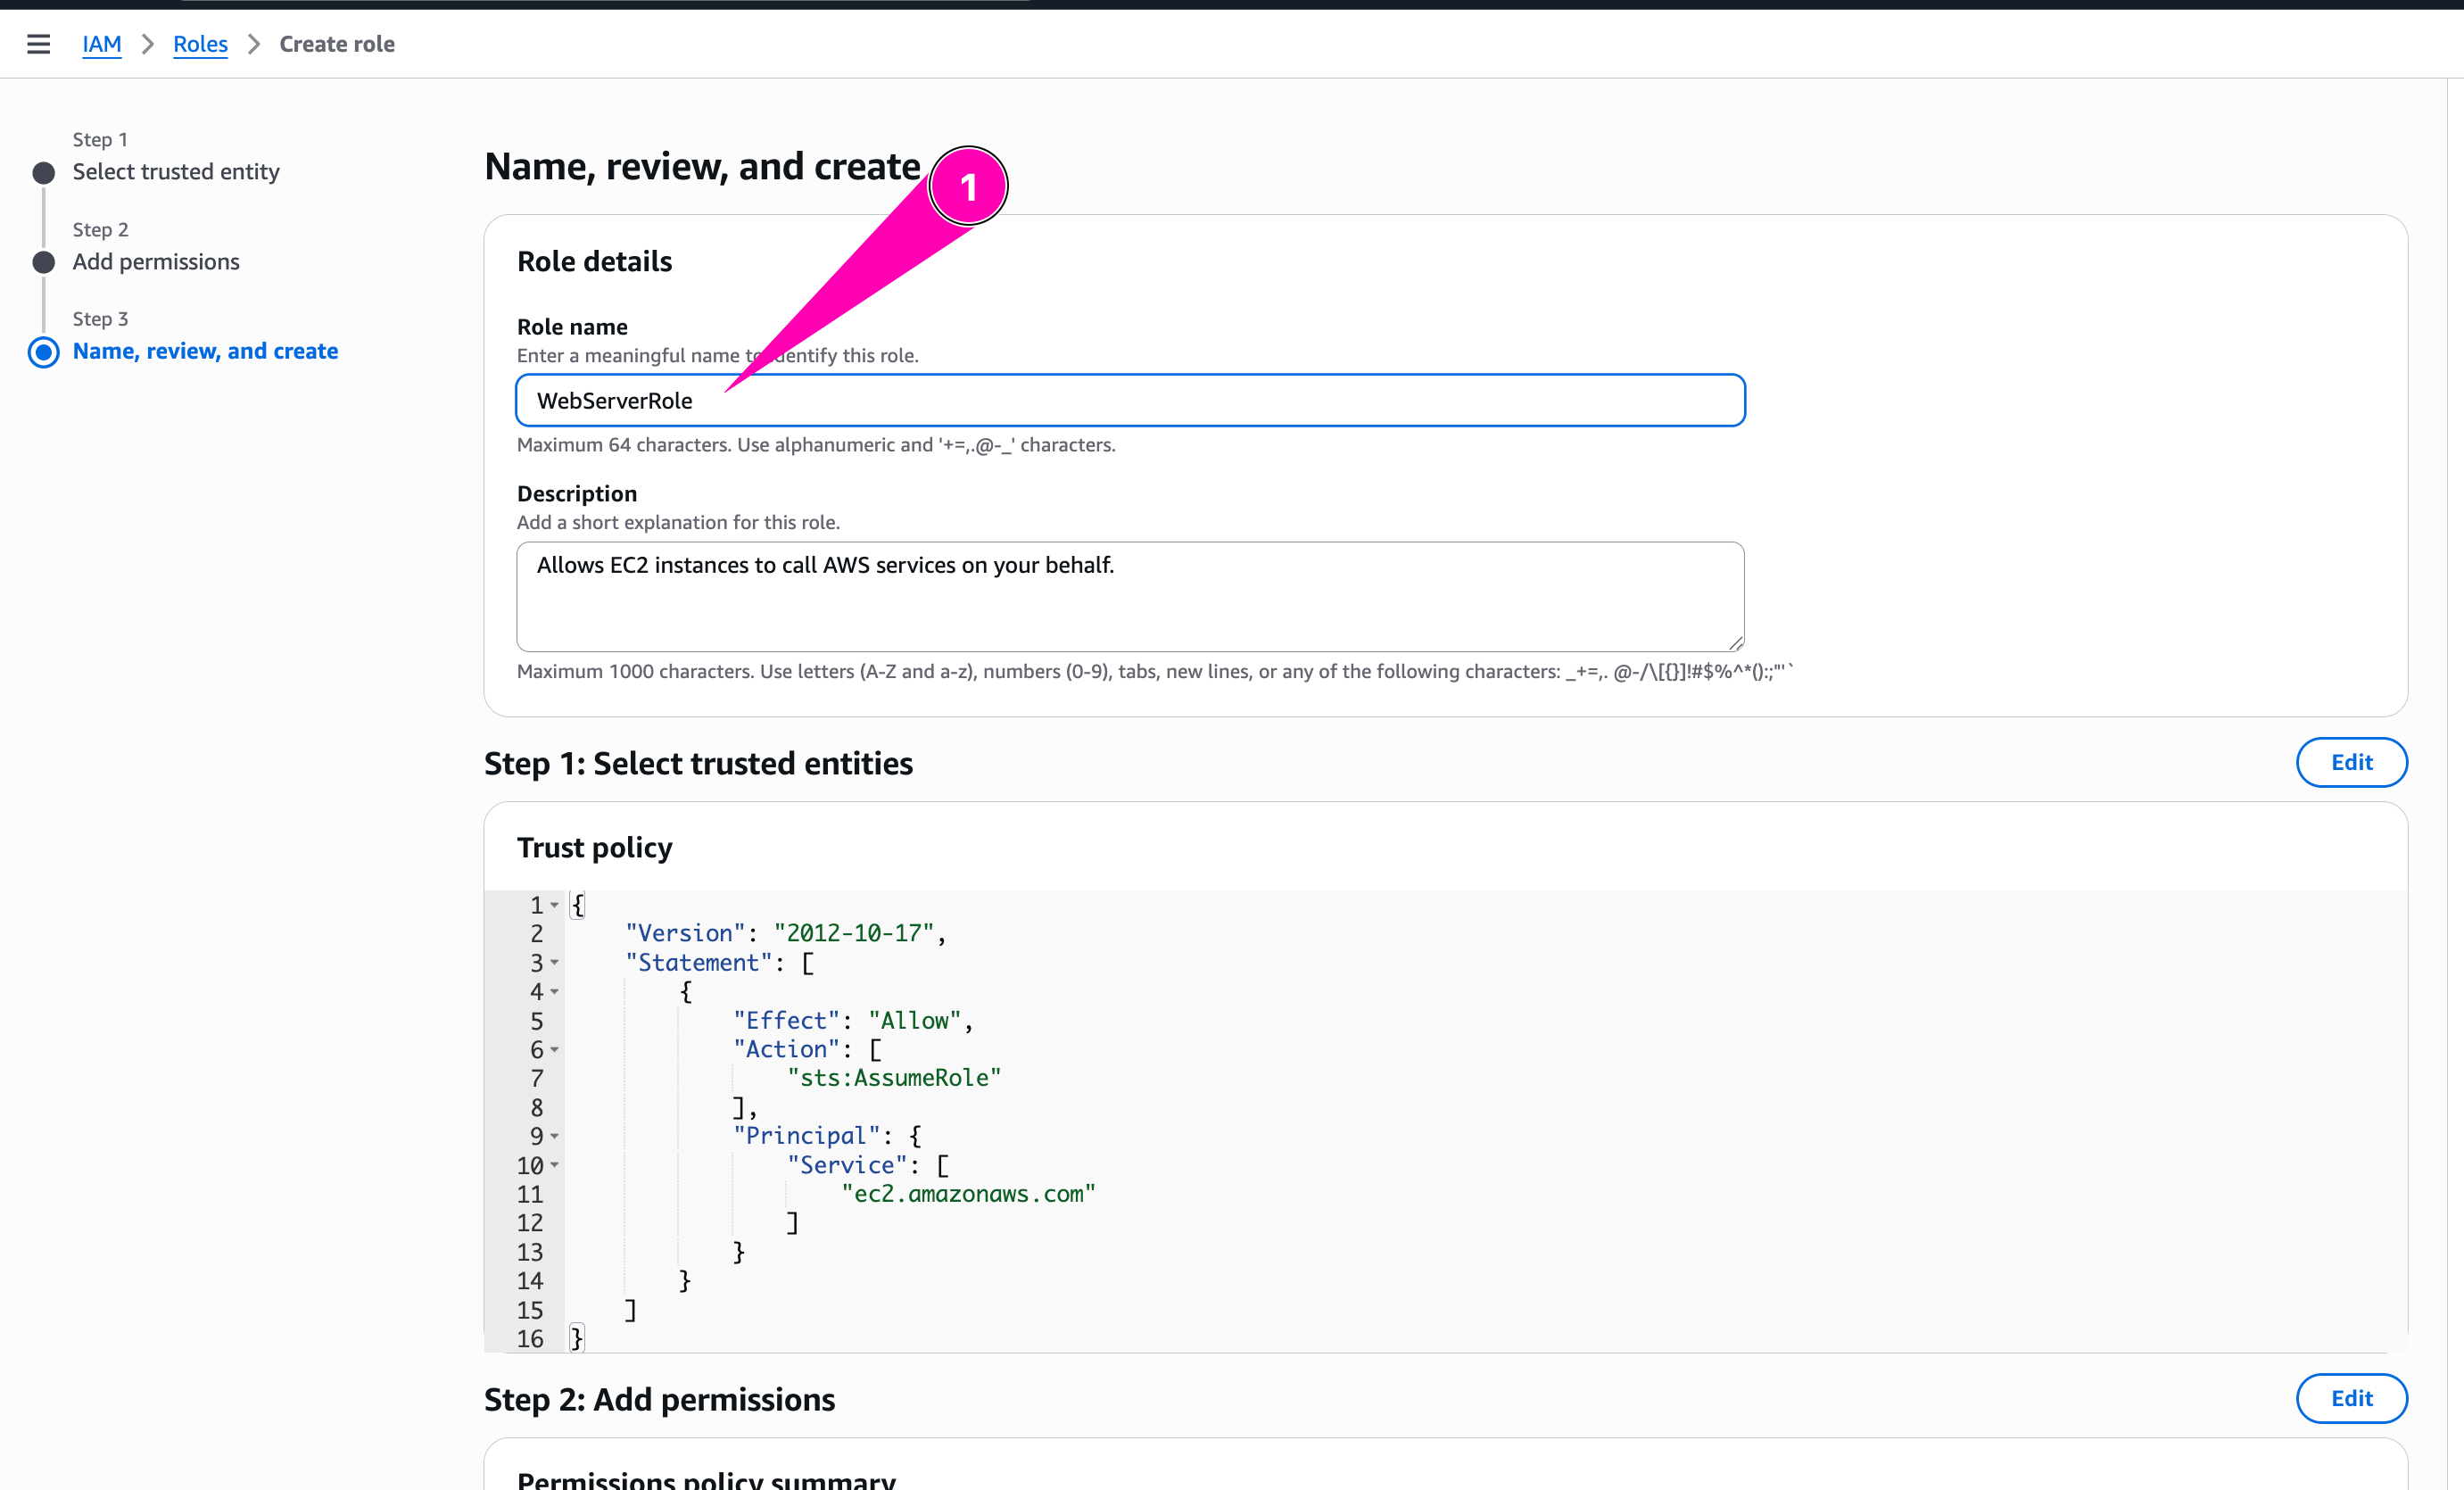
Role WebServerRole created.
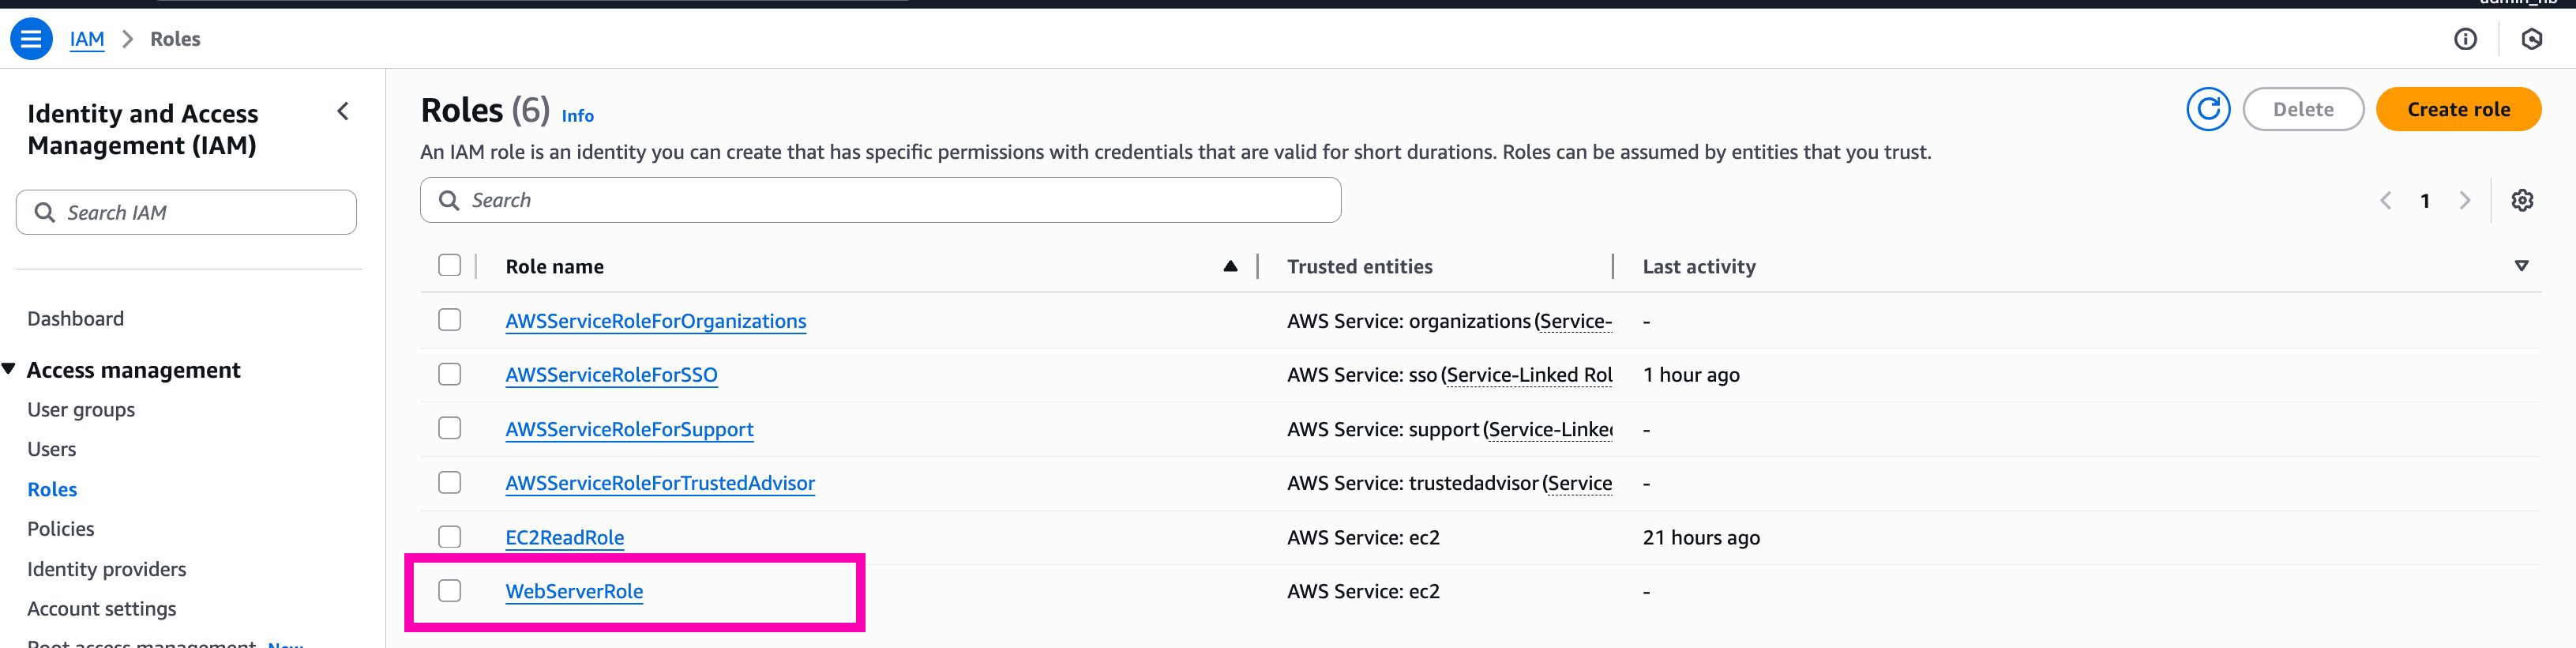
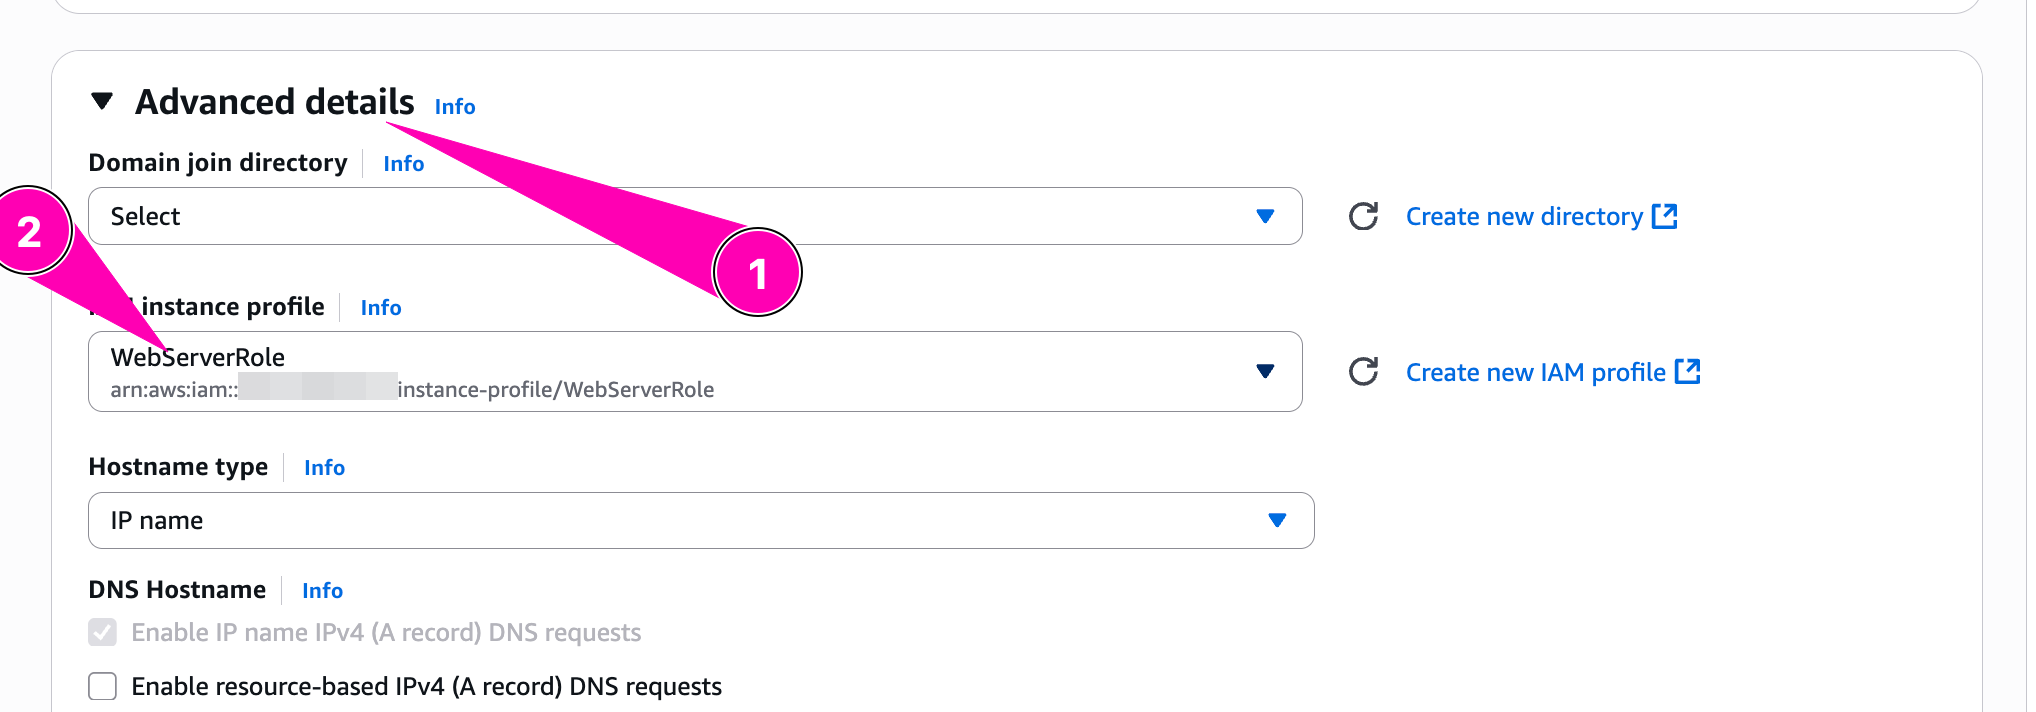
Test, launch instance and attach WebServerRole
When provisioning instance, we need to attach WebServerRole in IAM Profile by access to Advanced Details > IAM Instance Profile
Check role attached using IMDSv2
TOKEN=`curl -X PUT "http://169.254.169.254/latest/api/token" -H "X-aws-ec2-metadata-token-ttl-seconds: 21600"`

curl -H "X-aws-ec2-metadata-token: $TOKEN" \
  http://169.254.169.254/latest/meta-data/iam/security-credentials/
Result, successfuly to attach role WebServerRole

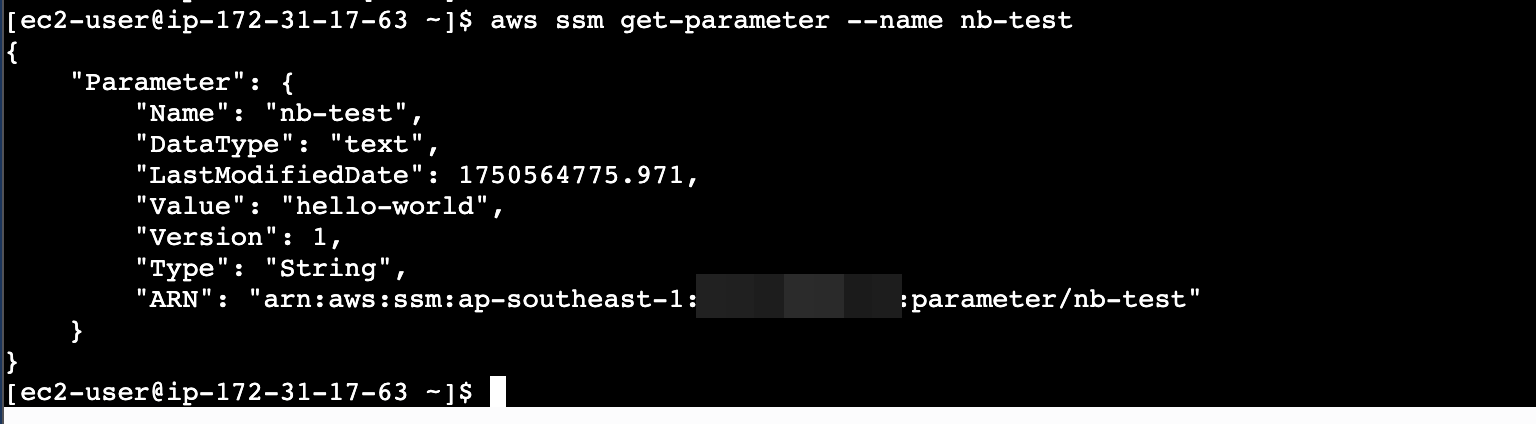
Trying to get parameter, nb-test
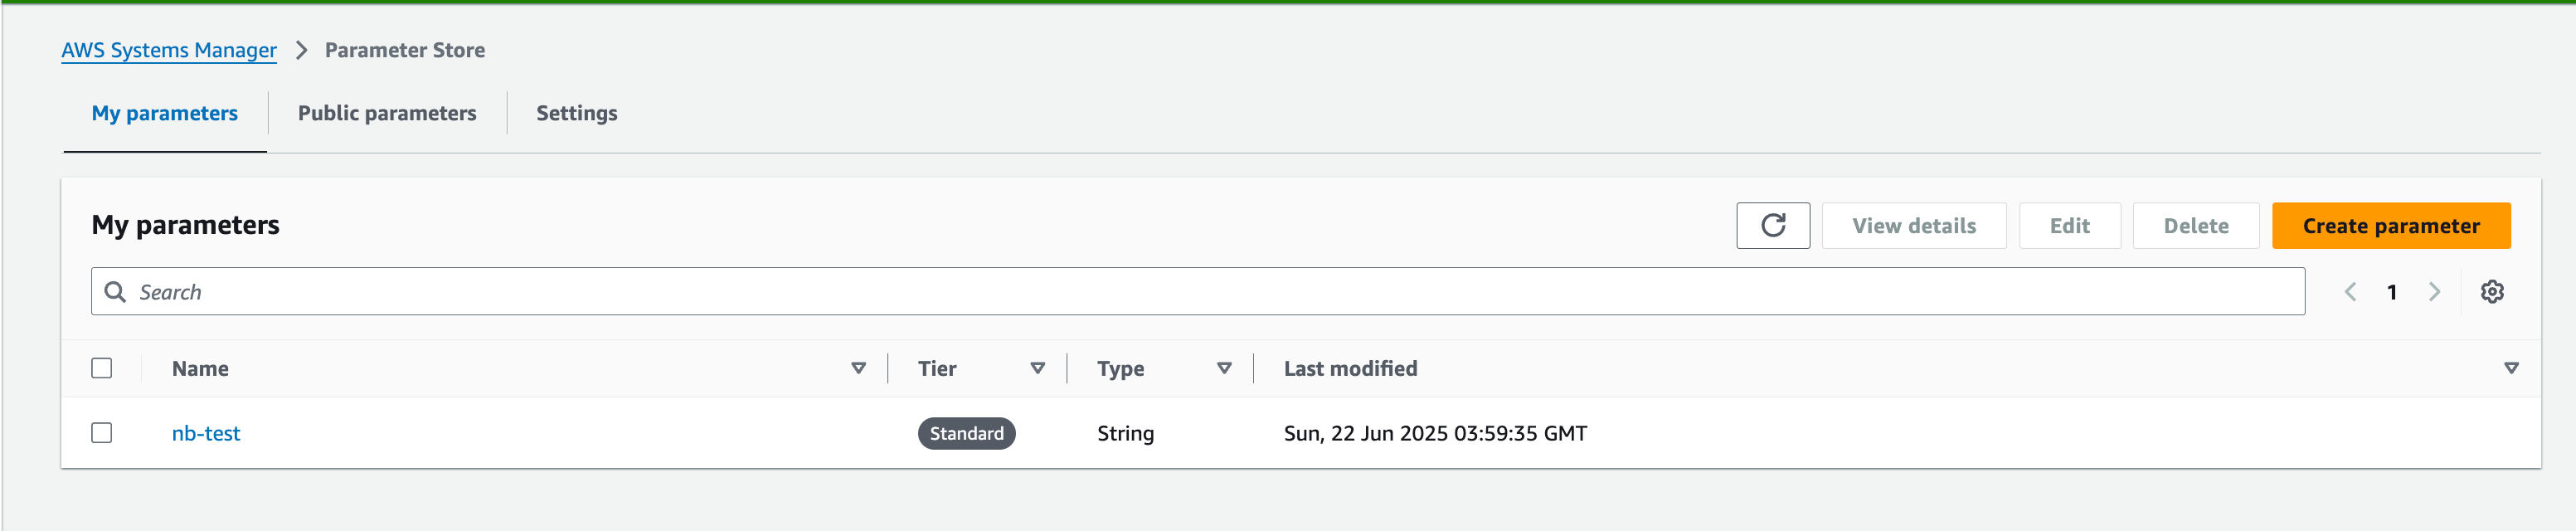
aws ssm get-parameter
How about delete-parameter

Denied, because doesn't have policy ssm:DeleteParameter
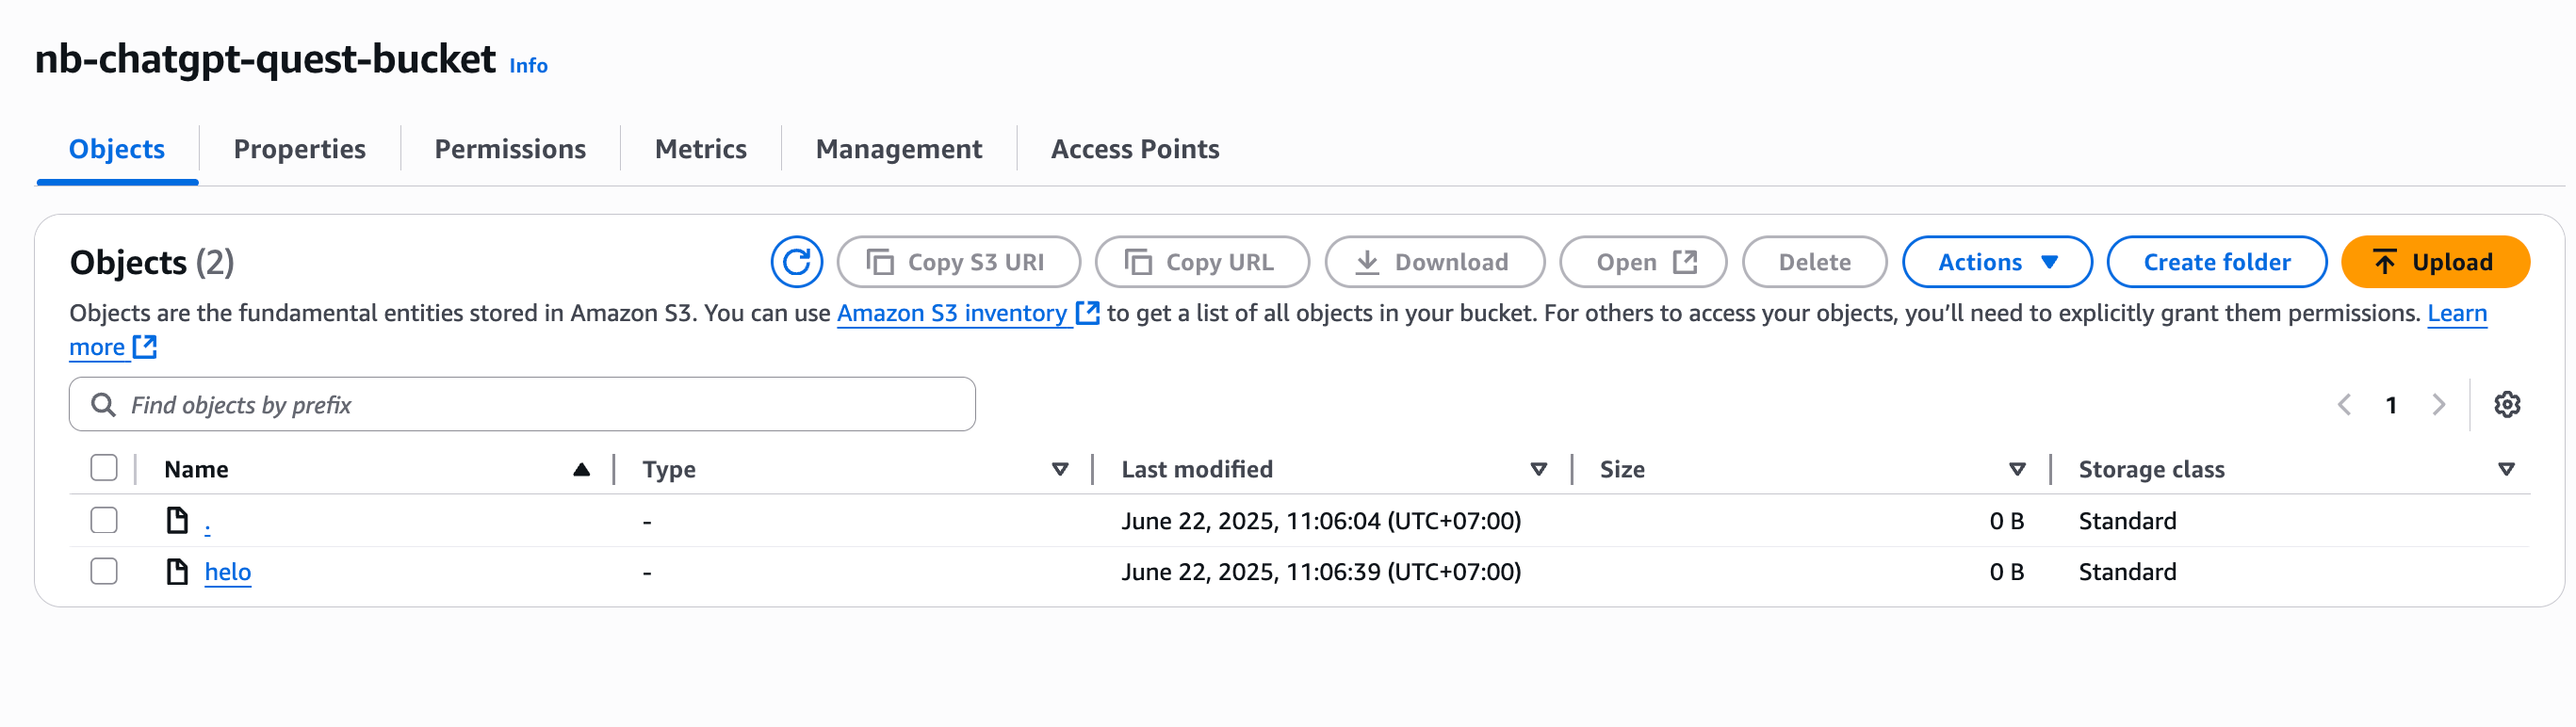
Try to put helo on S3 Bucket

Daily Quest #5: “Terraforming the Multi-Tier VPC”
Terraform is infrastructure as a code tool. Allow user to create anything resources using a declarative code typically HashiCorp Configuration Language (HCL). This can make infrastructure more flexible using code instead of accessing console again-and again.
Reference :
- AWS Providers Terraform
- https://developer.hashicorp.com/terraform/tutorials/aws-get-started
- https://github.com/ngurah-bagus-trisna/aws-vpc-iaac
Infrastructure as Code (IaC) tools allow you to manage infrastructure with configuration files rather than through a graphical user interface. IaC allows you to build, change, and manage your infrastructure in a safe, consistent, and repeatable way by defining resource configurations that you can version, reuse, and share.
So in this section, i want to create IaaC base from this article section Daily Quest #3: AWS Networking & VPC Deep Dive
Setup OpenTofu
Opentofu is opensource alternative for terraform.
Reference :
- https://opentofu.org/docs/intro/install/
I'm using Ubuntu os so i prefer to chose deb install method
curl --proto '=https' --tlsv1.2 -fsSL https://get.opentofu.org/install-opentofu.sh -o install-opentofu.sh
chmod +x install-opentofu.sh
./install-opentofu.sh --install-method deb
# verify install
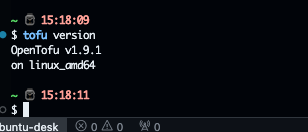
tofu version
Result
Setup VPC
- Create file
main.tfwith AWS provider and region
terraform {
  required_providers {
    aws = {
      source  = "hashicorp/aws"
      version = "~> 5.0"
    }
  }
}

# Configure the AWS Provider
provider "aws" {
  region = "ap-southeast-1"
}
- Setup variable.
On terraform, input variable let you customize aspects of modules without altering the module's own source code. This function allows to share modules accrost different terraform configuration. Create file called variable.tf. Reference
variable "vpc_cidr" {
  type = string
}

variable "subnet" {
  type = map(object({
    subnet_range      = string
    availability_zone = string
    type              = string
  }))
}

variable "natgw_name" {
  type = string
}

variable "route_tables" {
  type = map(
    object({
      cidr_source       = string
      route_destination = string
    })
  )
}
Then setup main.tf
terraform {
required_providers {
aws = {
source = "hashicorp/aws"
version = "~> 5.0"
}
}
}
# Configure the AWS Provider
provider "aws" {
region = "ap-southeast-1"
}
resource "aws_vpc" "nb-chatgpt-vpc" {
cidr_block = var.vpc_cidr
tags = {
"Name" = "nb-chatgpt-vpc"
}
}
resource "aws_subnet" "nb-subnet" {
vpc_id = aws_vpc.nb-chatgpt-vpc.id
for_each = var.subnet
cidr_block = each.value.subnet_range
availability_zone = each.value.availability_zone
tags = {
"Name" = each.key
"Type" = each.value.type
}
}
resource "aws_internet_gateway" "nb-inet-gw" {
vpc_id = aws_vpc.nb-chatgpt-vpc.id
tags = {
Name = "nb-inet-gw"
}
}
resource "aws_eip" "nb-eip-nat-gw" {
tags = {
"Name" = "nb-eip-nat-gw"
}
}
locals {
public_subnet_ids = [
for key, subnet in var.subnet : aws_subnet.nb-subnet[key].id
if subnet.type == "public"
]
private_subnet_ids = [
for key, subnet in var.subnet : aws_subnet.nb-subnet[key].id
if subnet.type == "private"
]
}
resource "aws_nat_gateway" "nb-nat-gw" {
depends_on = [aws_eip.nb-eip-nat-gw]
allocation_id = aws_eip.nb-eip-nat-gw.id
subnet_id = local.public_subnet_ids[0]
connectivity_type = "public"
tags = {
"Name" : var.natgw_name
}
}
resource "aws_route_table" "net-public" {
for_each = var.route_tables
vpc_id = aws_vpc.nb-chatgpt-vpc.id
route {
cidr_block = each.value.cidr_source
gateway_id = each.value.route_destination == "igw" ? aws_internet_gateway.nb-inet-gw.id : null
nat_gateway_id = each.value.route_destination == "nat" ? aws_nat_gateway.nb-nat-gw.id : null
}
}
resource "aws_route_table_association" "public" {
subnet_id = aws_subnet.nb-subnet["public-net"].id
route_table_id = aws_route_table.net-public["public"].id
}
resource "aws_route_table_association" "private" {
subnet_id = aws_subnet.nb-subnet["private-net"].id
route_table_id = aws_route_table.net-public["private"].id
}
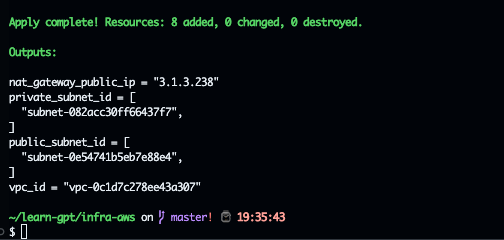
output "vpc_id" {
value = aws_vpc.nb-chatgpt-vpc.id
}
output "public_subnet_id" {
value = local.public_subnet_ids
}
output "private_subnet_id" {
value = local.private_subnet_ids
}
output "nat_gateway_public_ip" {
value = aws_nat_gateway.nb-nat-gw.public_ip
}
Then setup all value for variable in dev.tfvars
vpc_cidr = "10.0.0.0/16"
subnet = {
  "public-net" = {
    subnet_range      = "10.0.1.0/24"
    availability_zone = "ap-southeast-1c"
    type              = "public"
  },
  "private-net" = {
    subnet_range      = "10.0.2.0/24"
    availability_zone = "ap-southeast-1c"
    type              = "private"
  }
}

natgw_name = "nb-natgw"

route_tables = {
  "private" = {
    cidr_source       = "0.0.0.0/0"
    route_destination = "nat"
  },
  "public" = {
    cidr_source       = "0.0.0.0/0"
    route_destination = "igw"
  }
}
Then Init, plan, apply
tofu init
tofu plan -var-file=dev.tfvars

# if everything correct, apply to create resources
tofu apply
Result
Testing
Create 2 ec2 instances
Instance : public-net, Attach public subnet, and attach elastic-ip for access. Access to instances, check public_ip,
public-net instance using same as public_ipv4 attached to instance.
Then access private-net instances from public-net. Makesure public ip using nat gateway address.
Using nat-gateway address.
]]>IAM (Identity & Access Management) is a web service that helps you securely control access to AWS Resources. On this day, i learn to craft and attach the minimal set of permissions erquired for EC-2 based application, following the principle of least privilage

Reference :
- What is IAM?
- Security best practices in IAM <- Recomended to read this for first time using AWS Resources
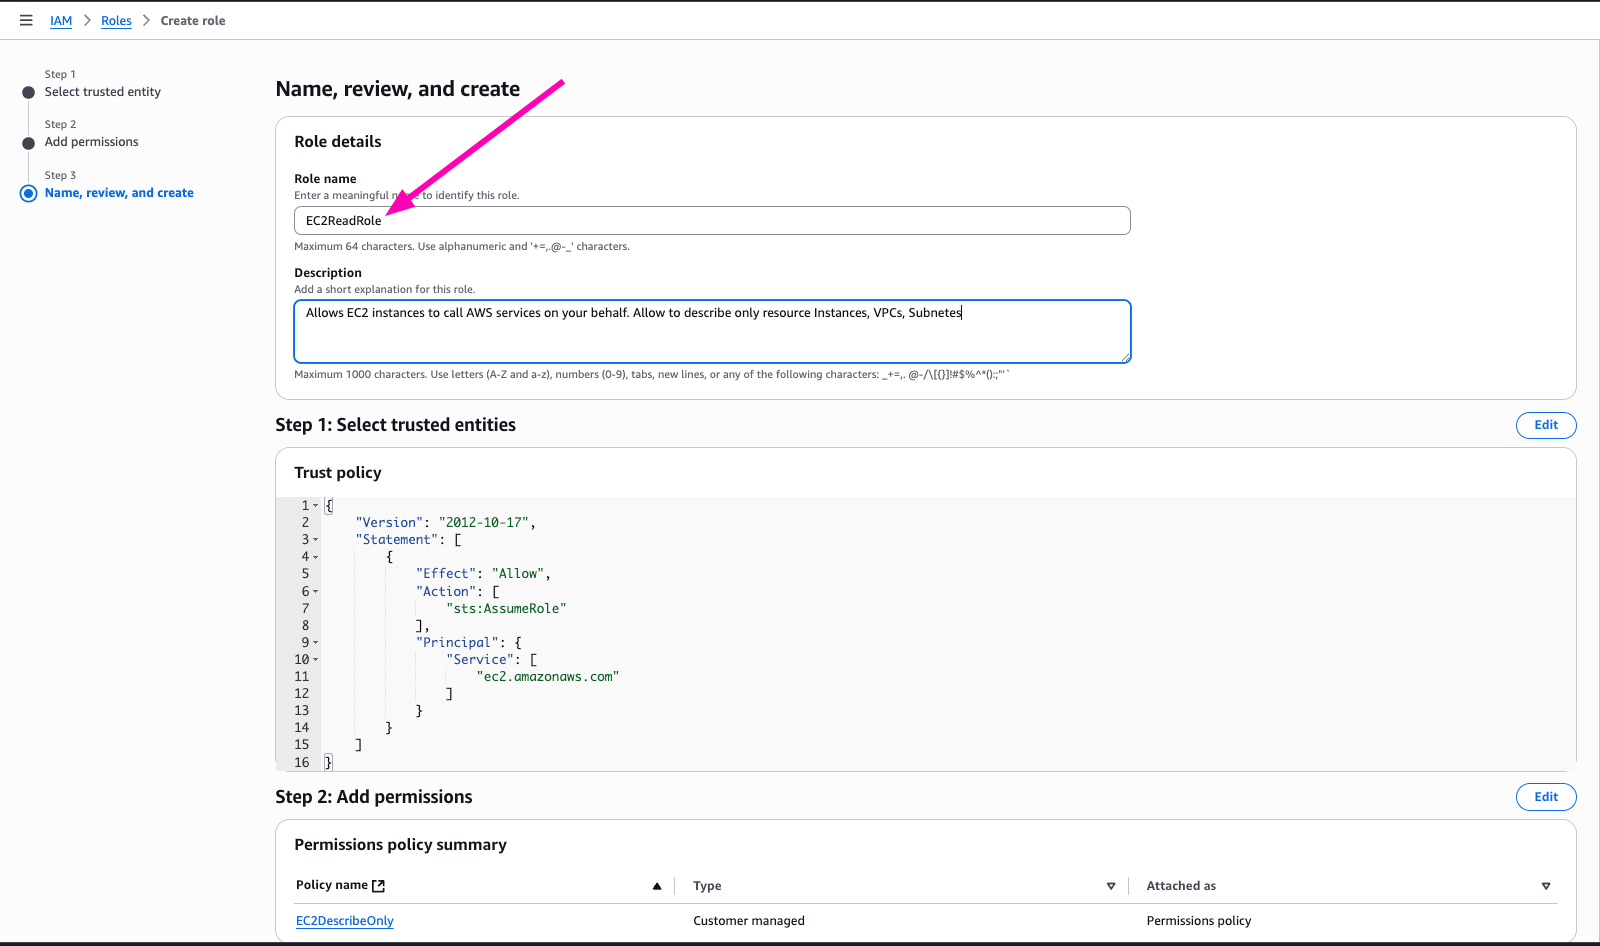
Skenario : Create IAM Policy to only permit DescribeInstances, DescribeSubnets, DescribeVpcs, And scope to aws account's resources.
IAM Policy
IAM Policy is feature to manage access in AWS. A policy is an object in AWS that, when associated with an identity or resource, defines their permissions
Reference :
Access to IAM Policy
Then open Policy menu in IAM Dashboard, select Create Policy
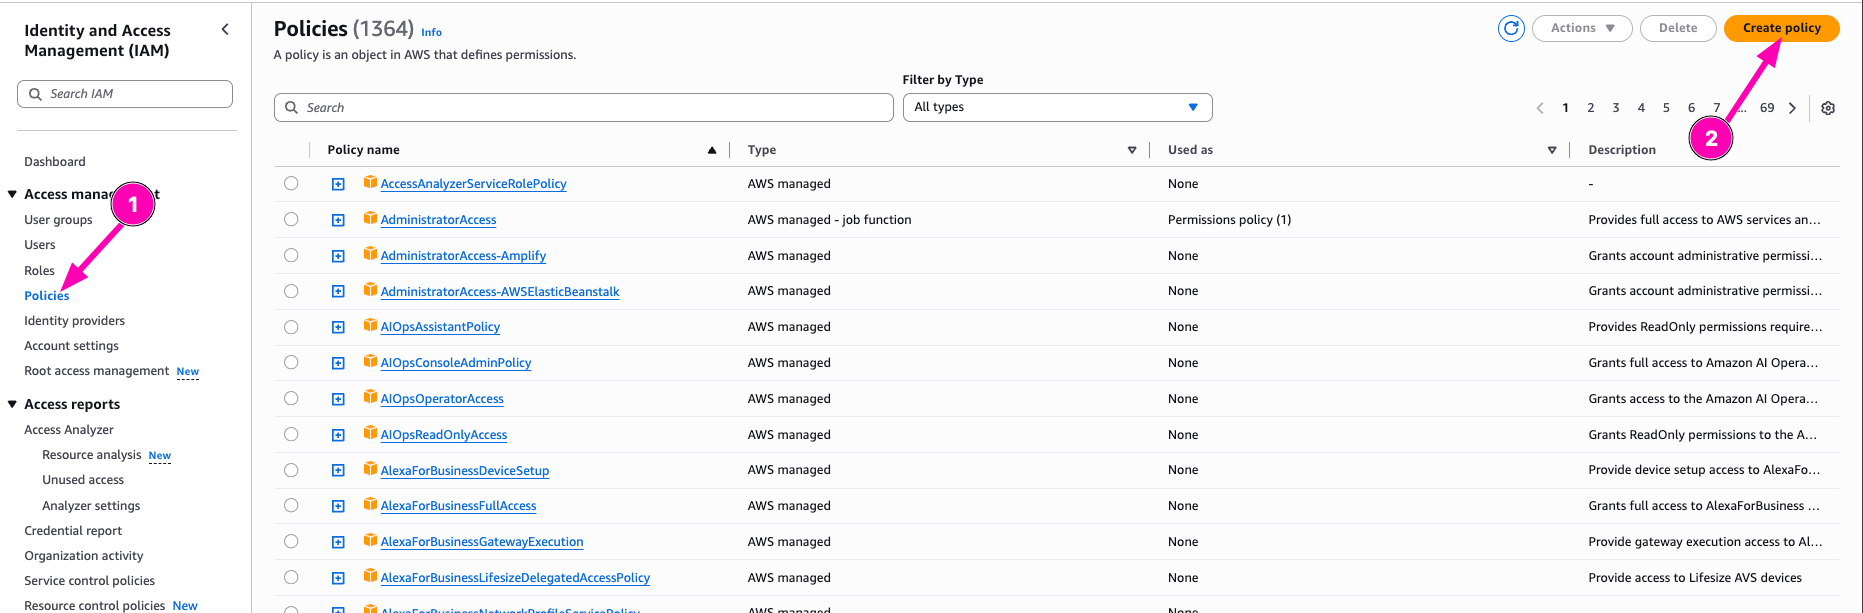
Select what resources to Allow or deny to access. On this section, i want to allow policy to Describe instances, subnets, and VPCs
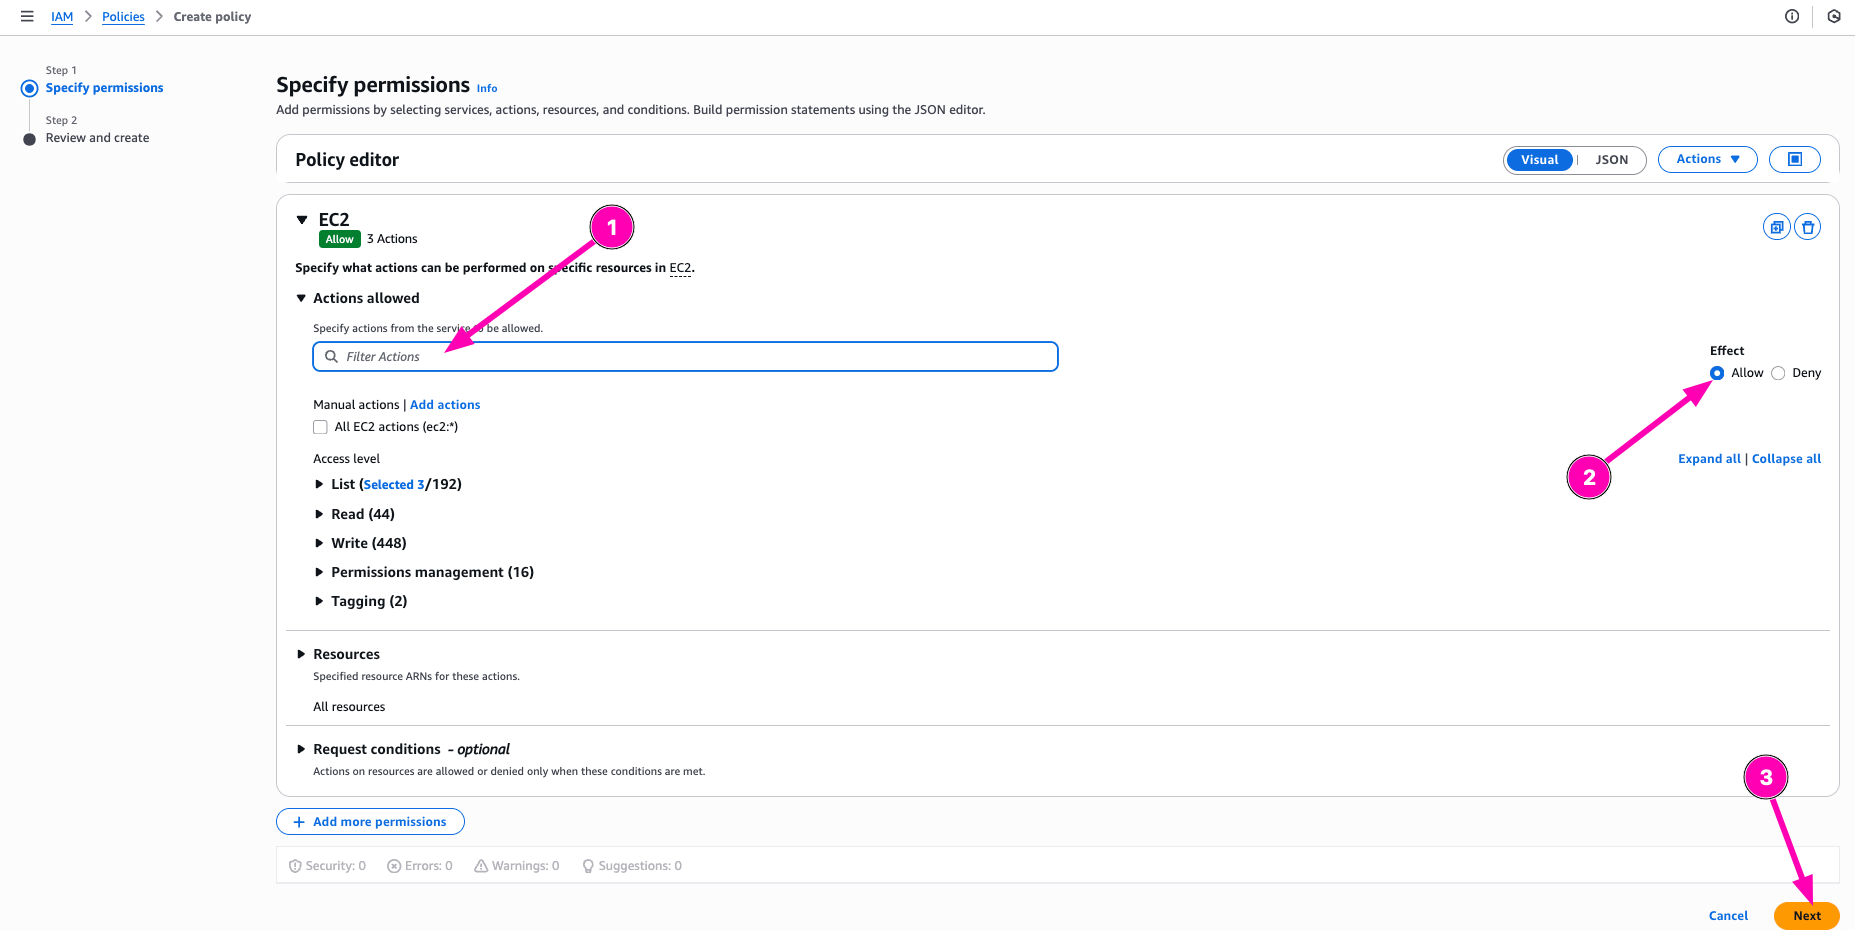
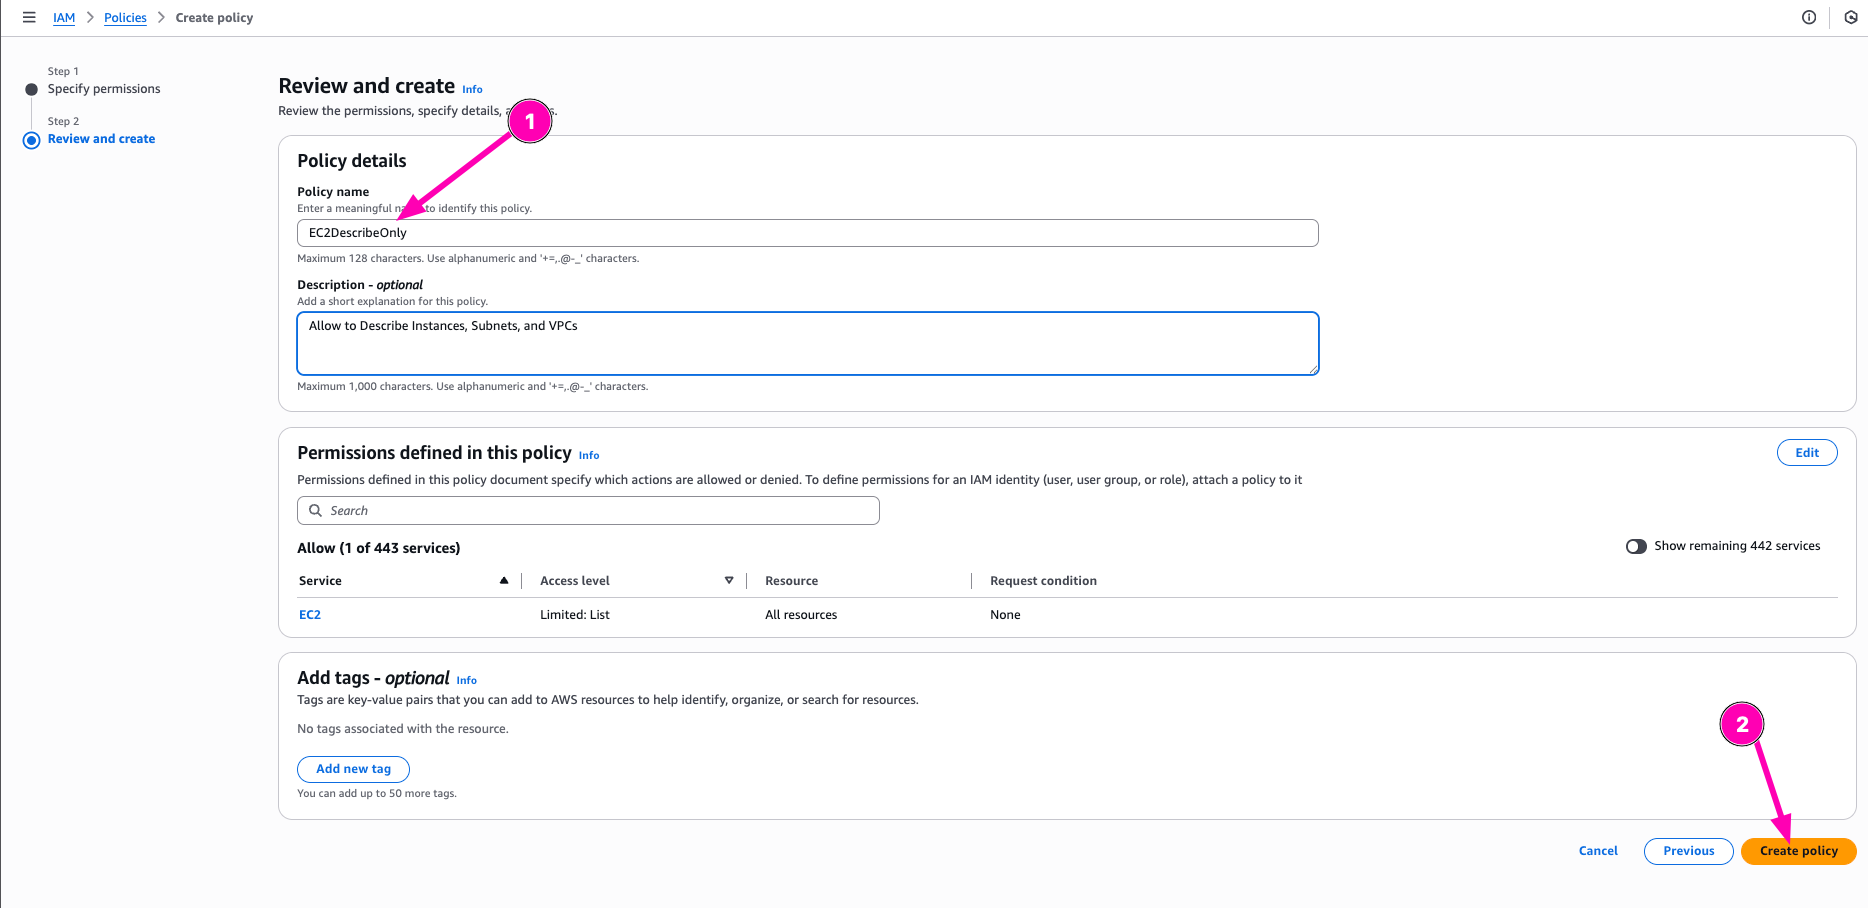
After all correct, begin to create Policy be click Create Policy
IAM Role
Object on AWS to assign spesific permission to account.
Now after policy created, we can attach policy to IAM Role. Navigate to Roles > Create Role
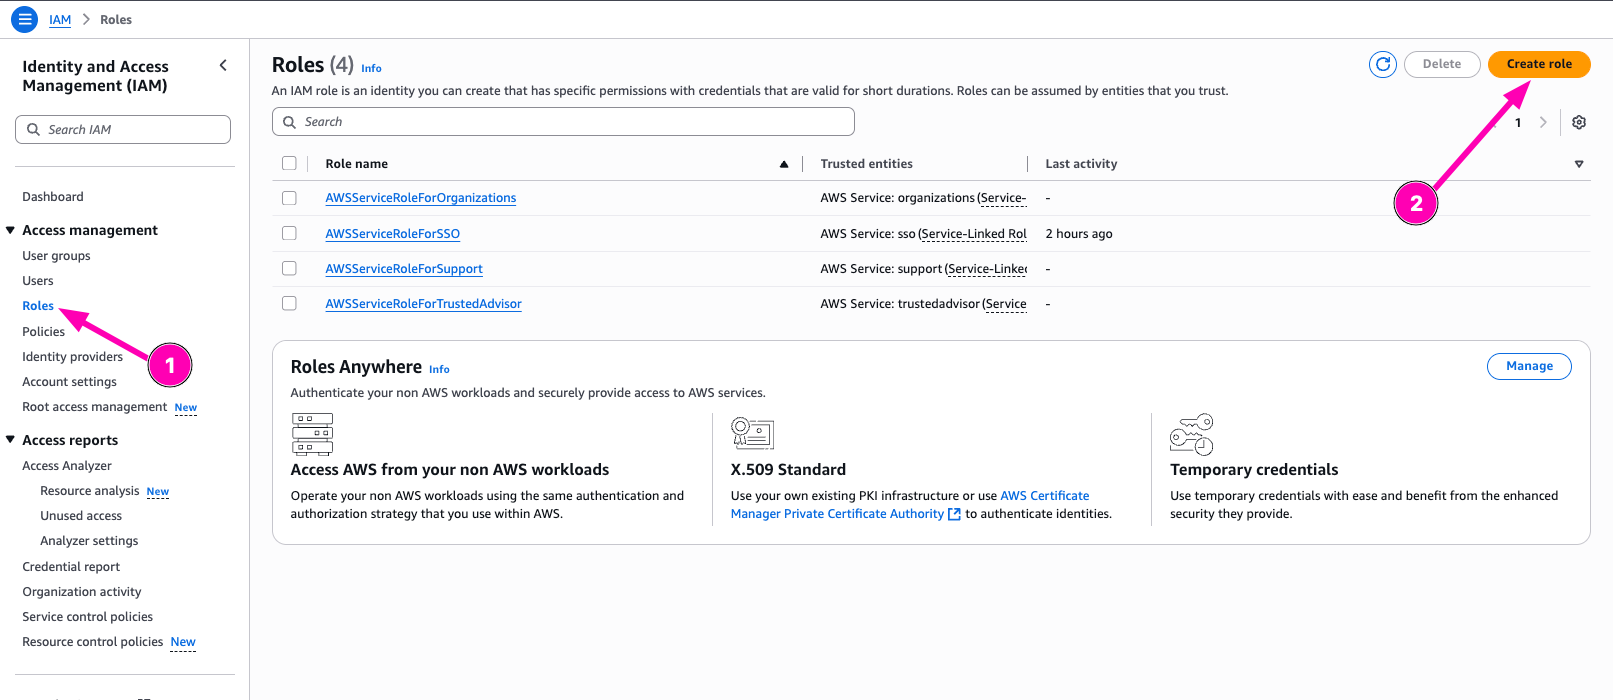
Then configure trusted entity. For this, i configure entity type to AWS Service, and Usecase to EC2
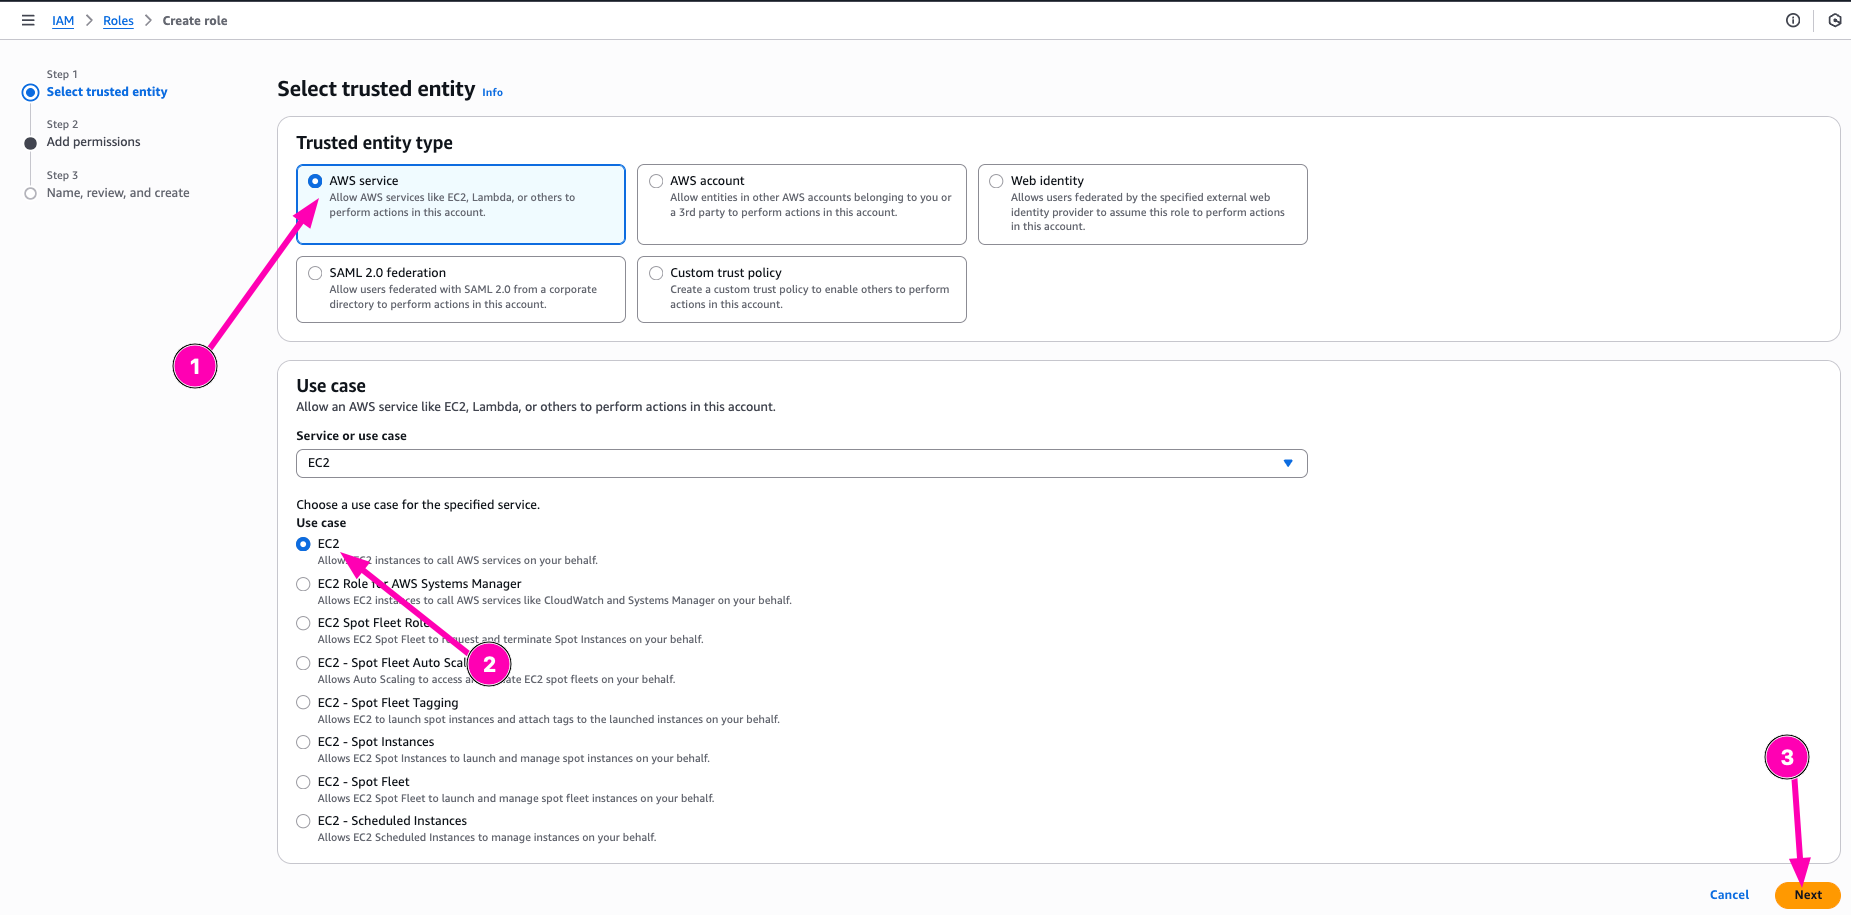
Search permission policy, and next
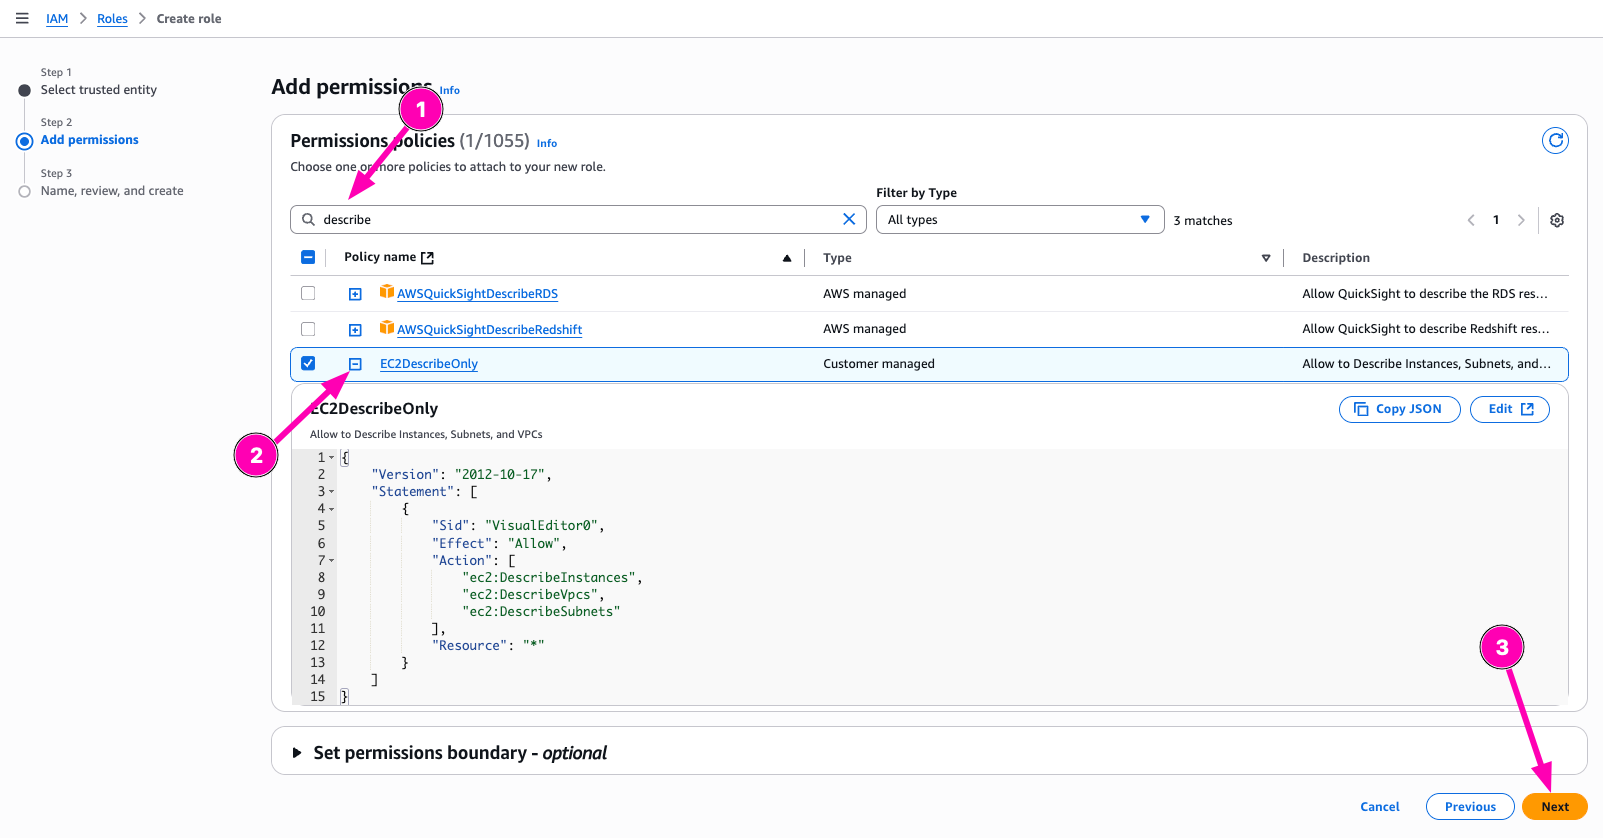
Enter name of roles, check again. If all correct, begin to create Role.
Check If Role Correct
To test role, we need to attach instance-profile to VM. And then testing to describe and terminate
Access to EC2 > Instances to assign new role.
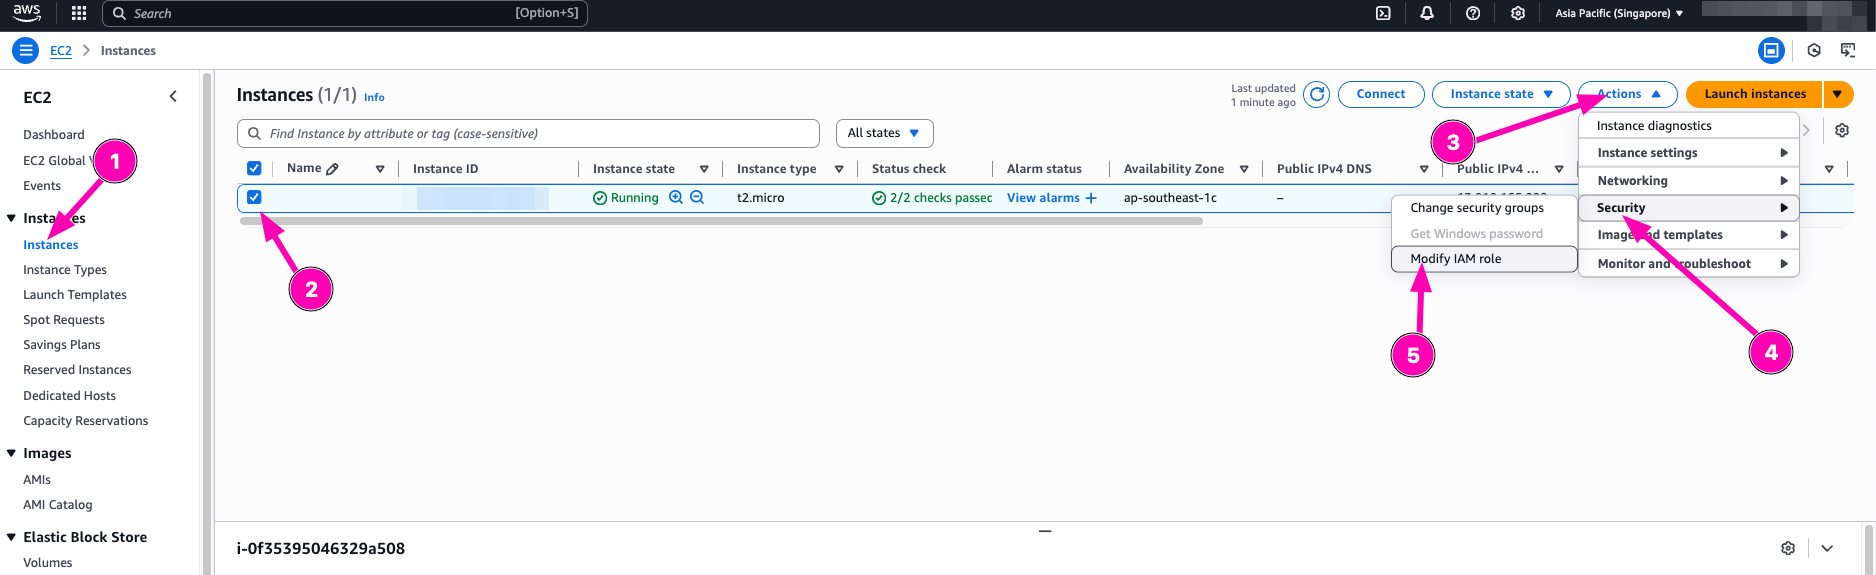
Attach Role > and update IAM role

To test, you need to access instances/vm via ssh.
Testing
Testing to describe-instances
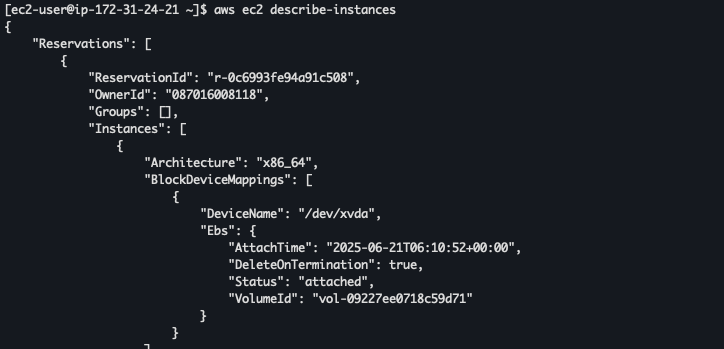
Testing destroy

Real World Usecase : Using IAM Roles with the principle of least privilege on EC2 instances is essential for maintaining security and operational efficiency. For example, a web application hosted on an EC2 instance may need to access files stored in Amazon S3, such as images or configuration data. Instead of hardcoding access keys—which poses security risks and is difficult to manage—an IAM Role allows the EC2 instance to securely access these resources using temporary credentials managed automatically by AWS
Question :
- Why is it dangerous to attach
AdministratorAccessto long-lived roles or CI/CD runners? - How would you modify this policy if a Lambda function needed read-only access to only a specific S3 bucket?
Answer :
- Attach
AdministratorAccessto ci/cd runners can potentialy have risk to manage all aws resources in instance without strict permission - I need to create policy called
S3ReadWritewith policy allow to readwrite S3 storage, and associate to lamda (i never try before, but i get the point using least-privilage)
Daily Quest #3: AWS Networking & VPC Deep Dive
Multi-tier network (public and private subnets) use for production use-case like connecting web servers to database. You don't need web-server comunicate to database exposed to internet. Instead we can useprivate-networkto connect beetween web-server and database. To expose web-server we can useinternet-gateway.
Reference :
Real World Usecase : In production web server and database recomend to use private network when comunicate each other. Using private network, need Nat Gateway to access intenet without exposing directly to the internet.
Skenario : Creating 2 instances, first instance alocated Elastic IP and second instance doesn't attach elasticIP. Two instances connected between private-network. Makesure all instances can access internet
Subnet
Subnet is range IP Addresses in VPC
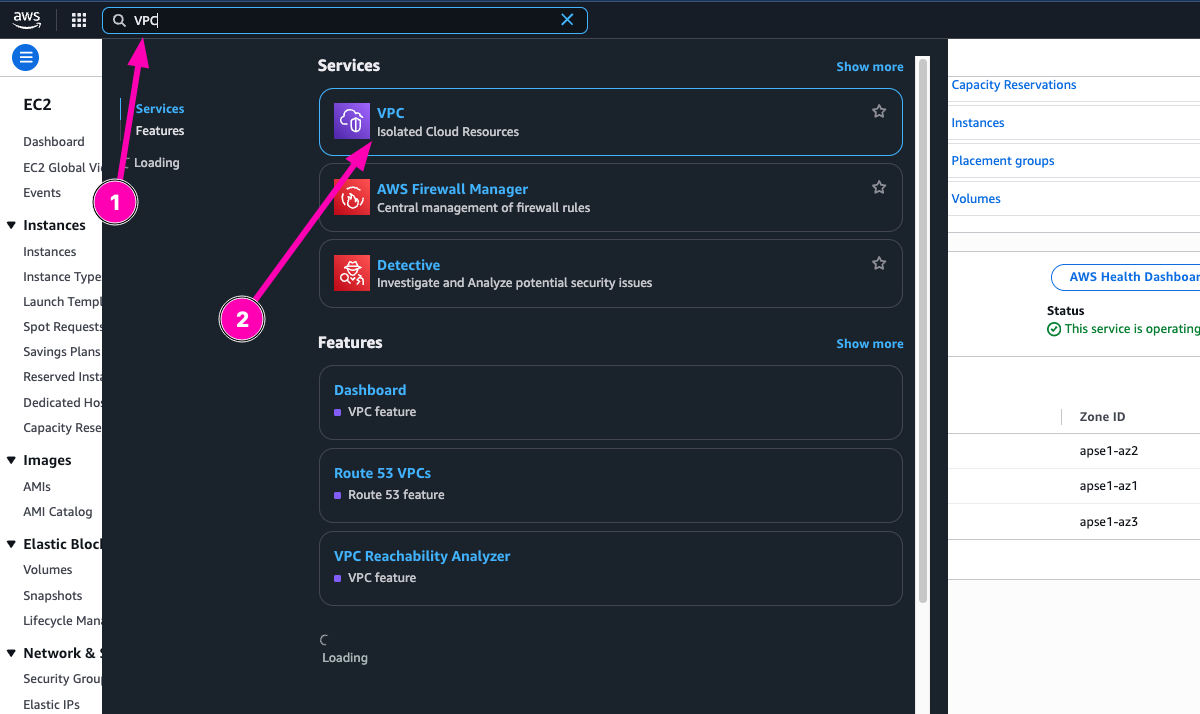
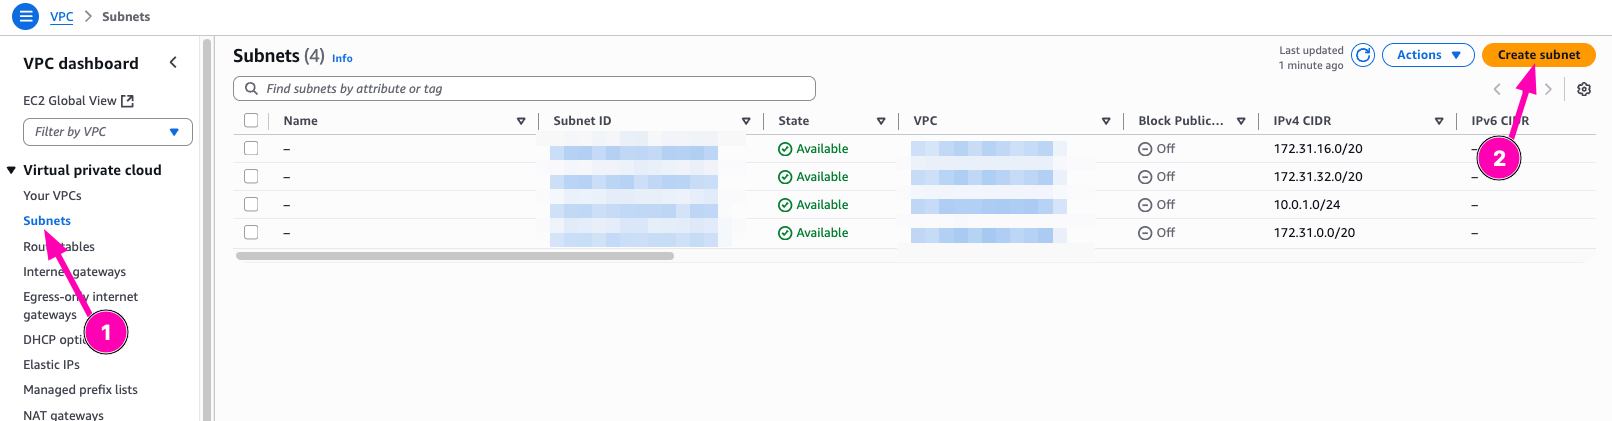
Create new subnet 10.0.2.0/24, but mark it as private it means doesn't need to associate external gateway. Navigate to VPC > Subnets
To create, click Create Subnet
Configure subnet we want to create
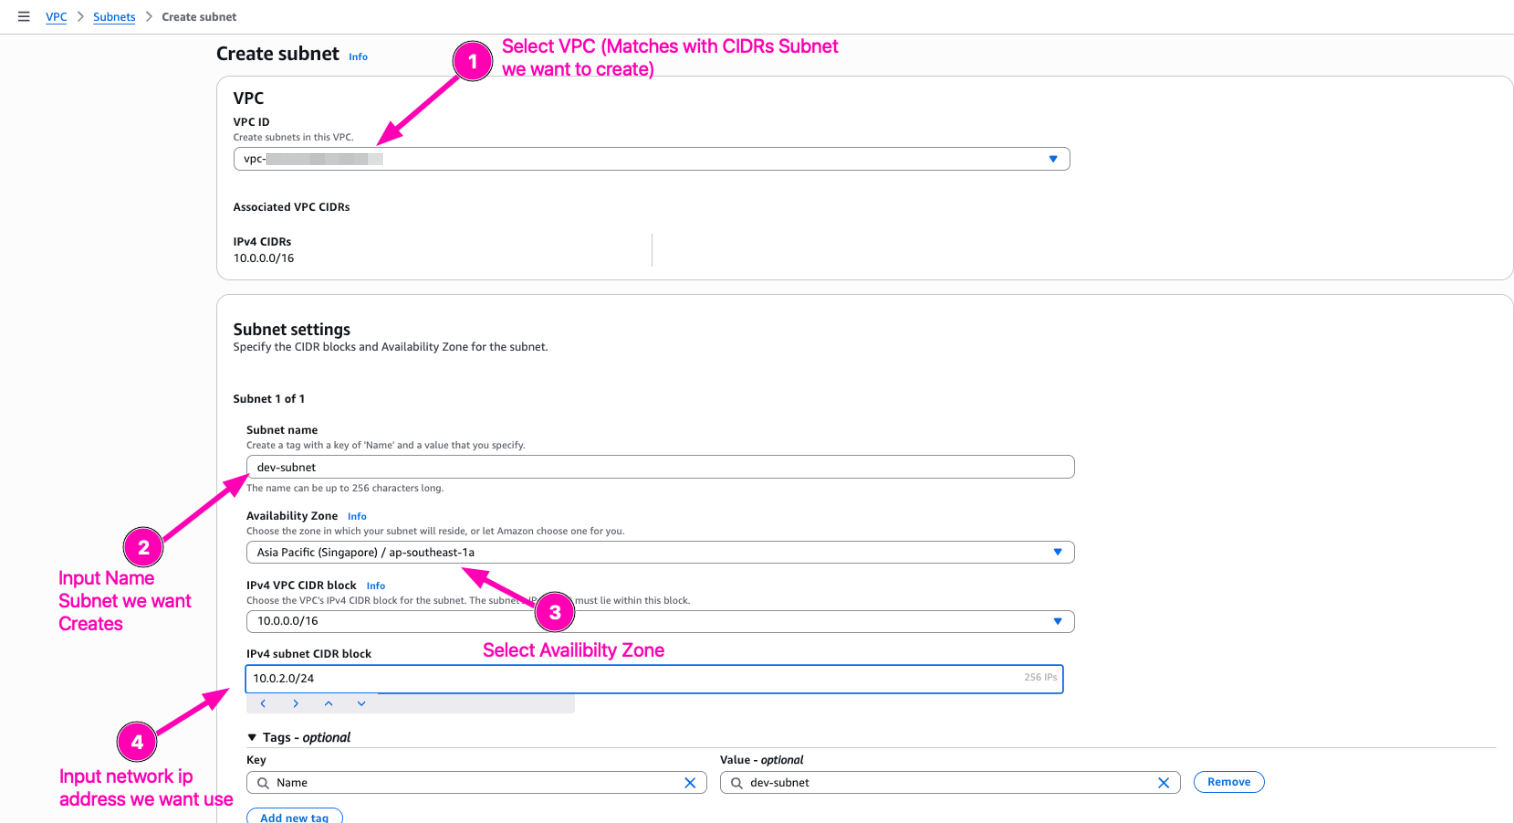
Result, subnet dev-subnet created

Nat Gateway
NAT Gateway is service you can use to private csubnet can connect to service outside your VPC but external services can't initiate a connection with those instances.
When you create NAT gateway, you specisfy one of the following connectivity types :
- Public : (Default) Instances in private subnets can connect to internet through a public NAT gateway, but the instances can't recive inbound connection from the internet
- Private : Instances in private subnets can connect to other VPCs on your on premises network through a private NAT gateway, but instances can't recive inbound connection other VPCs or the on-premises network. The defference with Public is You can route traffic from the NAT gateway through a transit gateway or a virtual private gateway. You can't associate an elastic IP address with a private NAT gateway. You can attach an internet gateway to a VPC with a private NAT gateway, but if you route traffic from the private NAT gateway to the internet gateway, the internet gateway drops the traffic.
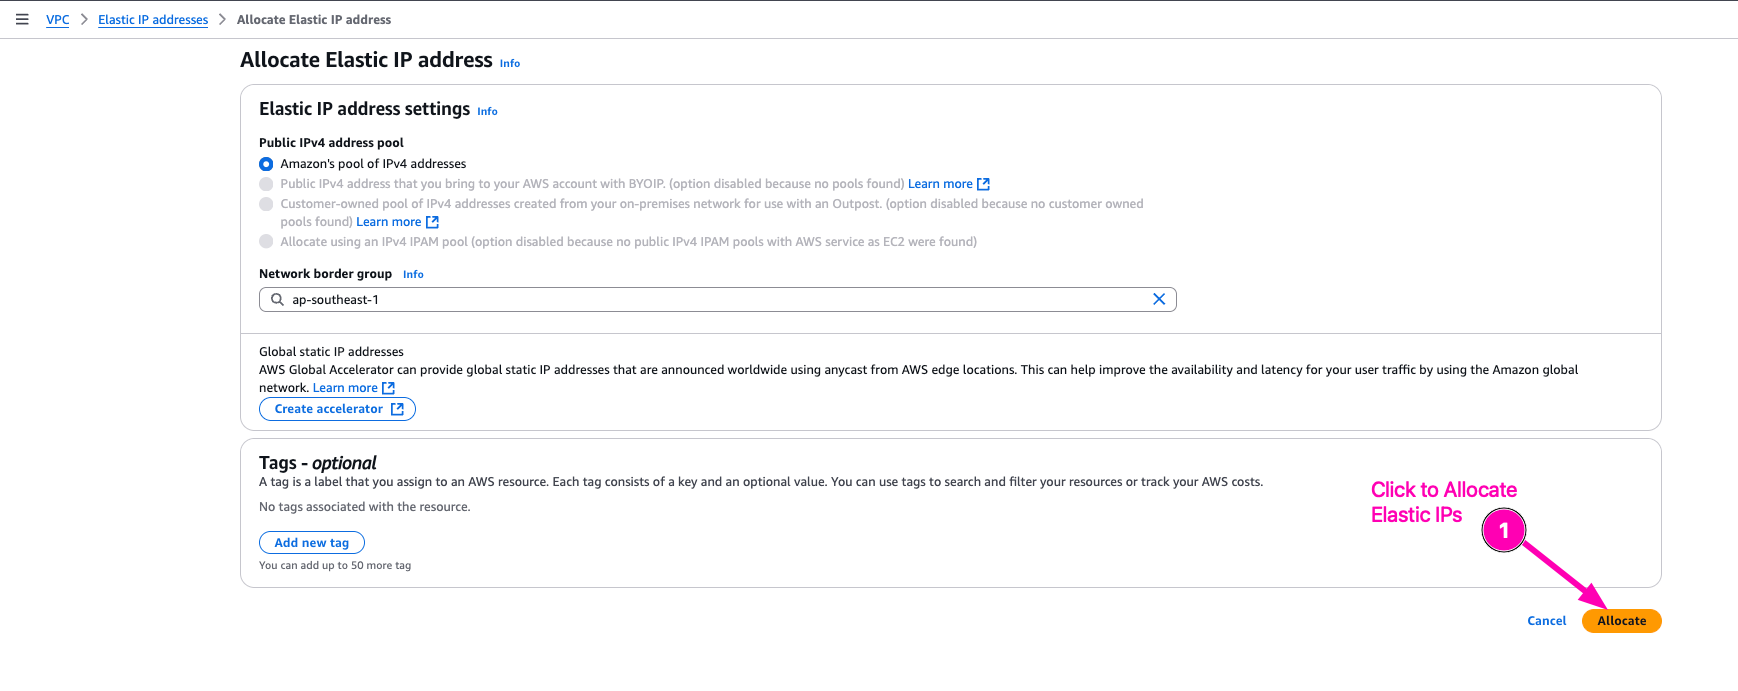
I want to create Public gateway, so first we need to Associate ElasticIP for launch Nat Gateway then. ElasticIP need to create because to NAT all private subnet to connect internet over ElasticIP.
Navigate to VPC > Elastic IPs > Associate Elastic IP address
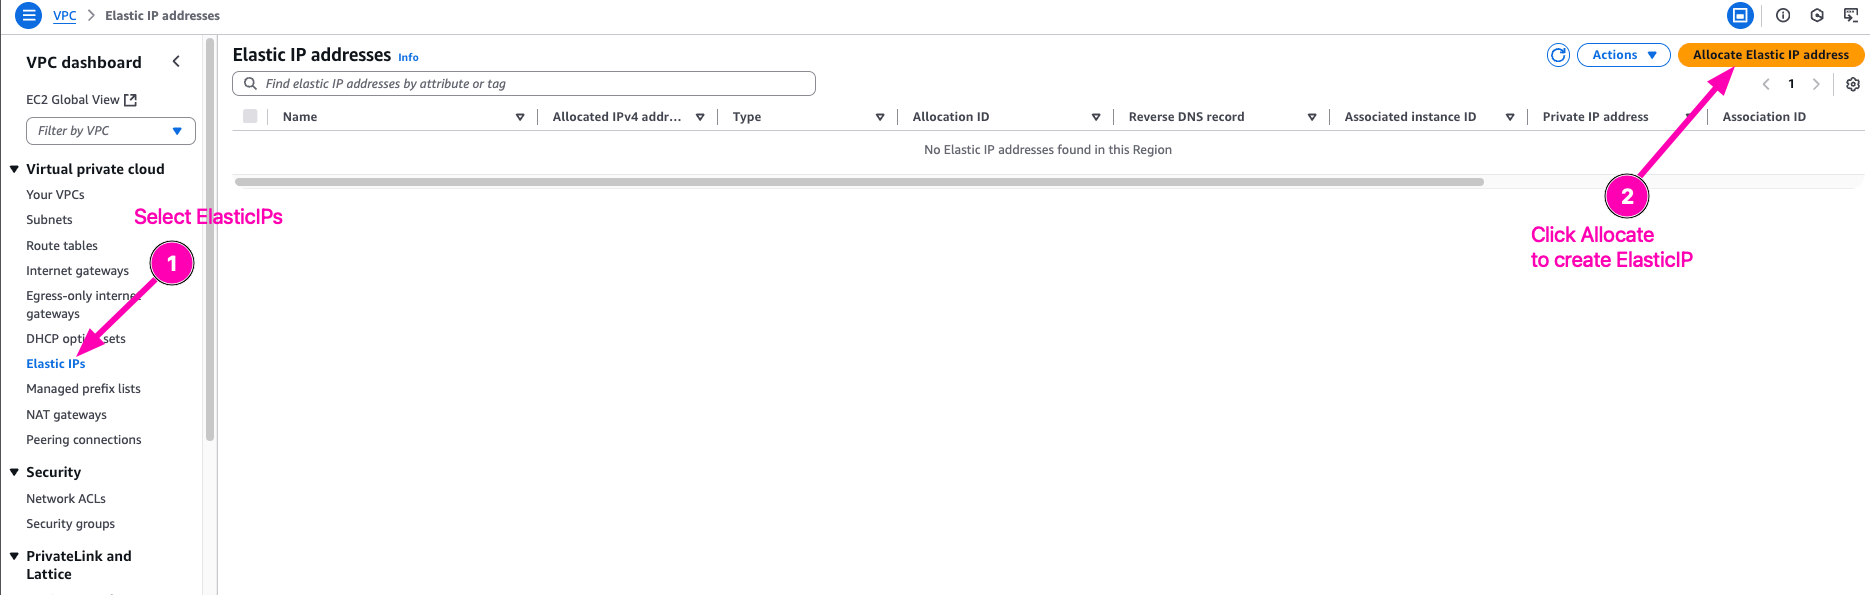
Allocate Elastic IPs
Then we begin to create NAT Gateway
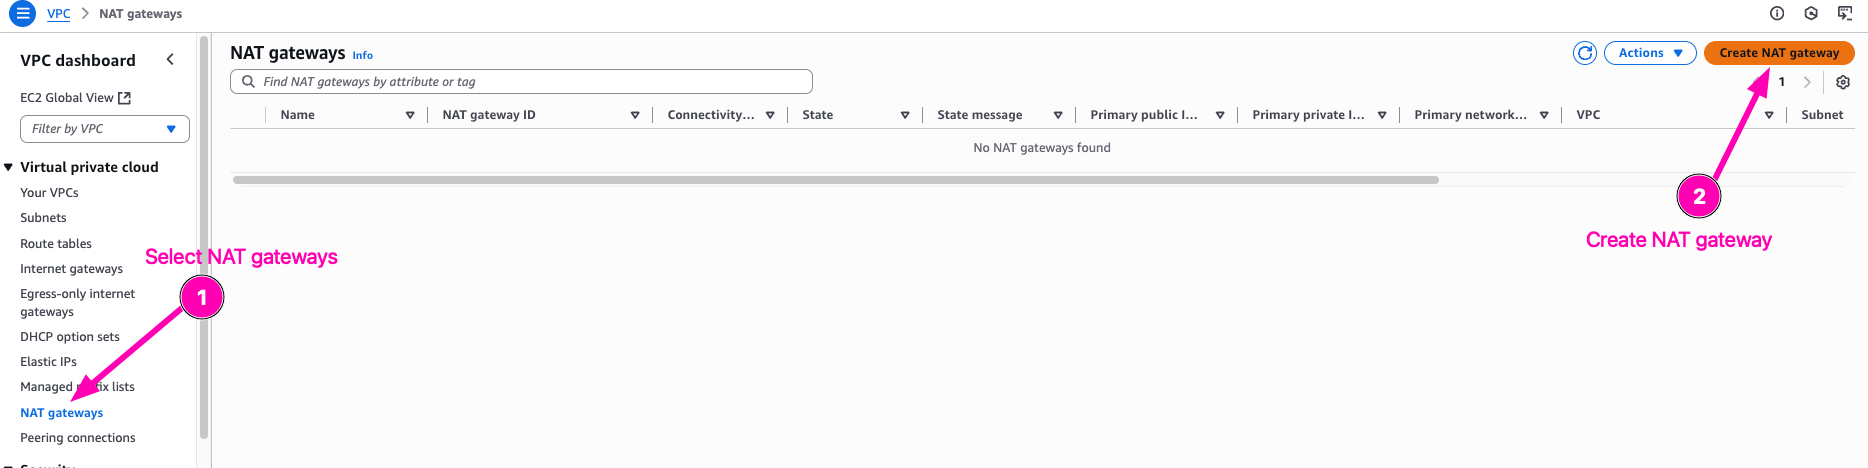
Configure public-subnet to use nat gateway
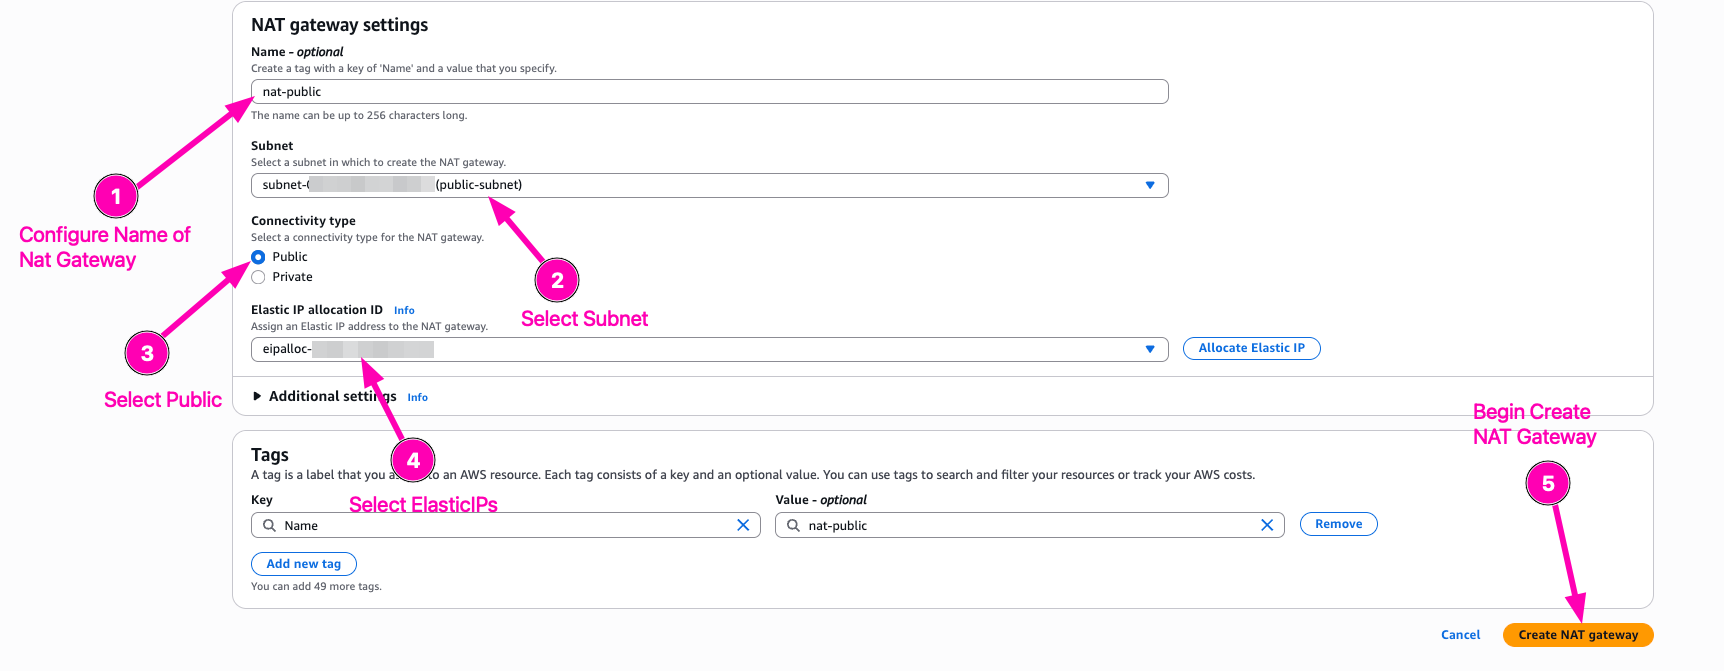
Result,

Edit route private subnets route table so that 0.0.0.0/0 point to Nat Gateway instead of IGW
Access to VPC > Route Tables > Your private-subnet/VPC Route ID
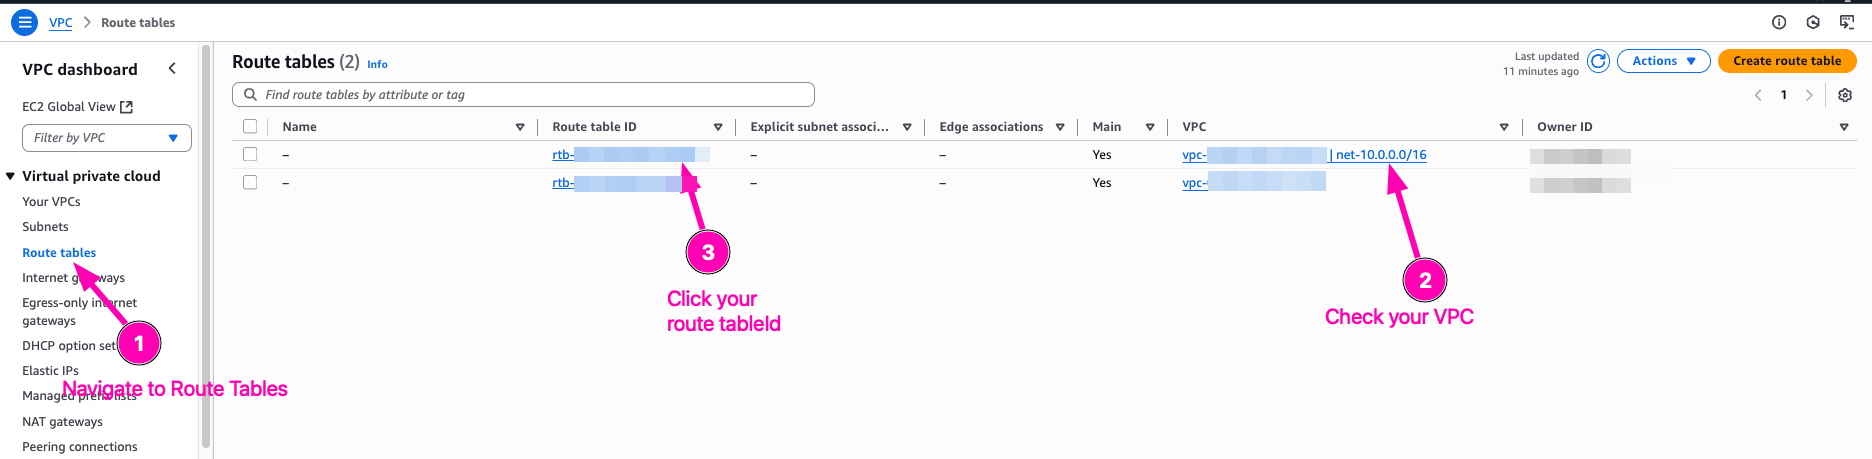
Edit Routes
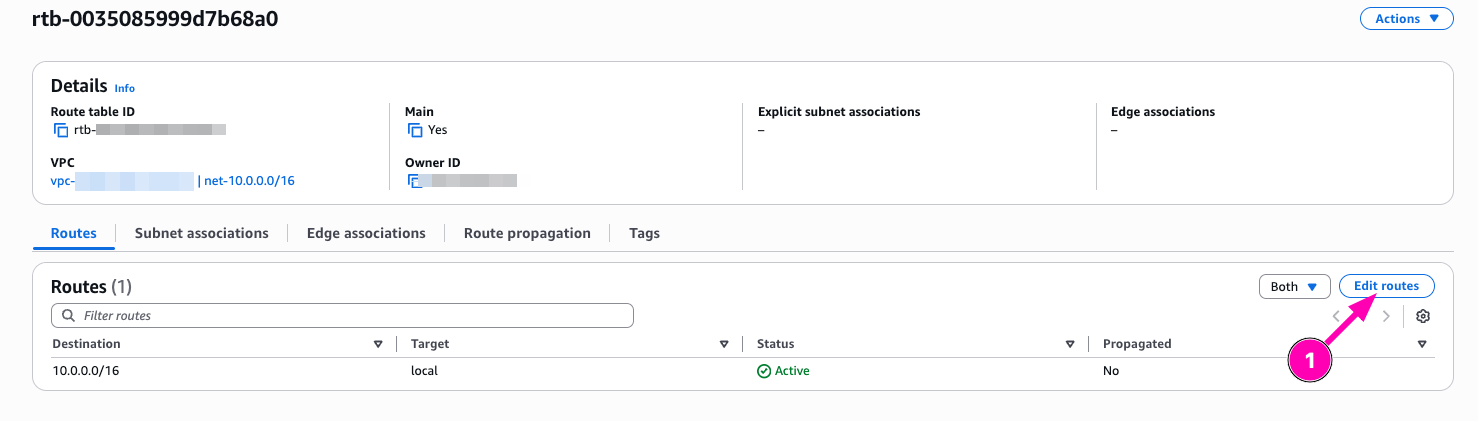
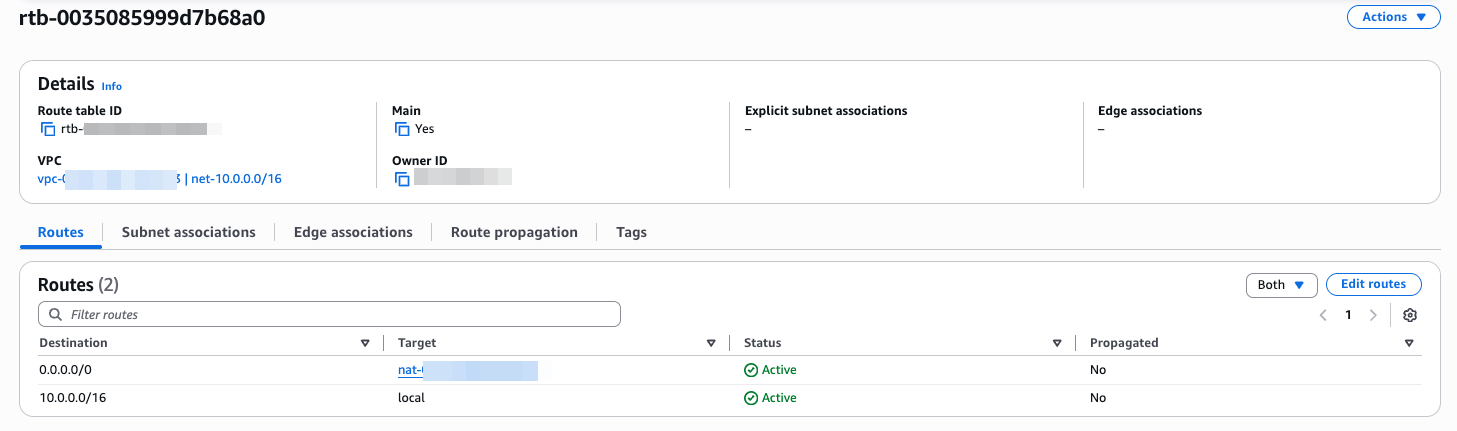
Add new route, select 0.0.0.0/0, configure target to Nat Gatway, than Save

Then result
Testing
Create EC2 Instance, first attach to public-subnet, and then another to private-subnet. One instance on public-subnet attach elastic_IP to access SSH. And instance with private_subnet don't attach Elastic IP. Only private network.
VM : pub-instance
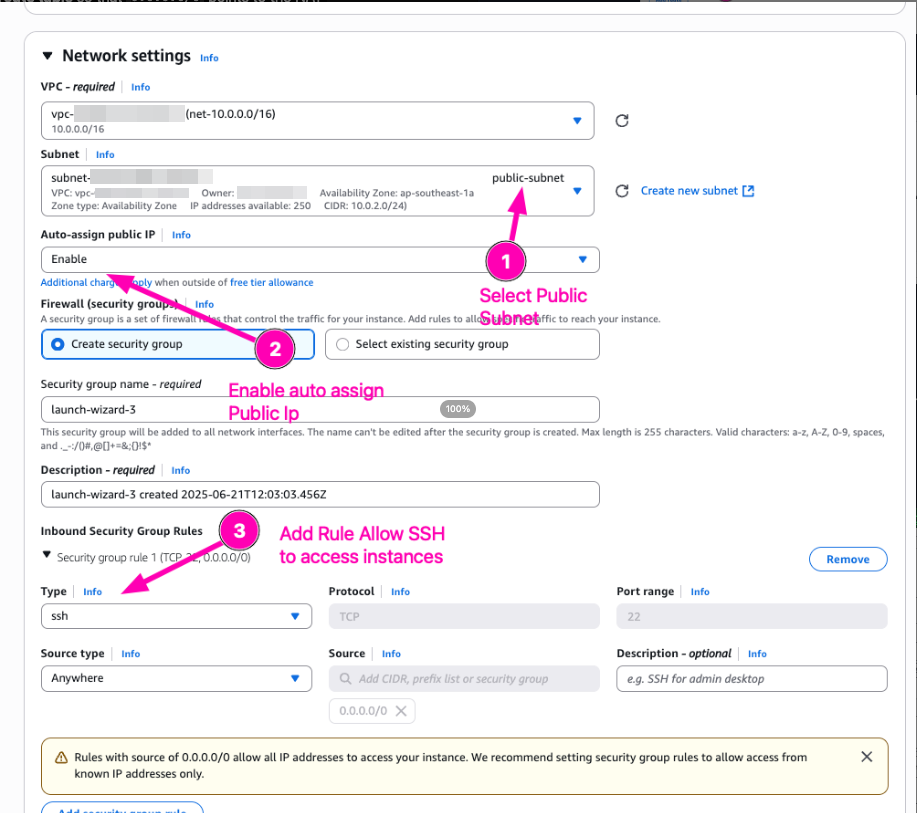
VM : private-instance
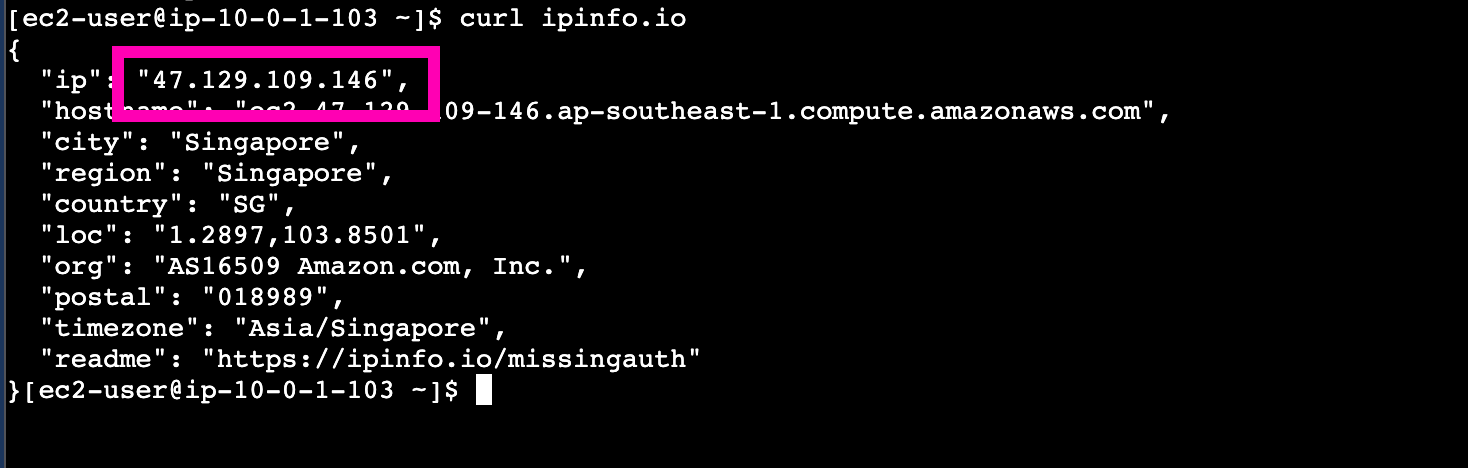
Access to pub-instance, testing curl to https://ifconfig.me

In public-instance we using ElasticIP from attached

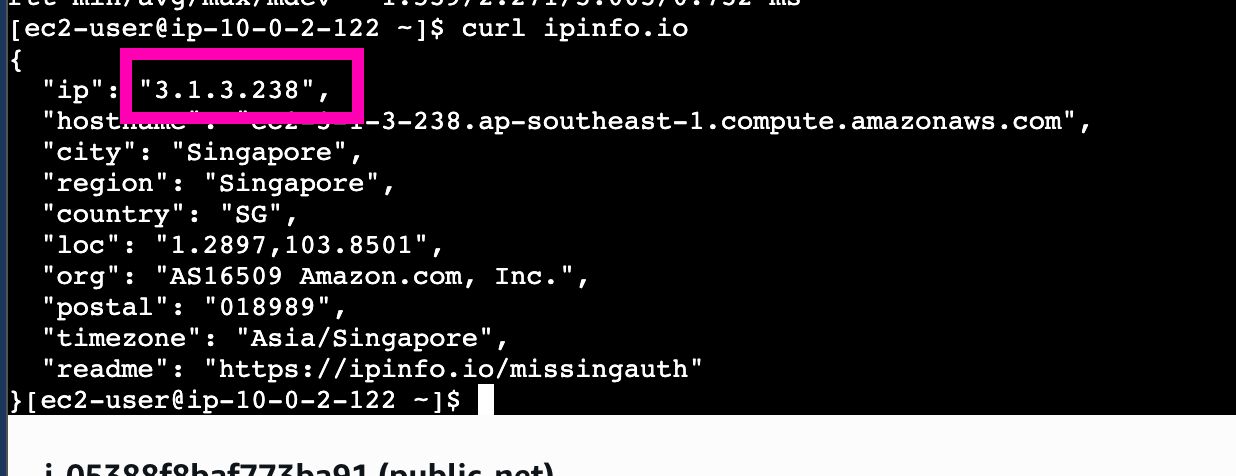
To access private-instance we have to access public_instance then ssh private-instance using private-ip.

In private-instance we get publicIp from natGateway


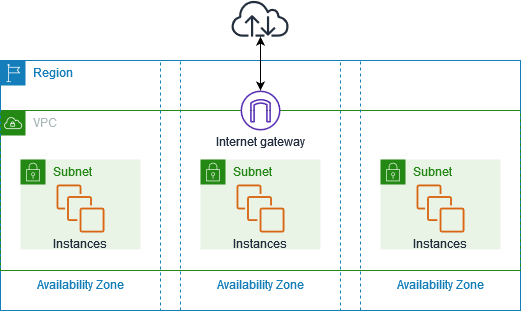
With amazon virtual private cloud (VPC), you can launch aws resources in logicaly. isolated virtual network
Reference :
Explanation :
- VPC : isolated private network, that closely resembles a traditional network that you'd operate in own data center.
- Subnet : After create
VPC, then we can set range of IP Address in your VPC. A subnet must reside in singleAvailibilty Zone. After youadd subnets, you can deploy AWS resources in VPC. - Internet Gateway : Gateway connect vpc to another network, for example if you want to connect all resources in VPC to internet, you nedd a
internet-gateway - Route Tables : Route table containts set of rules, called route. That are used to determine where network from your VPC is directed.
Daily Quest #1: AWS Free Tier Kickoff
Learn about basic VPC, subnet, IGW (Internet Gateway), SG (Security Group), and EC2 using AWS Free Tier. Because i don't have AWS account, i need to sign up After login to account, makesure to enable 2FA for security reason.
Reference :
- https://docs.aws.amazon.com/location/latest/developerguide/set-up.html
Setup IAM User
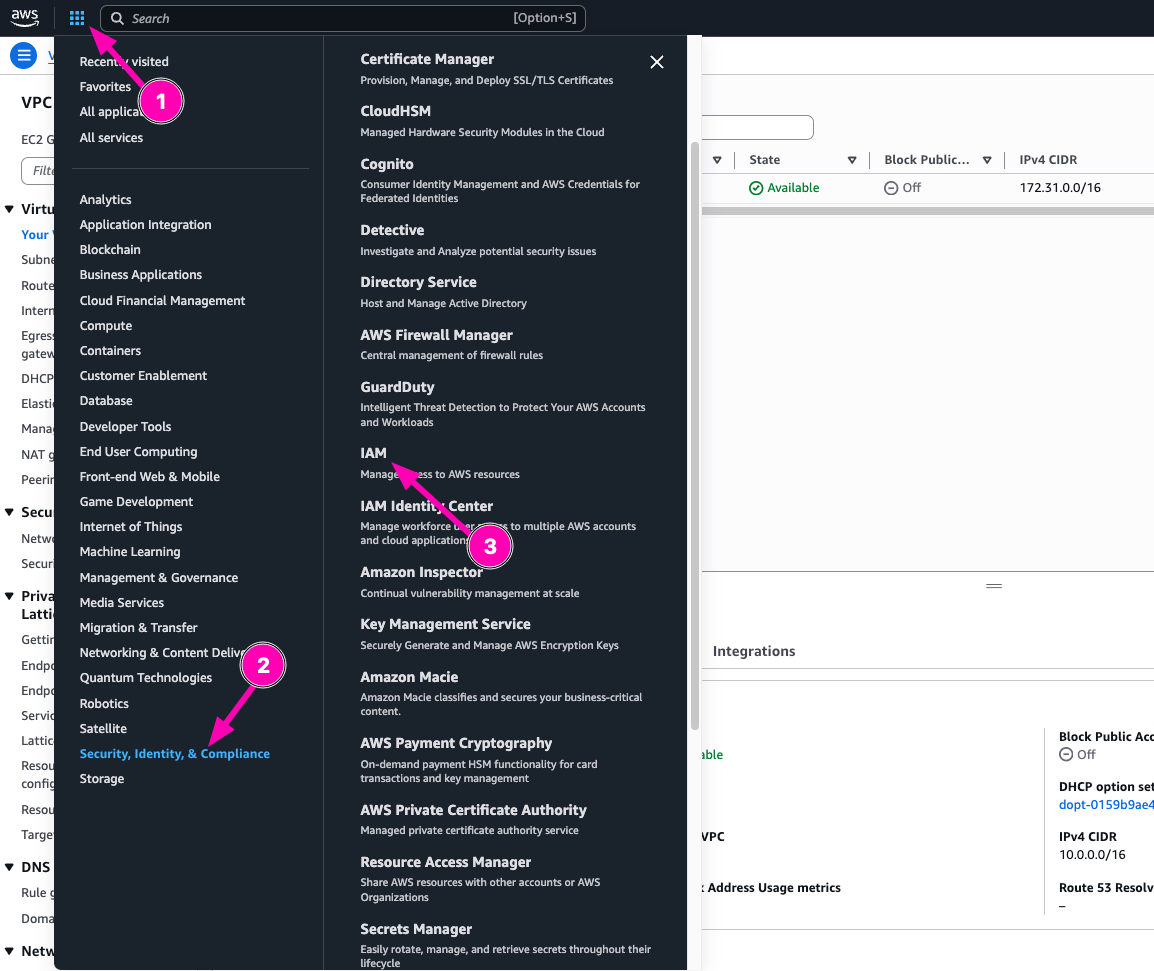
Instead login using root_user, AWS recomend to login using IAM user.I want to setup IAM user first, navigate to Menu > Security, Identitiy & Compliance > IAM
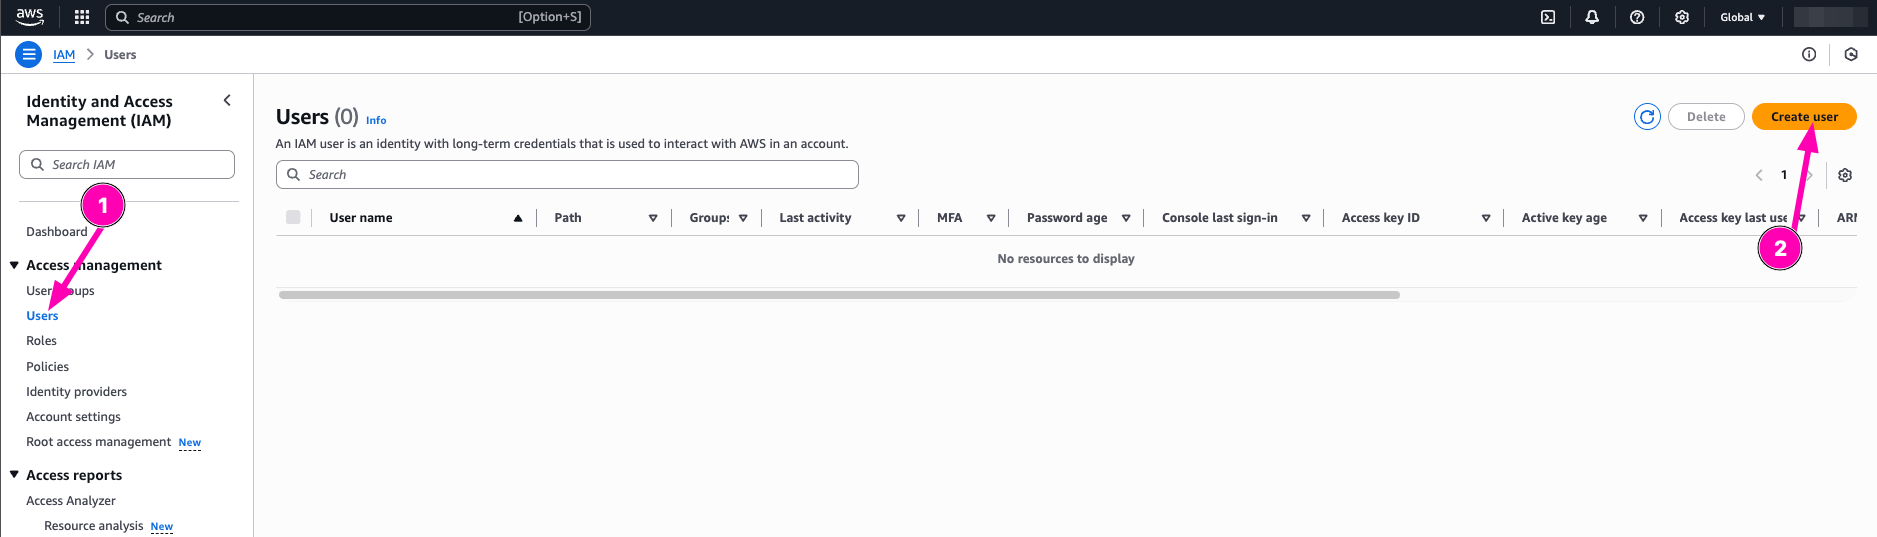
in IAM Dashboard, navigate to User > Create User
Then follow the step to create new IAM User. After all user details correct, click next
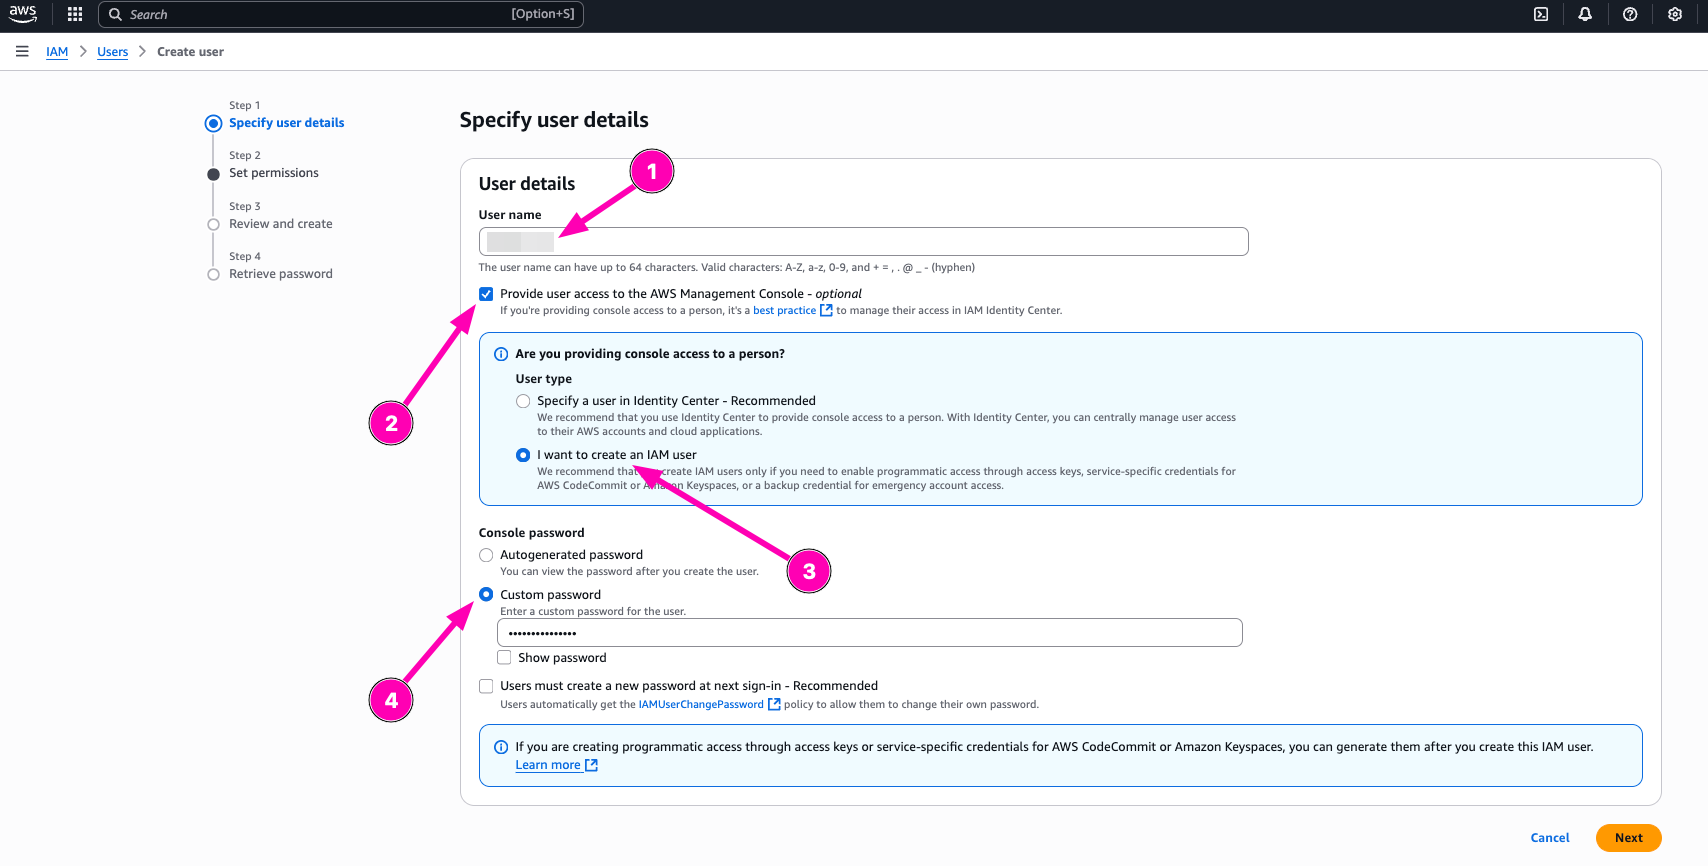
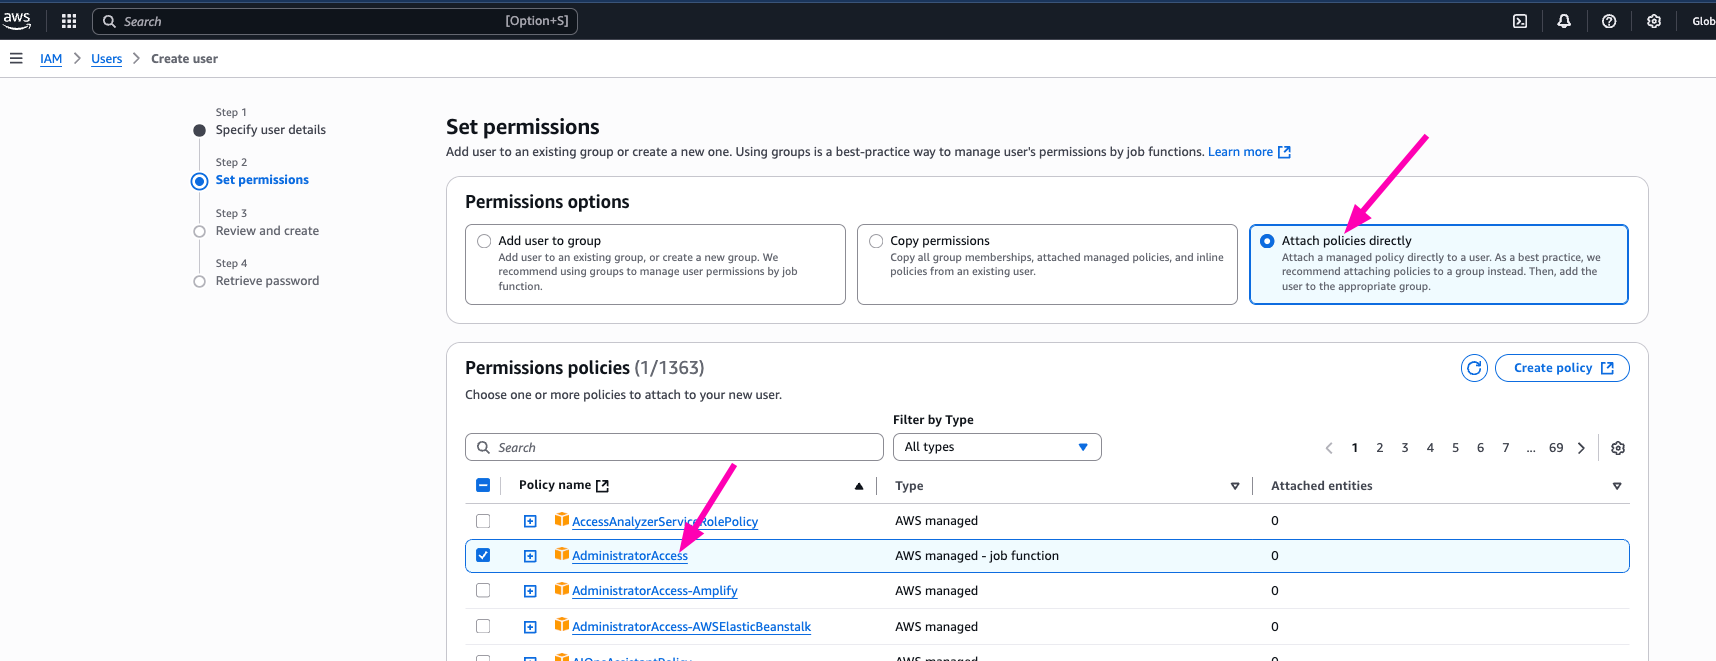
I think i don't need to create new group for my aws account, so i prefer to attach policy directly to AdministratorAccess
After creating new IAM user, next login makesure to login using IAM user.
AWS CLI
command line interface to manage all AWS Resources.
Reference :
- https://docs.aws.amazon.com/cli/latest/userguide/getting-started-install.html
Installing on macOs
curl "https://awscli.amazonaws.com/AWSCLIV2.pkg" -o "AWSCLIV2.pkg"
sudo installer -pkg AWSCLIV2.pkg -target /

# Setup auto complate
vim ~/.zshrc
---
# Endfile
autoload bashcompinit && bashcompinit
autoload -Uz compinit && compinit
complete -C '/usr/local/bin/aws_completer' aws
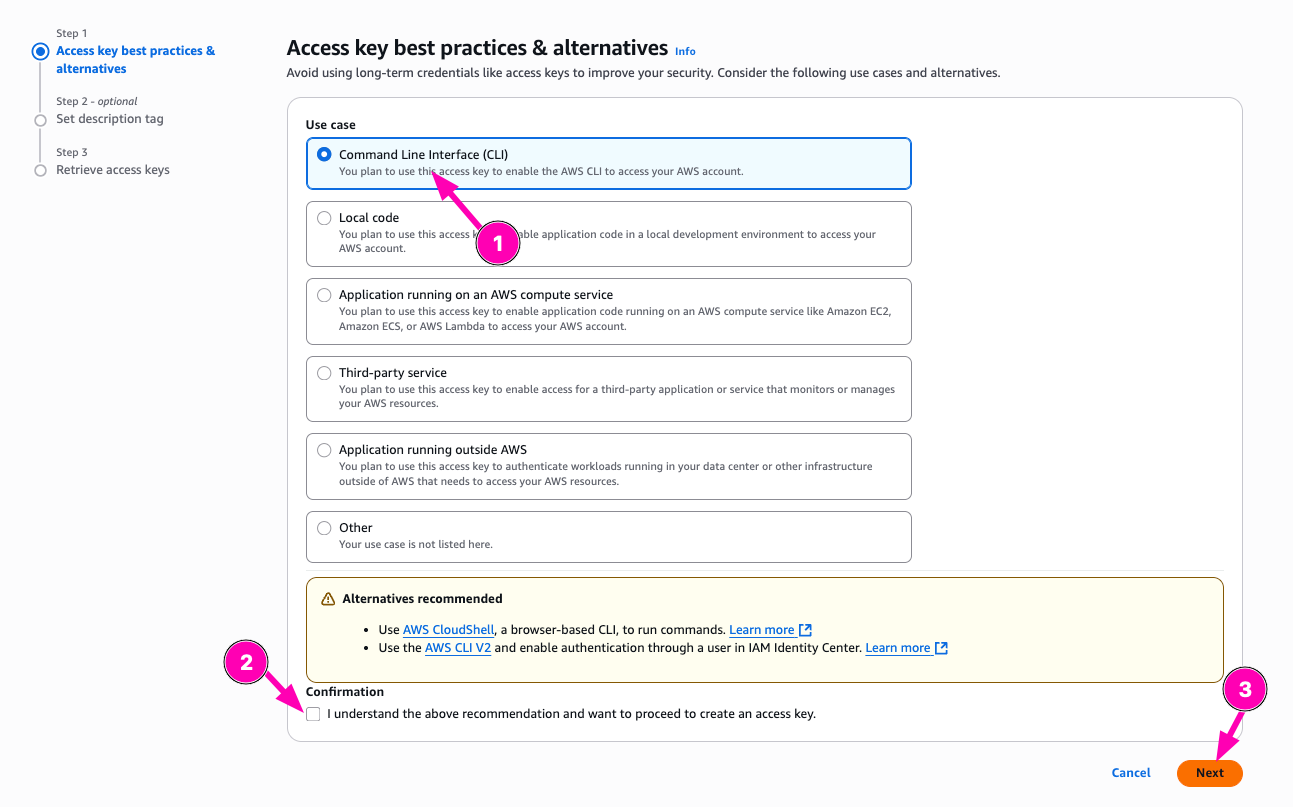
Next create access key. Navigate to IAM > Users

Then select your user, Security Credentials > Create Access Key

Then select Command Line Interface (CLI) and makesure you backup aws_access_key_id and aws_secret_access
To login, exec below in terminal
aws configure
You need to inputaws_access_key_idandaws_secret_accesspreviously you generate.
Setup VPC
So first i want to create testing virtual machine, but before we provisioning VM (EC2), we need to setup VPC.
- Create VPC with
10.0.0.0/16
VPC is your private network. It's isolated from anything network or internet
VPC_ID=$(aws ec2 create-vpc --cidr-block 10.0.0.0/16 --query 'Vpc.VpcId' --output text)

# check
echo $VPC_ID
Result, Navigate to VPC > Your VPCs

- Create public subnet
Subnet is your IP Address range can be used on EC2 Vm/Instances
SUBNET_ID=$(aws ec2 create-subnet --vpc-id $VPC_ID --cidr-block 10.0.1.0/24 --query 'Subnet.SubnetId' --output text)

# check
echo $SUBNET_ID
Result, VPC > Subnets

- Create & Attach Interent gateway
Attach internet gateway to makesure your vpc network can accessing internet
IGW_ID=$(aws ec2 create-internet-gateway --query 'InternetGateway.InternetGatewayId' --output text)

# Check
echo $IGW_ID

# Attach to VPC
aws ec2 attach-internet-gateway --vpc-id $VPC_ID --internet-gateway-id $IGW_ID
Result, VPC > Internet Gateways

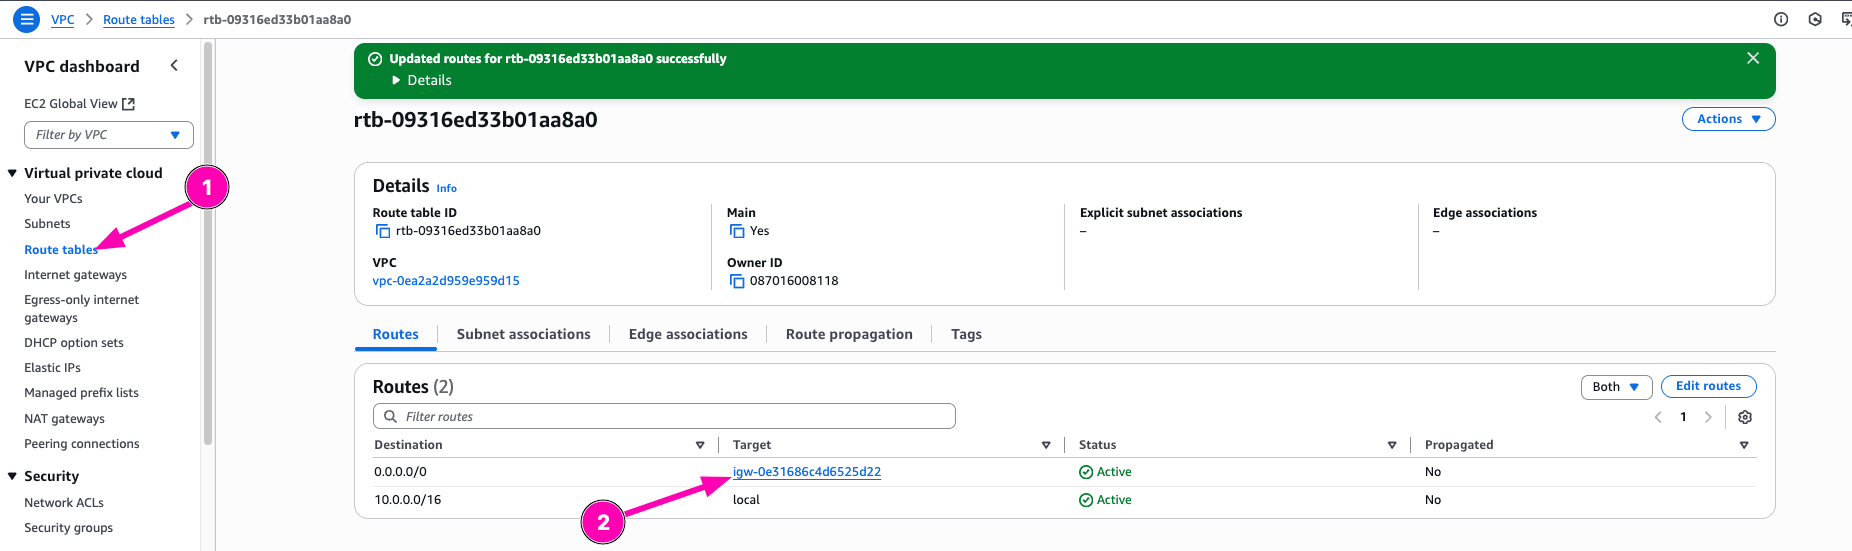
- Setup Route Table & Associate
Route table containts route, where network traffic from subnets/gateway directed
RTB_ID=$(aws ec2 create-route-table --vpc-id $VPC_ID --query 'RouteTable.RouteTableId' --output text)

#check
echo $RTB_ID

# next create route to internet, gateway using $IGW_ID
aws ec2 create-route --route-table-id $RTB_ID --destination-cidr-block 0.0.0.0/0 --gateway-id $IGW_ID

# next associate route table to subnet
aws ec2 associate-route-table --route-table-id $RTB_ID --subnet-id $SUBNET_ID
Check if route table to interet exists. VPC > Route Tables > Select $RTB_ID
Check if route table already associated to subnets VPC > Subnetes > Select $SUB_ID > Route Table
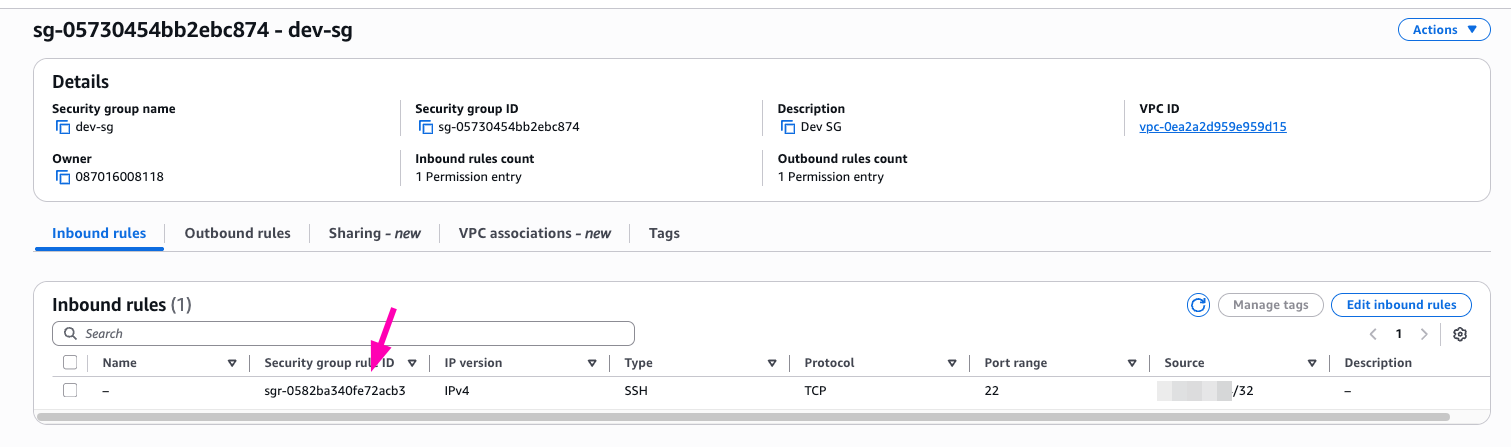
- Create Security group & Assign SSH Rule
A security group acts as a virtual firewall that controls the traffic for one or more instances.
SG_ID=$(aws ec2 create-security-group --group-name dev-sg --vpc-id $VPC_ID --query 'GroupId' --output text --description "Dev SG")

# check
$echo $SG_ID

# Assign security rule to allow ssh only from my public ip
aws ec2 authorize-security-group-ingress --group-id $SG_ID --protocol tcp --port 22 --cidr $(curl -s ifconfig.me)/32
Result,
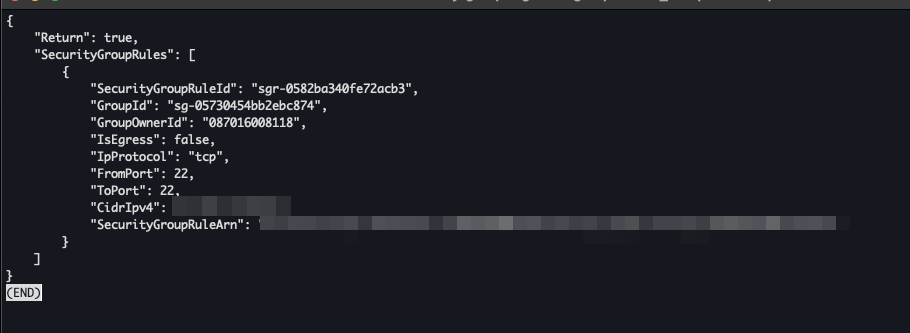
Check if security group created VPC > Security Groups

Check if security group rule created VPC > Security Groups > $SG_ID
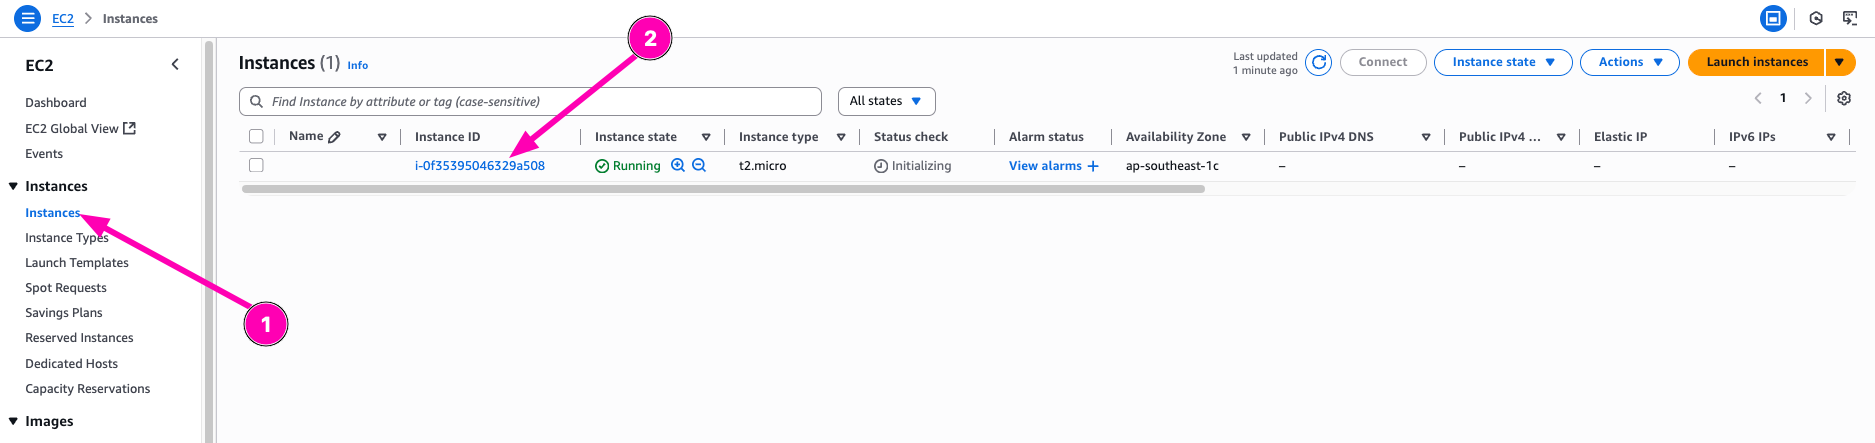
- Launch EC2 Instance
INSTANCE_ID=$(aws ec2 run-instances --image-id ami-02c7683e4ca3ebf58 --instance-type t2.micro --subnet-id $SUBNET_ID --associate-public-ip-address --security-group-ids $SG_ID --key-name nb-key --query 'Instances[0].InstanceId' --output text)

# check
echo $INSTANCE_ID

# Get Public IP
PUB_IP=$(aws ec2 describe-instances --instance-ids $INSTANCE_ID --query 'Reservations[0].Instances[0].PublicIpAddress' --output text)
Result, navigate to EC2 > Instances
Access instance
ssh -i ~/.ssh/<YourKeyPair>.pem ubuntu@$PUB_IP

Question
- Mengapa kita perlu subnet publik + IGW daripada langsung “internet-enabled”?
- Apa risiko membuka port 22 untuk publik dan bagaimana mitigasinya (hint: jump host)?
Answer
- Karena secara default, VPC dalam aws itu tidak dapat mengakses keluar. Jadi disini kita perlu membuat sebuah subnet yang diarahkan routingnya ke gateway
- Semua orang dapat mengakses, ini akan menjadikan kerentanan jika orang tidak bertanggung jawab bisa mengakses port SSH. Dan juga kadang SSH itu lawan di bruteforce

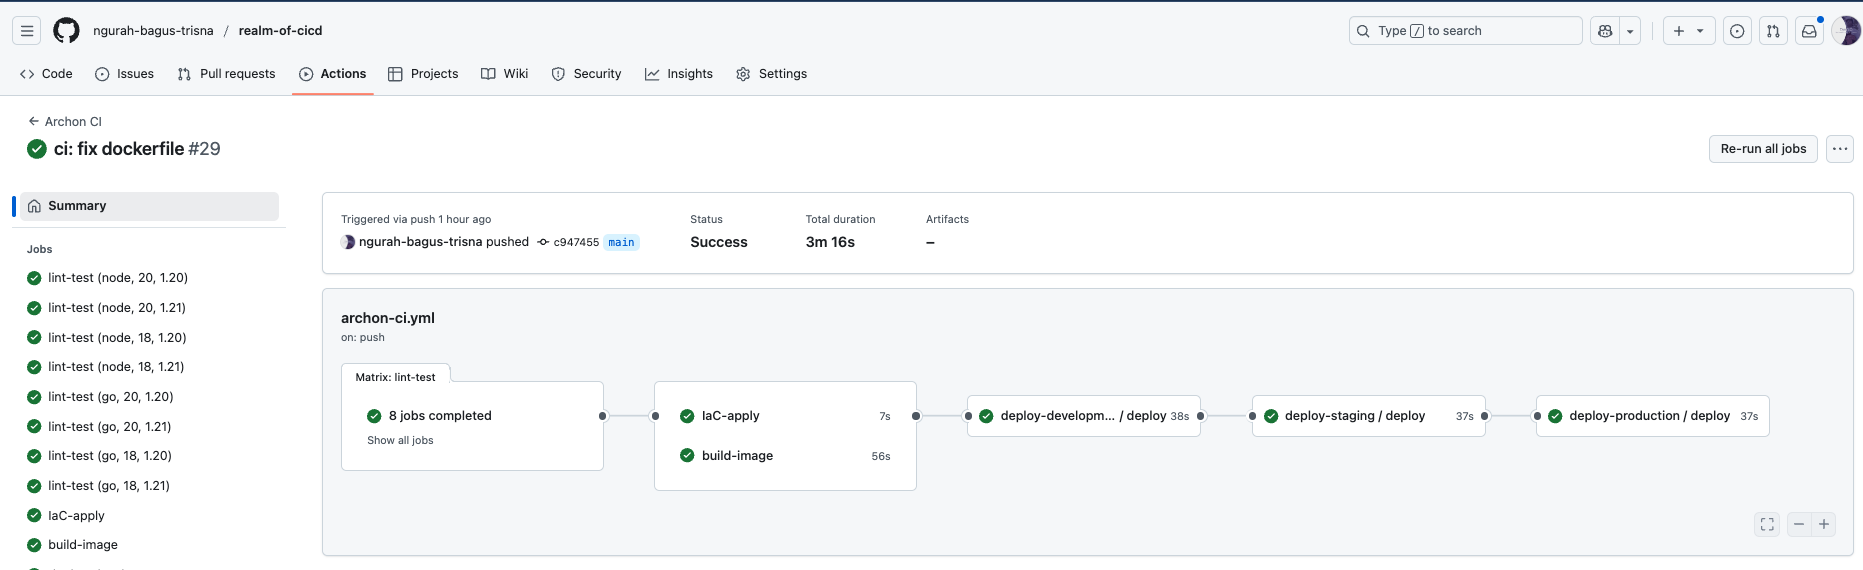
Create pipeline with lint & unit test, terraform, iaac testing (using terratest), Docker Build & Security Scan (Trivy), Deploy, Smoke Test & Metrics Scrape, Cleanup & Notification
Objective
- Lint & Unit Test for both Node.js & Go using a matrix strategy.
- Terraform Plan & Apply on
mainbranch (dev environment). - Infrastructure Testing with Terratest.
- Docker Build & Security Scan (Trivy).
- Deploy to Staging (auto) then Production (manual approvals).
- Smoke Tests & Metrics Scrape (Prometheus).
- Cleanup & Notification.
Action!
Repository : https://github.com/ngurah-bagus-trisna/realm-of-cicd
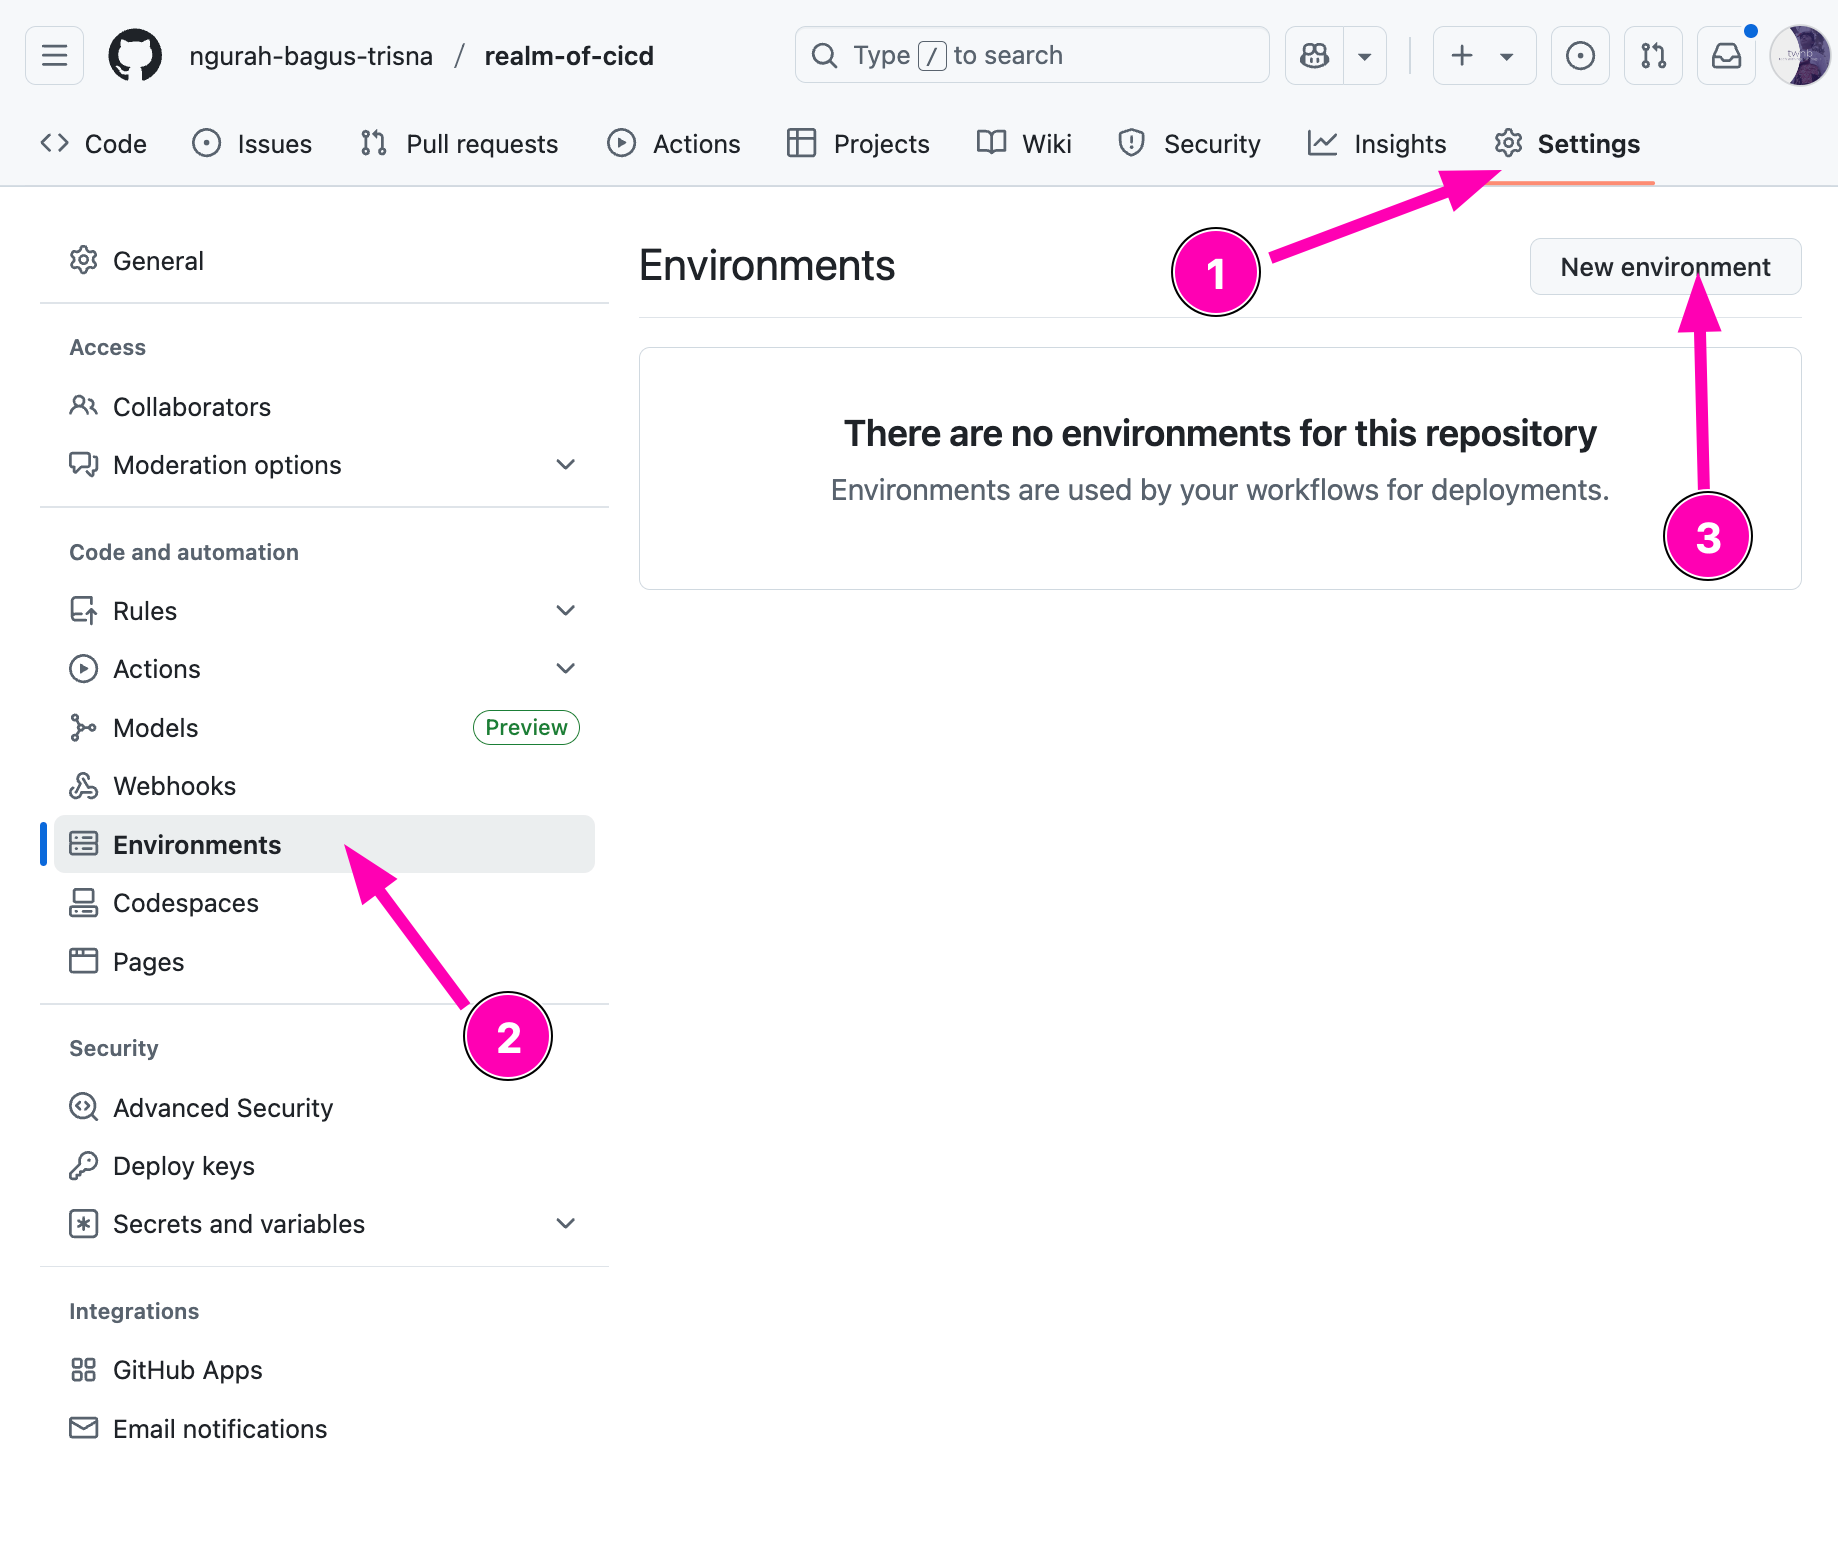
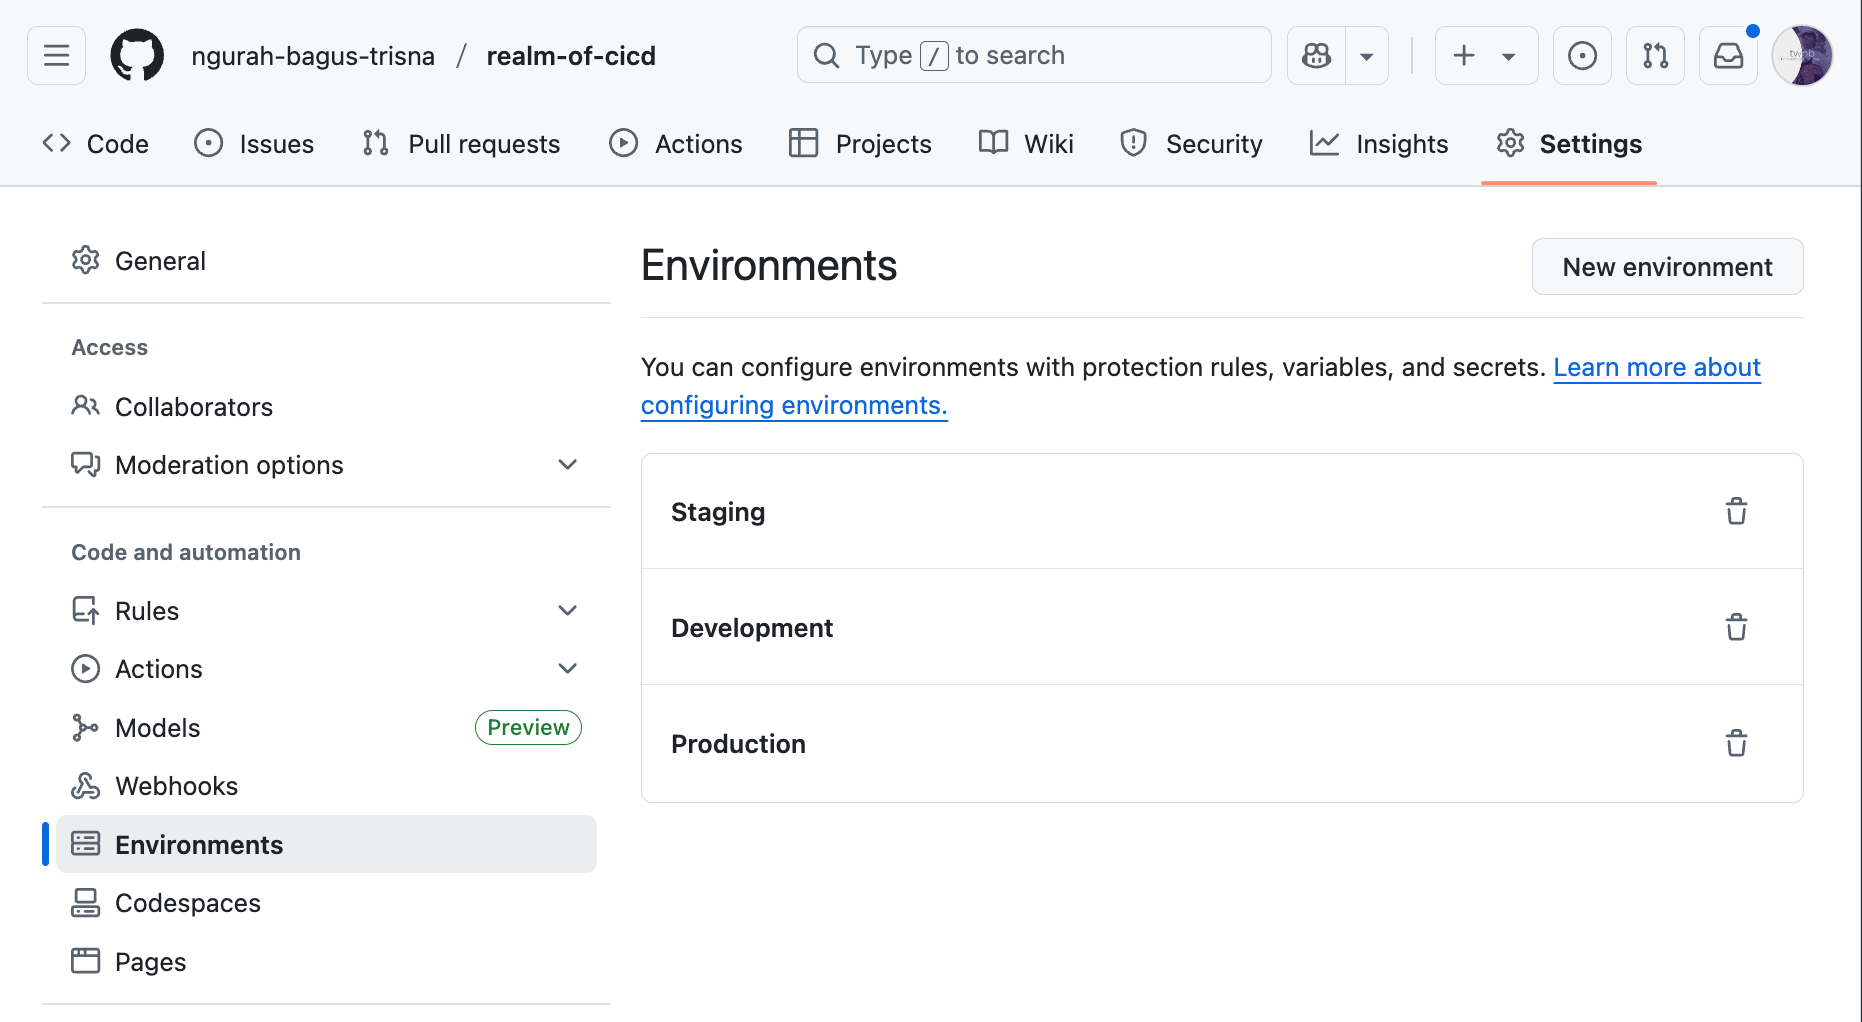
- Define three environments in repo Settings: dev, staging, production (Add required reviewers in production)
Create new repository first called realm-of-cicd, after that creating new environment by accesing Settings > Environment > New Environmet
Result
- Setup linter for
nodejs-apps
Reference :
- https://medium.com/opportunities-in-the-world-of-tech/how-i-set-up-ci-cd-for-a-node-js-app-with-eslint-jest-and-docker-hub-7d3cacf7add8
npm init -y
npm install express

npm install --save-dev jest supertest
npx eslint --init
Create basic helloWorld node-js apps using express js.
const express = require('express')
const app = express()

app.get('/', (req, res) => {
  res.send('Hello World!')
})

module.exports = app;
const app = require('./index');
const port = 8080;

app.listen(port, () => {
  console.log(`Example app listening on port ${port}`);
});
Create test unit using jest
const request = require('supertest');
const app = require('../');

describe('GET /', () => {
  it('responds with hello message', async () => {
    const res = await request(app).get('/');
    expect(res.statusCode).toEqual(200);
    expect(res.text).toContain(`Hello World!`);
  });
});
Configure eslint.config.mjs for lint jest
import js from "@eslint/js";
import globals from "globals";
import { defineConfig } from "eslint/config";


export default defineConfig([
  {
    files: ["**/*.{js,mjs,cjs}"],
    plugins: { js },
    extends: ["js/recommended"]
  },
  {
    files: ["**/*.{js,mjs,cjs}"],
    languageOptions: {
      globals: globals.node
    }
  },
  {
    files: ["**/*.test.{js,mjs,cjs}"],
    languageOptions: {
      globals: globals.jest
    }
  }
]);
Configure package.json, add script for lint,test and dev
  "scripts": {
    "lint": "npx eslint .",
    "test": "jest",
    "dev": "node server.js"
  },
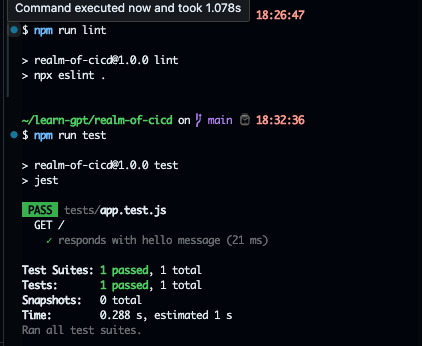
Try to run first in terminal, makesure all passed.
- In quest, need to plan
main.tfto createhello.txt.
Create main.tf
terraform {
  required_providers {
    local = {
      source  = "hashicorp/local"
      version = "~> 2.0"
    }
  }

  required_version = ">= 1.0"
}

provider "local" {
  # No configuration needed for local provider

}

resource "local_file" "hello_world" {
  content  = "Hello, OpenTofu!"
  filename = "${path.module}/test/hello.txt"

}
It will create a text file with the content Hello, Opentofu!Create terratest to makesure terraform can apply main.tf
package test
import (
"testing"
"github.com/gruntwork-io/terratest/modules/terraform"
"github.com/stretchr/testify/assert"
"os"
)
func TestHelloFile(t *testing.T) {
// retryable errors in terraform testing.
terraformOptions := terraform.WithDefaultRetryableErrors(t, &terraform.Options{
TerraformDir: "../",
})
defer terraform.Destroy(t, terraformOptions)
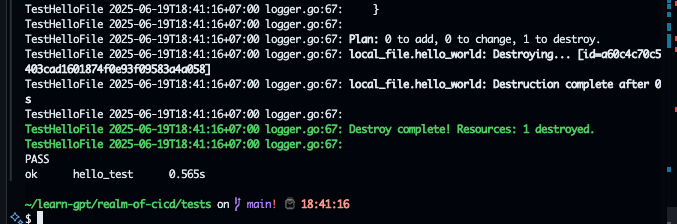
terraform.InitAndApply(t, terraformOptions)
content, err := os.ReadFile("hello.txt")
assert.NoError(t, err)
assert.Contains(t, string(content), "Hello, OpenTofu!")
}
It will apply main.tf, and destroy after the check finishedInit go modules & install modules
go mod init helo_test
go mod tidy

go test
- Create github workflows
.github/workflows/archon-ci.yml
name: Archon CI
on:
  push:
    branches: [main]
jobs:
  lint-test:
    strategy:
      matrix:
        language: [node, go]
        node-version: [20, 18]
        go-version: ["1.20", "1.21"]
    runs-on: ubuntu-latest
    steps:
      - name: Checkout repository
        uses: actions/checkout@v4

      - name: Setup Node.js
        if: matrix.language == 'node'
        uses: actions/setup-node@v2
        with:
          node-version: ${{ matrix.node-version }}

      - name: Run lint and unit tests on nodejs
        if: matrix.language == 'node'
        run: |
          npm install
          npm run lint
          npm run test

  IaC-apply:
    needs: lint-test
    runs-on: ubuntu-latest
    steps:
      - name: Checkout repository
        uses: actions/checkout@v4

      - name: Setup Terraform
        uses: hashicorp/setup-terraform@v3
        with:
          terraform_version: 1.7.1

      - name: Configure terraform plugin cache
        run: |
          echo "TF_PLUGIN_CACHE_DIR=$HOME/.terraform.d/plugin-cache" >>"$GITHUB_ENV"
          mkdir -p $HOME/.terraform.d/plugin-cache

      - name: Caching terraform providers
        uses: actions/cache@v4
        with:
          key: terraform-${{ runner.os }}-${{ hashFiles('**/.terraform.lock.hcl') }}
          path: |
            $HOME/.terraform.d/plugin-cache
          restore-keys: |
            terraform-${{ runner.os }}-

      - name: Apply terraform
        run: |
          terraform init
          terraform apply -auto-approve

      - name: Export to artifact
        uses: actions/upload-artifact@v4
        with:
          name: Output files
          path: |
            tests/hello.txt

  build-image:
    needs: lint-test
    runs-on: ubuntu-latest
    steps:
      - name: Checkout repository
        uses: actions/checkout@v4

      - name: Setup Docker Buildx
        uses: docker/setup-buildx-action@v3

      - name: Login to Docker Hub
        uses: docker/login-action@v2
        with:
          username: ${{ secrets.DOCKER_USERNAME }}
          password: ${{ secrets.DOCKER_PASSWORD }}

      - name: Build docker image with layer cache
        uses: docker/build-push-action@v4
        with:
          context: .
          push: true
          tags: ${{ secrets.DOCKER_USERNAME }}/archon-image:latest
          cache-from: type=gha
          cache-to: type=gha,mode=max

      - name: Pull image
        run: |
          docker pull ${{ secrets.DOCKER_USERNAME }}/archon-image:latest

      - name: Scan docker image
        uses: aquasecurity/[email protected]
        with:
          image-ref: ${{ secrets.DOCKER_USERNAME }}/archon-image:latest
          format: 'table'
          severity: CRITICAL,HIGH
          ignore-unfixed: true
          exit-code: 1

      - name: Push docker image sha
        run: |
          # Add your docker push commands here, e.g.:
          docker tag ${{ secrets.DOCKER_USERNAME }}/archon-image:latest ${{ secrets.DOCKER_USERNAME }}/archon-image:${{ github.sha }}
          docker push ${{ secrets.DOCKER_USERNAME }}/archon-image:${{ github.sha }}

  deploy-development:
    needs: [build-image, IaC-apply]
    uses: ./.github/workflows/deploy.yaml
    with:
      environment: Development

  deploy-staging:
    needs: [deploy-development]
    uses: ./.github/workflows/deploy.yaml
    with:
      environment: Staging

  deploy-production:
    needs: [deploy-staging]
    uses: ./.github/workflows/deploy.yaml
    with:
      environment: Production
Explanation : This workflow automates linting, testing, infrastructure deployment, Docker image building, and multi-environment deployments using a matrix strategy and job dependencies.
Next create reusable workflow deploy.yml
name: Deploy Workflow
on:
  workflow_call:
    inputs:
      environment:
        description: 'The environment to deploy to'
        required: true
        type: string
jobs:
  deploy:
    runs-on: ubuntu-latest
    environment: ${{ inputs.environment }}
    steps:
    - name: Checkout repository
      uses: actions/checkout@v4

    - name: Deploy to ${{ inputs.environment }}
      run: |
        echo "Deploy to ${{ inputs.environment }}"
        docker run -d --name archon-${{ inputs.environment}} -p 8080:8080 ngurahbagustrisna/archon-image:latest

    - name: Wait for service to be ready
      run: |
        echo "Waiting for service to be ready"
        sleep 20  # Adjust the sleep time as necessary

    - name: Testing to hit using smoke tests on environment ${{ inputs.environment }}
      run: |
        echo "Running smoke tests"
        # Add your smoke test commands here, e.g.:
        chmod +x ./tests/smoke_test
        bash ./tests/smoke_test
        echo "Finished deploy to ${{ inputs.environment }}"
        docker rm -f archon-${{ inputs.environment}} || true
Push to github repository, and makesure all job passed.

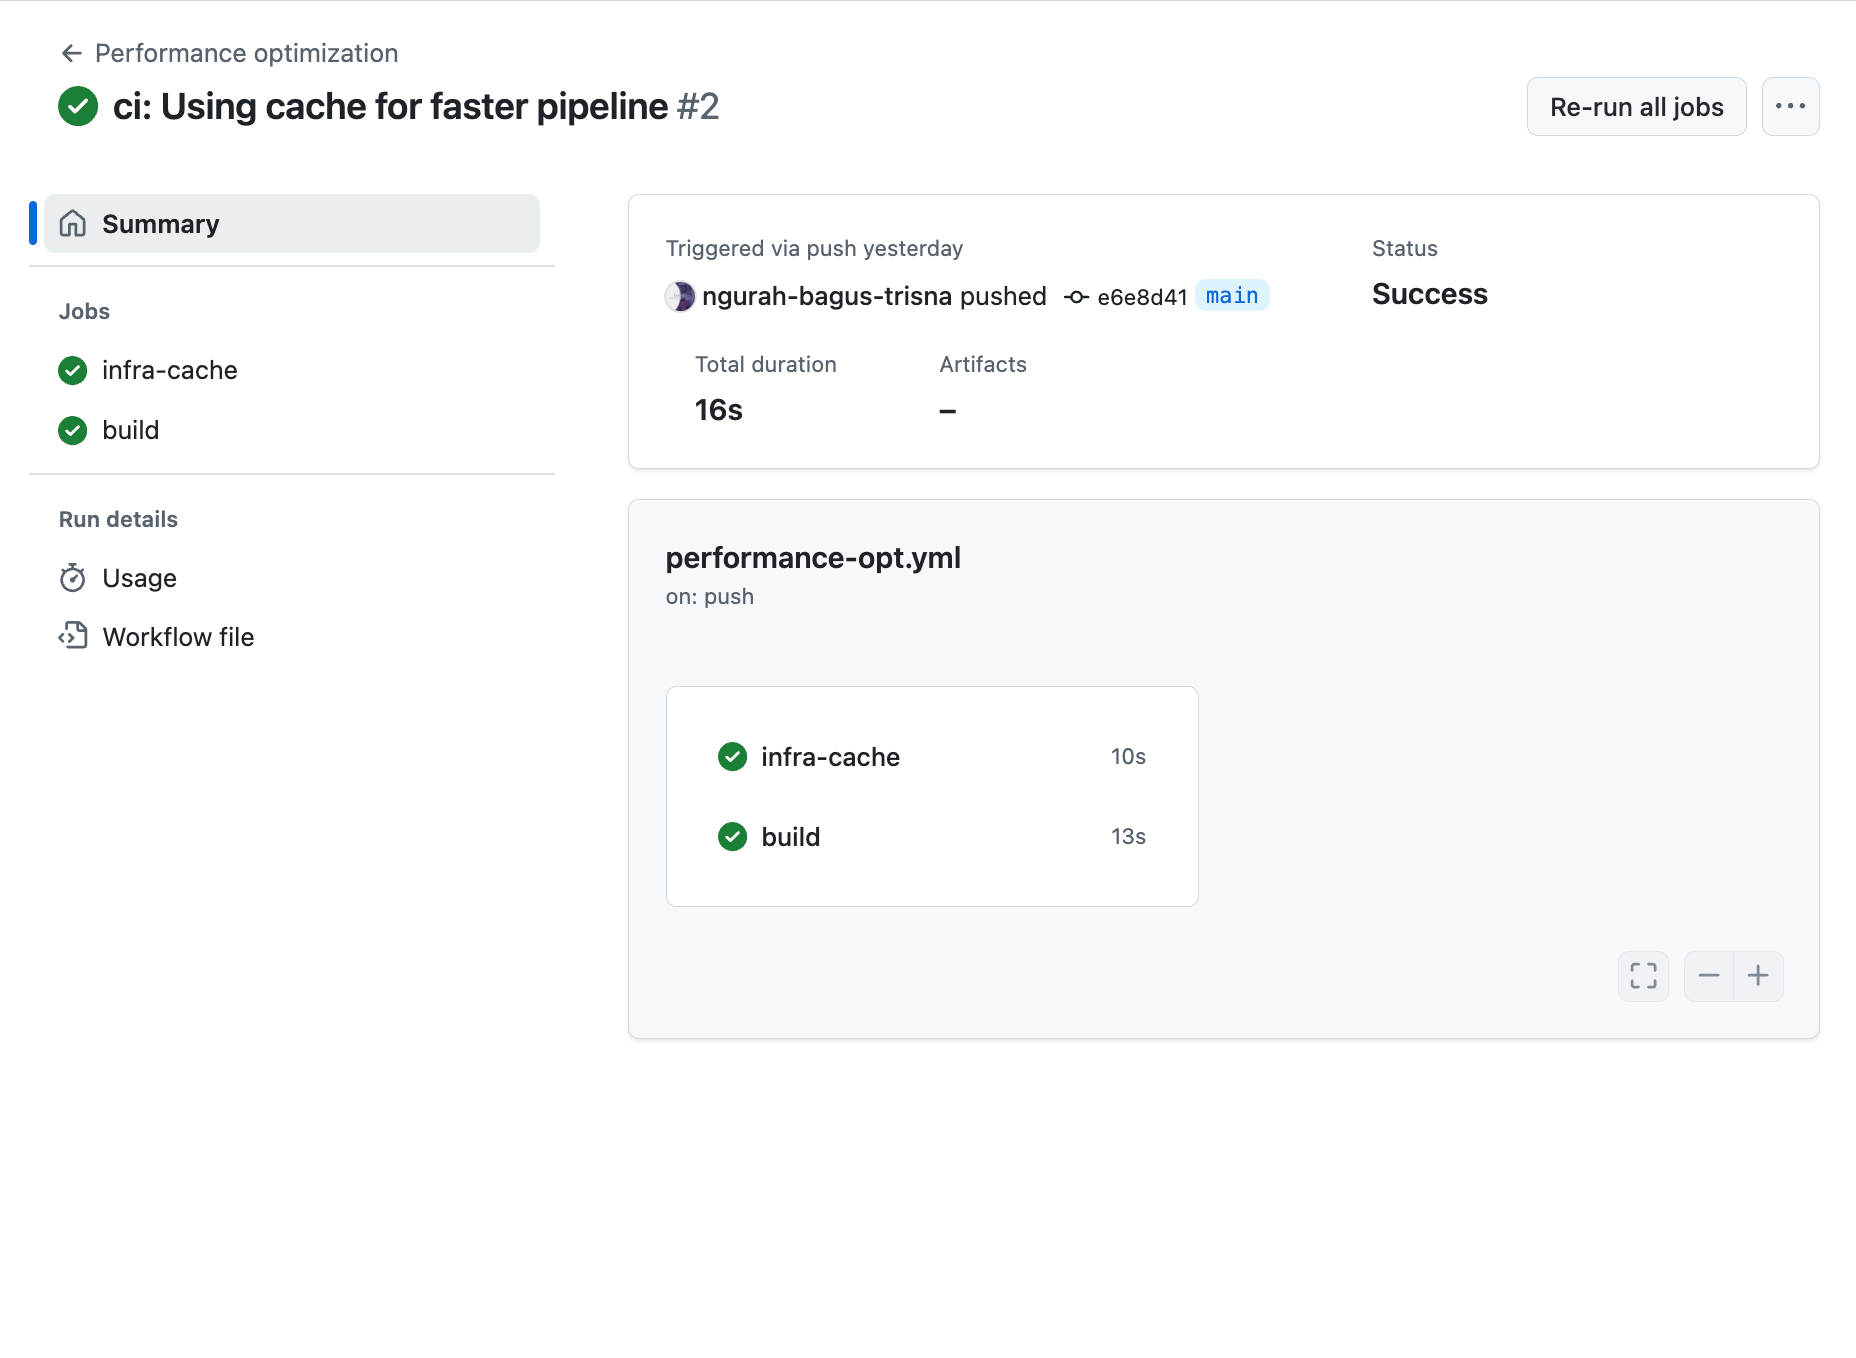
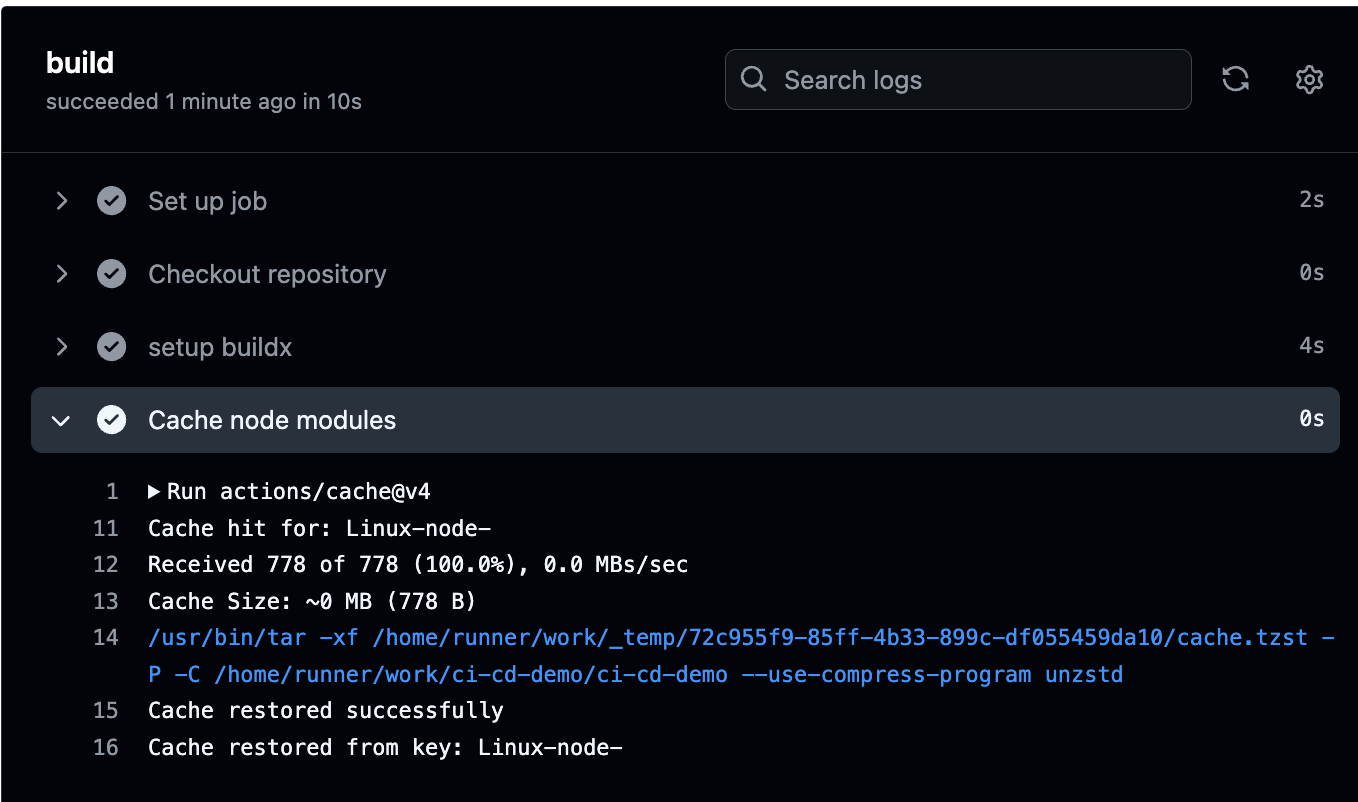
Performance optimization in ci/cd pipeline focus on faster build & test for example using feature like caching, and pararel jobs
Reference :
- https://docs.github.com/en/actions/writing-workflows/choosing-what-your-workflow-does/caching-dependencies-to-speed-up-workflows
- https://github.com/docker/build-push-action
Real world usecase : Instead to runingterraform initto re-download all provider, we can usingcachingin.terraform/plugins. An theninitonly check if update available.
Skenario : Using caching for terraform providers, node modules, docker layers and build pararel jobs in github actions for faster pipeline
- Create new workflow
.github/workflows/performance-opt.yml
name: Performance optimization
on:
  push:
    branches:
    - main
jobs:
  infra-cache:
    runs-on: ubuntu-latest
    steps:
    - name: Checkout repository
      uses: actions/checkout@v3

    - name: Cache terraform providers
      uses: actions/cache@v4
      with:
        path: .terrafrom/plugins
        key: ${{ runner.os }}-terraform-${{ hashFiles('**/*.tf') }}
        restore-keys: |
          ${{ runner.os }}-terraform-

    - name: Setup terraform
      uses: hashicorp/setup-terraform@v3
      with:
        terraform_version: 1.7.2

    - name: Terraform init & Apply
      run: |
        terraform init
        terraform plan -out=tfplan.out

  build:
    runs-on: ubuntu-latest
    steps:
    - name: Checkout repository
      uses: actions/checkout@v3

    - name: setup buildx
      uses: docker/setup-buildx-action@v3

    - name: Cache node modules
      uses: actions/cache@v4
      with:
        path: ~/.npm
        key: ${{ runner.os }}-node-${{ hashFiles('**/package-lock.json') }}
        restore-keys: |
          ${{ runner.os }}-node-
    - name: Build docker image with layer cache
      uses: docker/build-push-action@v4
      with:
        context: .
        file: Dockerfile
        push: false
        cache-from: type=gha
        cache-to: type=gha,mode=max
        tags: ci-cd-demo:latest
- Result running
Question :
- Bagaimana caching folder
.terraform/pluginsmempercepatterraform init? - Jelaskan cara kerja opsi
cache-fromdancache-todidocker/build-push-action.
Answer :
- Dalam terraform init diperlukan caching agar tidak perlu mendownload depedency kembali ketika menjalankan terraform init. Ini akan mempersingkat waktu berjalanya workflow serta menghemat bandwith unduhan
cache-frommerupakan spesifik tempat dimana cache sebelumnya ditaruh. Dan cache-to adalah tempat dimana export build terbaru cache layer dimana mengizinkan untuk build dan menggunakan kembali cache tersebut.

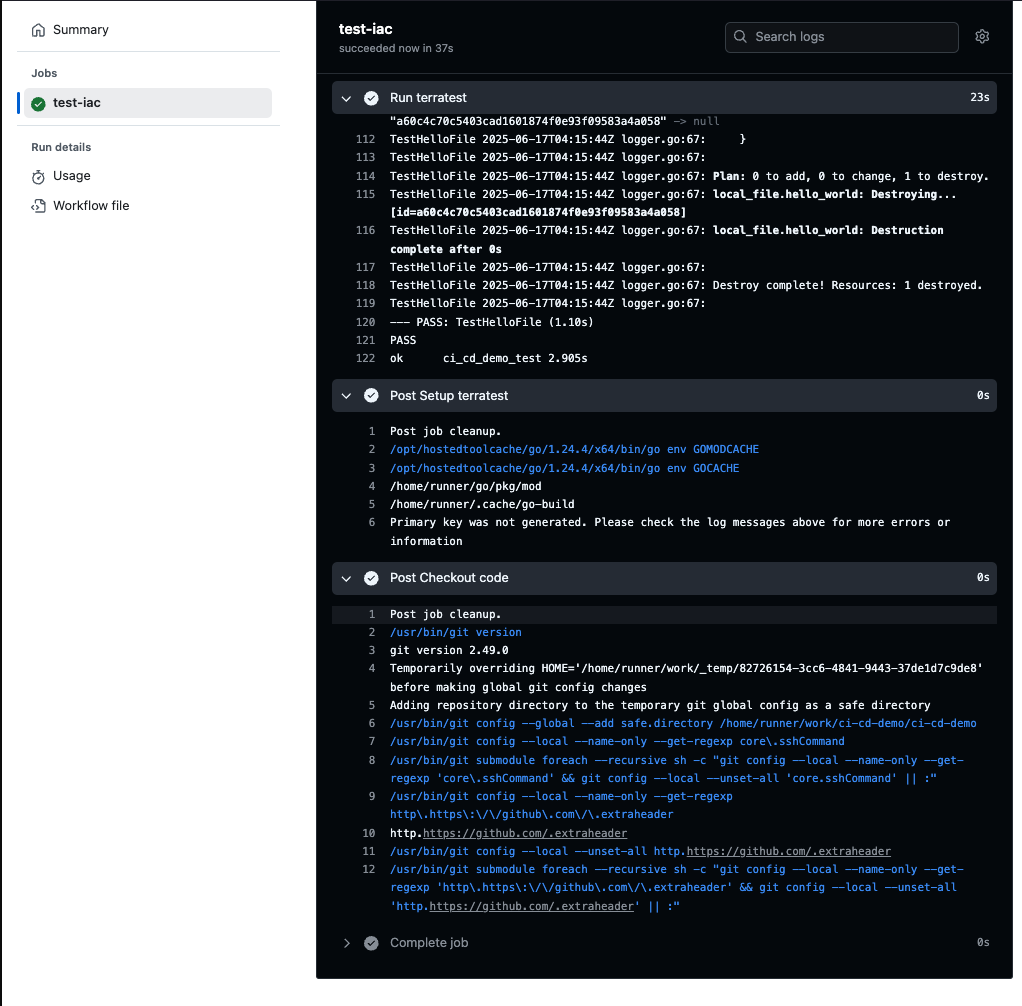
Infrasturtucre testing in ci/cd makesure to running smoothly provisioning using terraform work realy well as expected. Reference :
- https://terratest.gruntwork.io/
- https://github.com/hashicorp/setup-terraform
With terratest or kitchen-terraform you can write automate test with :
terraform init&applyin temporarry workspace- Verify resource exsist and right configuration
- Cleanup
destroyafter test complated
Realworld Usecase : You have terraform module to create bucket in s3 storage. Terratest will apply that module, check that bucket created, and destroy resources.
Skenario : Integrate terratest to github actions for validate live infrasturcture post-apply and pre-merge
makesure installing go first
- Create directory
test/and install go module ondtest/
mdkir test && cd test
go mod init ci_cd_demo_test
got get github.com/gruntwork-io/terratest/modules/terraform
Create text/terraform_hello_test.go
package test

import (
	"testing"

	"github.com/gruntwork-io/terratest/modules/terraform"
	"github.com/stretchr/testify/assert"
	"io/ioutil"
)

func TestHelloFile(t *testing.T) {
	// retryable errors in terraform testing.
	terraformOptions := terraform.WithDefaultRetryableErrors(t, &terraform.Options{
		TerraformDir: "../",
	})

	defer terraform.Destroy(t, terraformOptions)

	terraform.InitAndApply(t, terraformOptions)

	content, err := ioutil.ReadFile("hello.txt")
	assert.NoError(t, err)
	assert.Contains(t, string(content), "Hello, OpenTofu!")
}
Create main.tf
terraform {
  required_providers {
    local = {
      source  = "hashicorp/local"
      version = "~> 2.0"
    }
  }

  required_version = ">= 1.0"
}

provider "local" {
  # No configuration needed for local provider

}

resource "local_file" "hello_world" {
  content  = "Hello, OpenTofu!"
  filename = "${path.module}/test/hello.txt"

}
Create workflow files .github/workflows/infra-test.yml
name: Infrastructure as Code (IaC) testing
on:
  push:
jobs:
  test-iac:
    runs-on: ubuntu-latest
    steps:
      - name: Checkout code
        uses: actions/checkout@v2

      - name: Setup terraform
        uses: hashicorp/setup-terraform@v3
        with:
          terraform_version: 1.7.3

      - name: Setup terratest
        uses: actions/setup-go@v5
        with:
          go-version: '1.24'

      - name: Run terratest
        working-directory: test
        run: |
          go test -v
- Push & test passed
Answer :
- Instead using
teraform plan/validateusing terratest we can makes it easier to write automated tests for your infrastructure code. It provides a variety of helper functions and patterns for common infrastructure testing tasks - Kitchen terraform using
rubylanguage. (jelaskan)
Refleksi Jawaban
- Mengapa Terratest vs
terraform plan/validate?plan/validatehanya melakukan static pemeriksaan konfigurasi Terraform, tanpa menjalankan resource.- Terratest melakukan live
init&apply, lalu menjalankan pemeriksaan di runtime (misal membaca file, mengecek resource eksis), dan akhirnyadestroy. Ini menangkap bug yang hanya muncul saat provisioning nyata—misal kesalahan permission, path, atau ketergantungan environment.
- Kenapa/Bagaimana Kitchen-Terraform menggunakan Ruby?
- Kitchen-Terraform adalah plugin untuk Test Kitchen, framework testing infrastruktur berbasis Ruby.
- Kamu mendefinisikan
platforms,provisioner, danverifier(biasanya InSpec) di file.kitchen.yml. - Saat dijalankan, Test Kitchen (
kitchen converge) akan apply Terraform, lalu InSpec (kitchen verify) menjalankan tes compliance/functional yang ditulis dalam Ruby DSL. - Ini cocok jika kamu tim yang sudah familier dengan ekosistem Ruby/Test Kitchen atau butuh InSpec untuk security/compliance testing.
Daily Quest #14: Cleanup & Maintenance
Makesure environment clean, build, and resource runner eficient Reference :
- https://docs.github.com/en/actions/writing-workflows/choosing-when-your-workflow-runs/events-that-trigger-workflows#scheduled-events
- https://docs.docker.com/reference/cli/docker/system/prune/
- https://docs.github.com/en/actions/writing-workflows/choosing-what-your-workflow-does/storing-and-sharing-data-from-a-workflow#setting-retention-period
Real world case : Devops team runningself-hostedrunner only have 50GB disk, so in end-of-day, need to runpruneimage.
Skenario : Create workflows action to clean docker resource, volume and set artifact retention
- Create
cleanup-workflow.yml
name: Cleanup & maintenance
on:
  push:
    branches:
    - main
  schedule:
    - cron: '0 0 * * *' # Every Sunday at midnight
jobs:
  maintenance:
    runs-on: ubuntu-latest
    steps:
      - name: Checkout repository
        uses: actions/checkout@v4

      - name: Cleanup old branches
        run: |
          docker system prune -a -f
          docker volume prune -f
      - name: Cleanuup old terraform state files
        run: |
          find ${{ github.workspace }}/test -name "*.tfstate" -mtime +7 -delete
      - name: cleanup temporary workspace
        run: |
          rm -rf ${{ github.workspace }}/tmp/* || true
      - name: Generate report
        run: |
          echo "Cleanup completed successfully on $(date)" > ${{ github.workspace }}/cleanup_report.txt
          cat ${{ github.workspace }}/cleanup_report.txt
      - name: Upload report
        uses: actions/upload-artifact@v4
        with:
          name: cleanup-report
          path: ${{ github.workspace }}/cleanup_report.txt
Workflow run every push to branch main & scheduled using cron every sunday midnight.
- Push & Result

Answer :
- Scheduling cleanup after off-peak hours is important to makesure not inffected production environment.
- Retention-days make efficient storage and audit because deleted unused old resources.
🧠 Refleksi Jawaban
- Mengapa schedule di off-peak hours penting?
Menjalankan cleanup saat traffic rendah (off-peak) mengurangi risiko mengganggu job produksi dan menghindari bottleneck I/O di runner. - Bagaimana
retention-daysbantu storage & audit?
Dengan membatasi umur artefak, kita mencegah penumpukan file usang—menghemat storage dan memudahkan audit karena hanya artefak relevan yang tersimpan.

Observability & monitoring is key to understand about application and infrastructure healty in real-time
Reference :
- https://docs.github.com/en/actions/use-cases-and-examples/using-containerized-services/about-service-containers
Real world usecase : Before deploying application in production, devops team scrape request latency and error rate in 30Second. if error rate > 1% deployment canceled
We use feature on github workflows called service_containers, you can use other tools using docker container that provide a simple and portable way for you to host services you might need to test or operate your application in a workflow.
Skenario : Integrate prometheus service in github actions, scrape basic metrics, and save snapshot using artefacts
- Create folder
/monitoringwithprometheus.ymlanddocker-compose.yaml
global:
  scrape_interval: 5s
scrape_configs:
  - job_name: 'ci-cd-demo'
    static_configs:
    - targets:
      - 'localhost:9090'
name: Observability & monitoring
on:
  push:
jobs:
  observe:
    runs-on: ubuntu-latest
    steps:
      - name: Checkout repository
        uses: actions/checkout@v4
      - name: Running prometheus container
        run: |
          docker run -d \
            --name prometheus \
            -p 9090:9090 \
            -v ${{ github.workspace }}/monitoring/prometheus.yml:/etc/prometheus/prometheus.yml \
            prom/prometheus:latest \
            --config.file=/etc/prometheus/prometheus.yml \
            --web.listen-address=:9090
      - name: Wait prometheus to be ready
        run: |
          echo "Waiting for Prometheus to be ready..."
          sleep 30s
          docker logs prometheus
          echo "Prometheus should be ready now."

      - name: Run Prometheus
        run: |
          echo "scrape metrics"
          curl http://localhost:9090/metrics | head -n 10 > prometheus_metrics.txt

      - name: Upload metrics to artifact
        uses: actions/upload-artifact@v4
        with:
          name: prometheus-metrics
          path: prometheus_metrics.txt
- Push and see result

# HELP go_gc_cycles_automatic_gc_cycles_total Count of completed GC cycles generated by the Go runtime. Sourced from /gc/cycles/automatic:gc-cycles.
# TYPE go_gc_cycles_automatic_gc_cycles_total counter
go_gc_cycles_automatic_gc_cycles_total 6
# HELP go_gc_cycles_forced_gc_cycles_total Count of completed GC cycles forced by the application. Sourced from /gc/cycles/forced:gc-cycles.
# TYPE go_gc_cycles_forced_gc_cycles_total counter
go_gc_cycles_forced_gc_cycles_total 0
# HELP go_gc_cycles_total_gc_cycles_total Count of all completed GC cycles. Sourced from /gc/cycles/total:gc-cycles.
# TYPE go_gc_cycles_total_gc_cycles_total counter
go_gc_cycles_total_gc_cycles_total 6
# HELP go_gc_duration_seconds A summary of the wall-time pause (stop-the-world) duration in garbage collection cycles.
Answer (jelaskan dong):
- Scrape lebih unggul untuk mendapatkan data dari hal yang dimonitoring
- Snapshot metrik dapat digunakan sebagai acuan dalam mendesign grafana dashboard
]]>

Github actions, you can configure your workflows to run when spesific activity on github happens, schedule thime, or when event outside github occurs Workflow triggers are events that cause a worflow to run. Example you want to run job when somone push to main branch using push trigger, or pull_request when running job about validation to code before merge to main.
- Create
triggers-workflow.yml
name: artifacts-workflows
on:
  push:
  pull_request:
  schedule:
    - cron: '0 0 * * *' # Every day at midnight
jobs:
  build:
    runs-on: ubuntu-latest
    steps:
        - name: Checkout code
          uses: actions/checkout@v4
        - name: Get event
          run: |
            echo "Report at $(date)" > report.txt
            echo "Triggered by ${{ github.event_name }}" >> report.txt
        - name: Upload report
          uses: actions/upload-artifact@v4
          with:
            name: report
            path: report.txt
explanation : This workflow running when push, pull_request, schedule on every midnight
- Push, and result
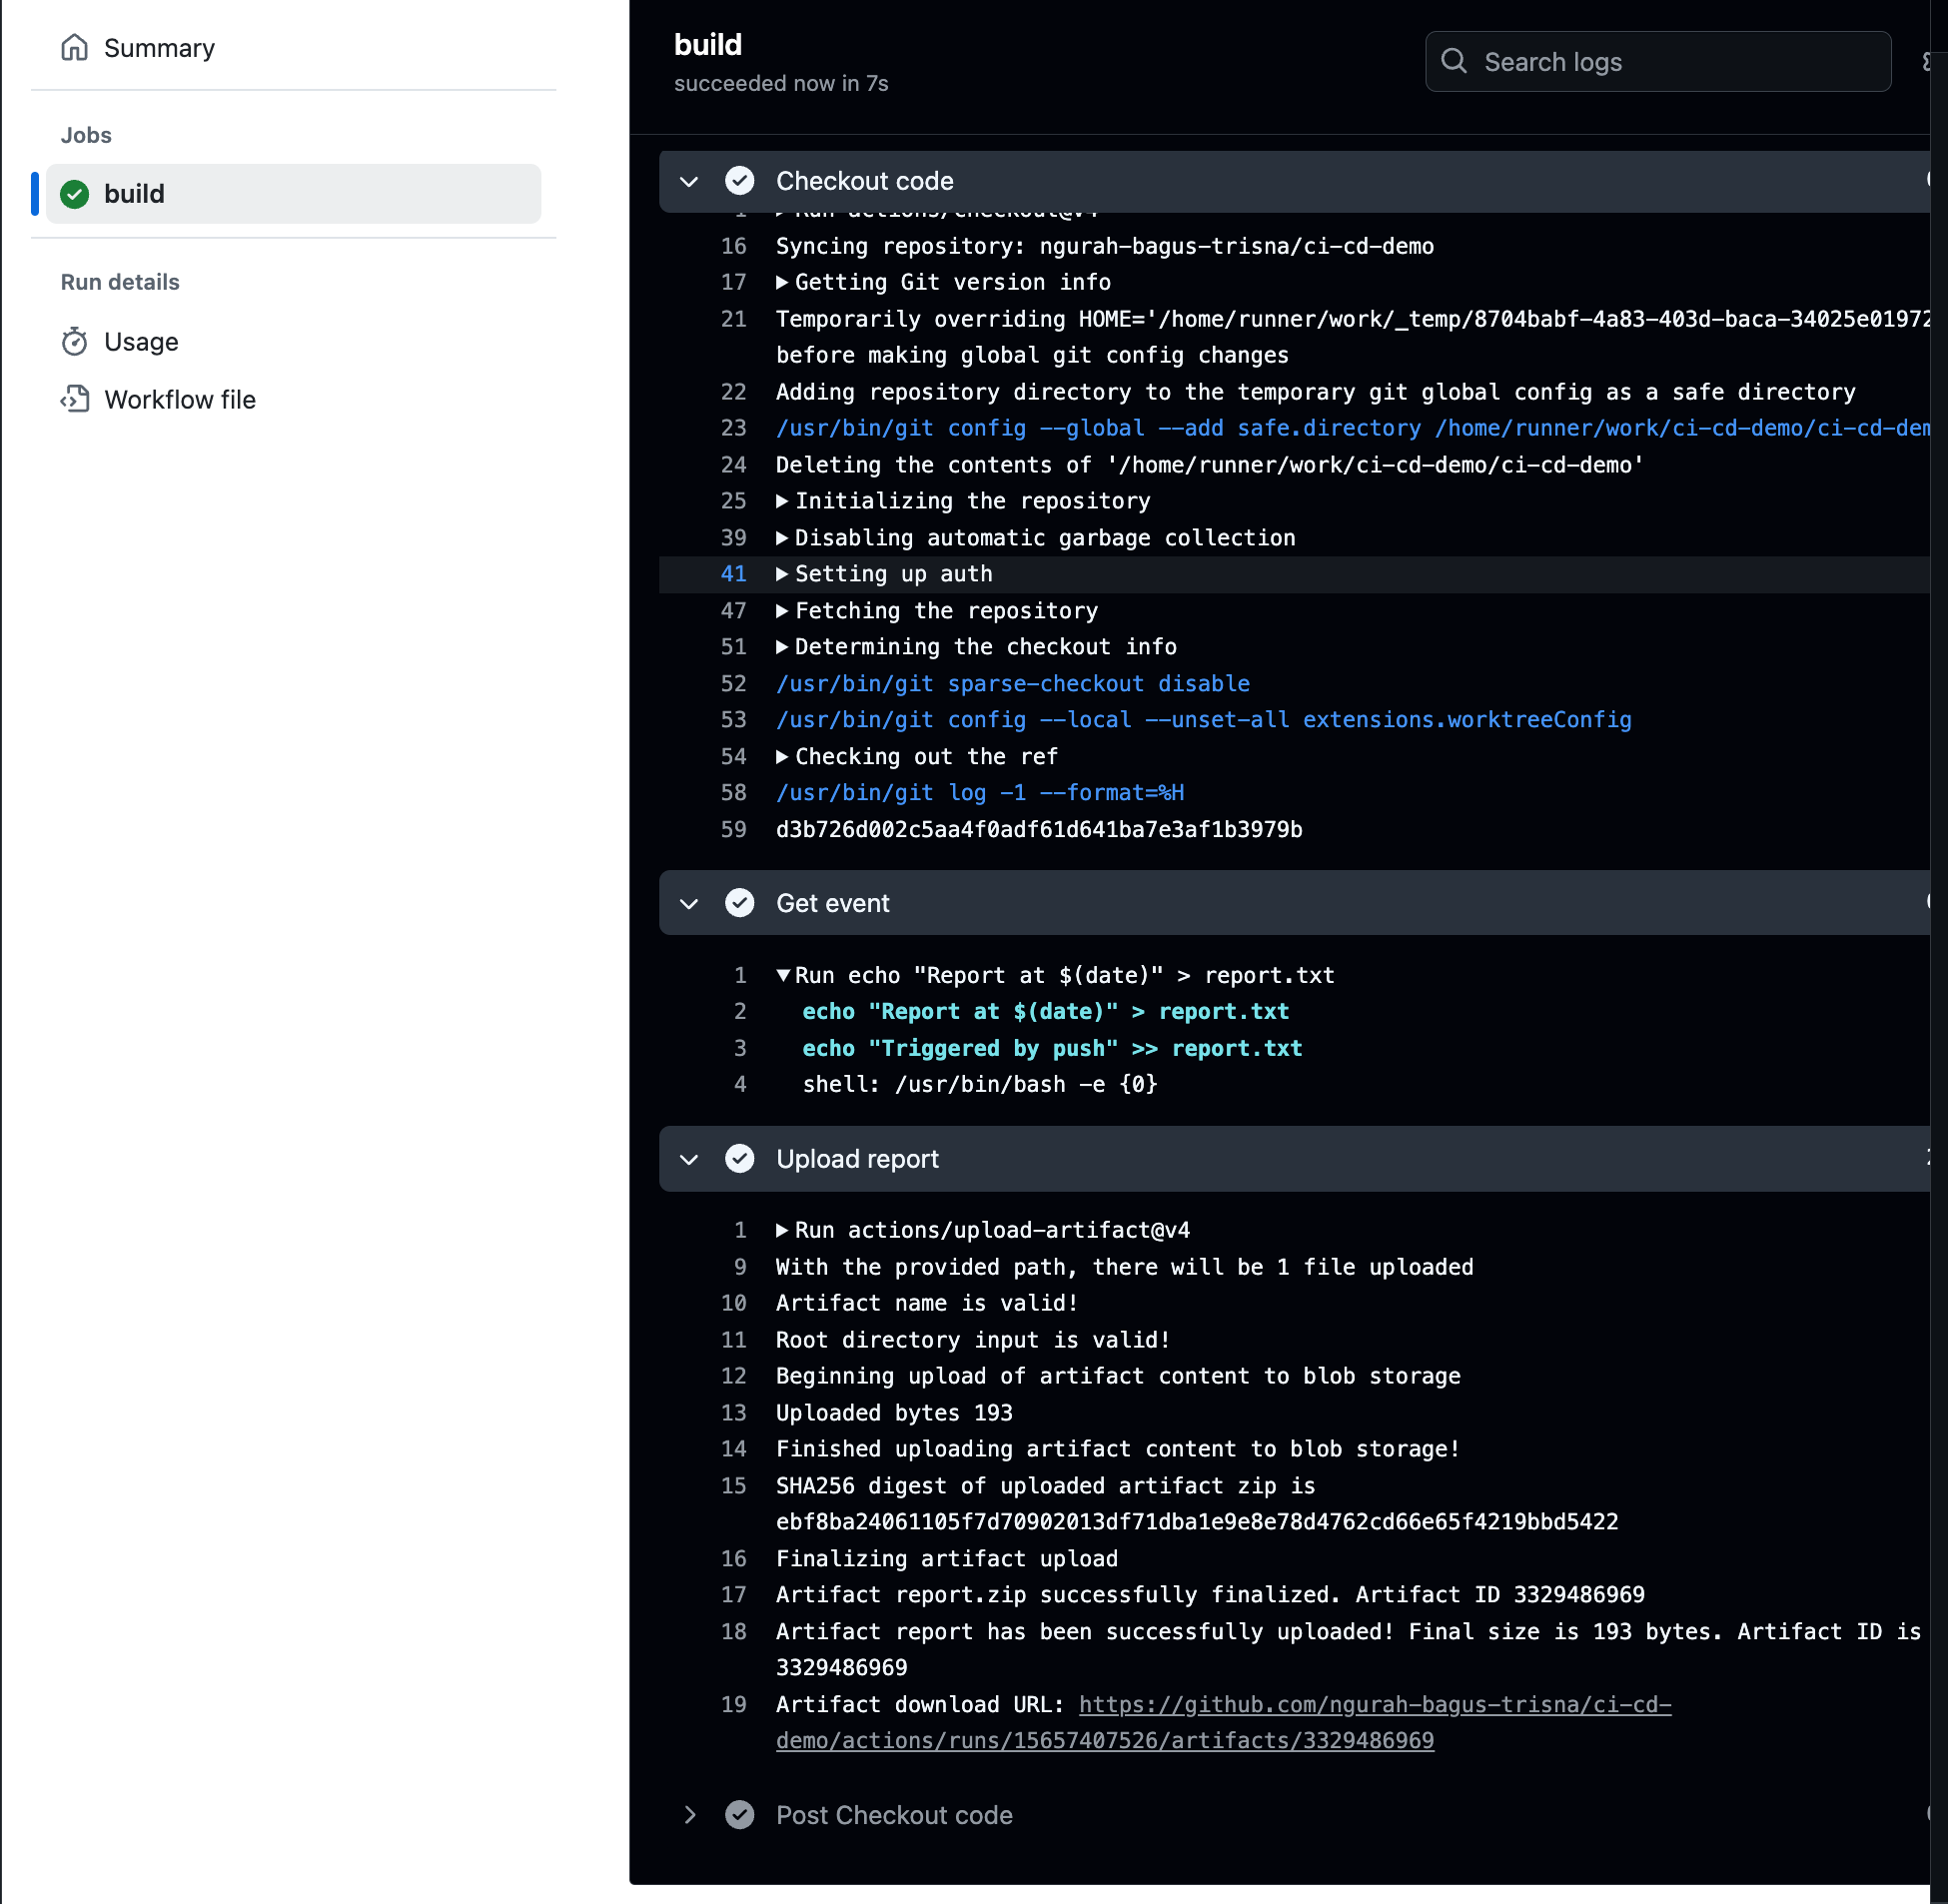
Workflow triggered by push to main branch
Answer :
- Schedule akan dipilih ketika ingin membuat workflow berjalan pada waktu tertentu secara otomatis. Sedangkan
workflow_dispatchdipilih jika ingin workflow tersebut berjalan manual - Hak akses harus diperhatikan ketika menggunakan manual trigger seperti
workflow_dispatch. Mengantisipasi orang yang tidak bertanggung jawab menjalankan workflow
Daily Quest #8: Parameterization & Reuse
Sometimes a complex workflow need value to adjust like environment name, script or flag build without duplicate a lot code in yaml workflow file. In github_actions, you can reuse wofklows so you and anyone. with access reusable workflow can call reusable workflow from another workflow

Real world case : If you have same deploy job for stg, QA, and production, you need one reusable workflowdeploy.yml. And then call iit with inputenv_stg, orenv_prodvalue.
- Create
reusable.ymlworkflow
name: Reusable Template
on:
  workflow_call:
    inputs:
      env_name:
        required: true
        type: string
      script_path:
        required: true
        type: string
jobs:
  run-script:
    runs-on: ubuntu-latest
    steps:
      - name: Checkout code
        uses: actions/checkout@v4
      - name: Echo parameters
        run: |
          echo "Running script in environment: ${{ inputs.env_name }}"
          echo "Script path: ${{ inputs.script_path }}"
      - name: Run script
        run: |
          bash ${{ inputs.script_path }}
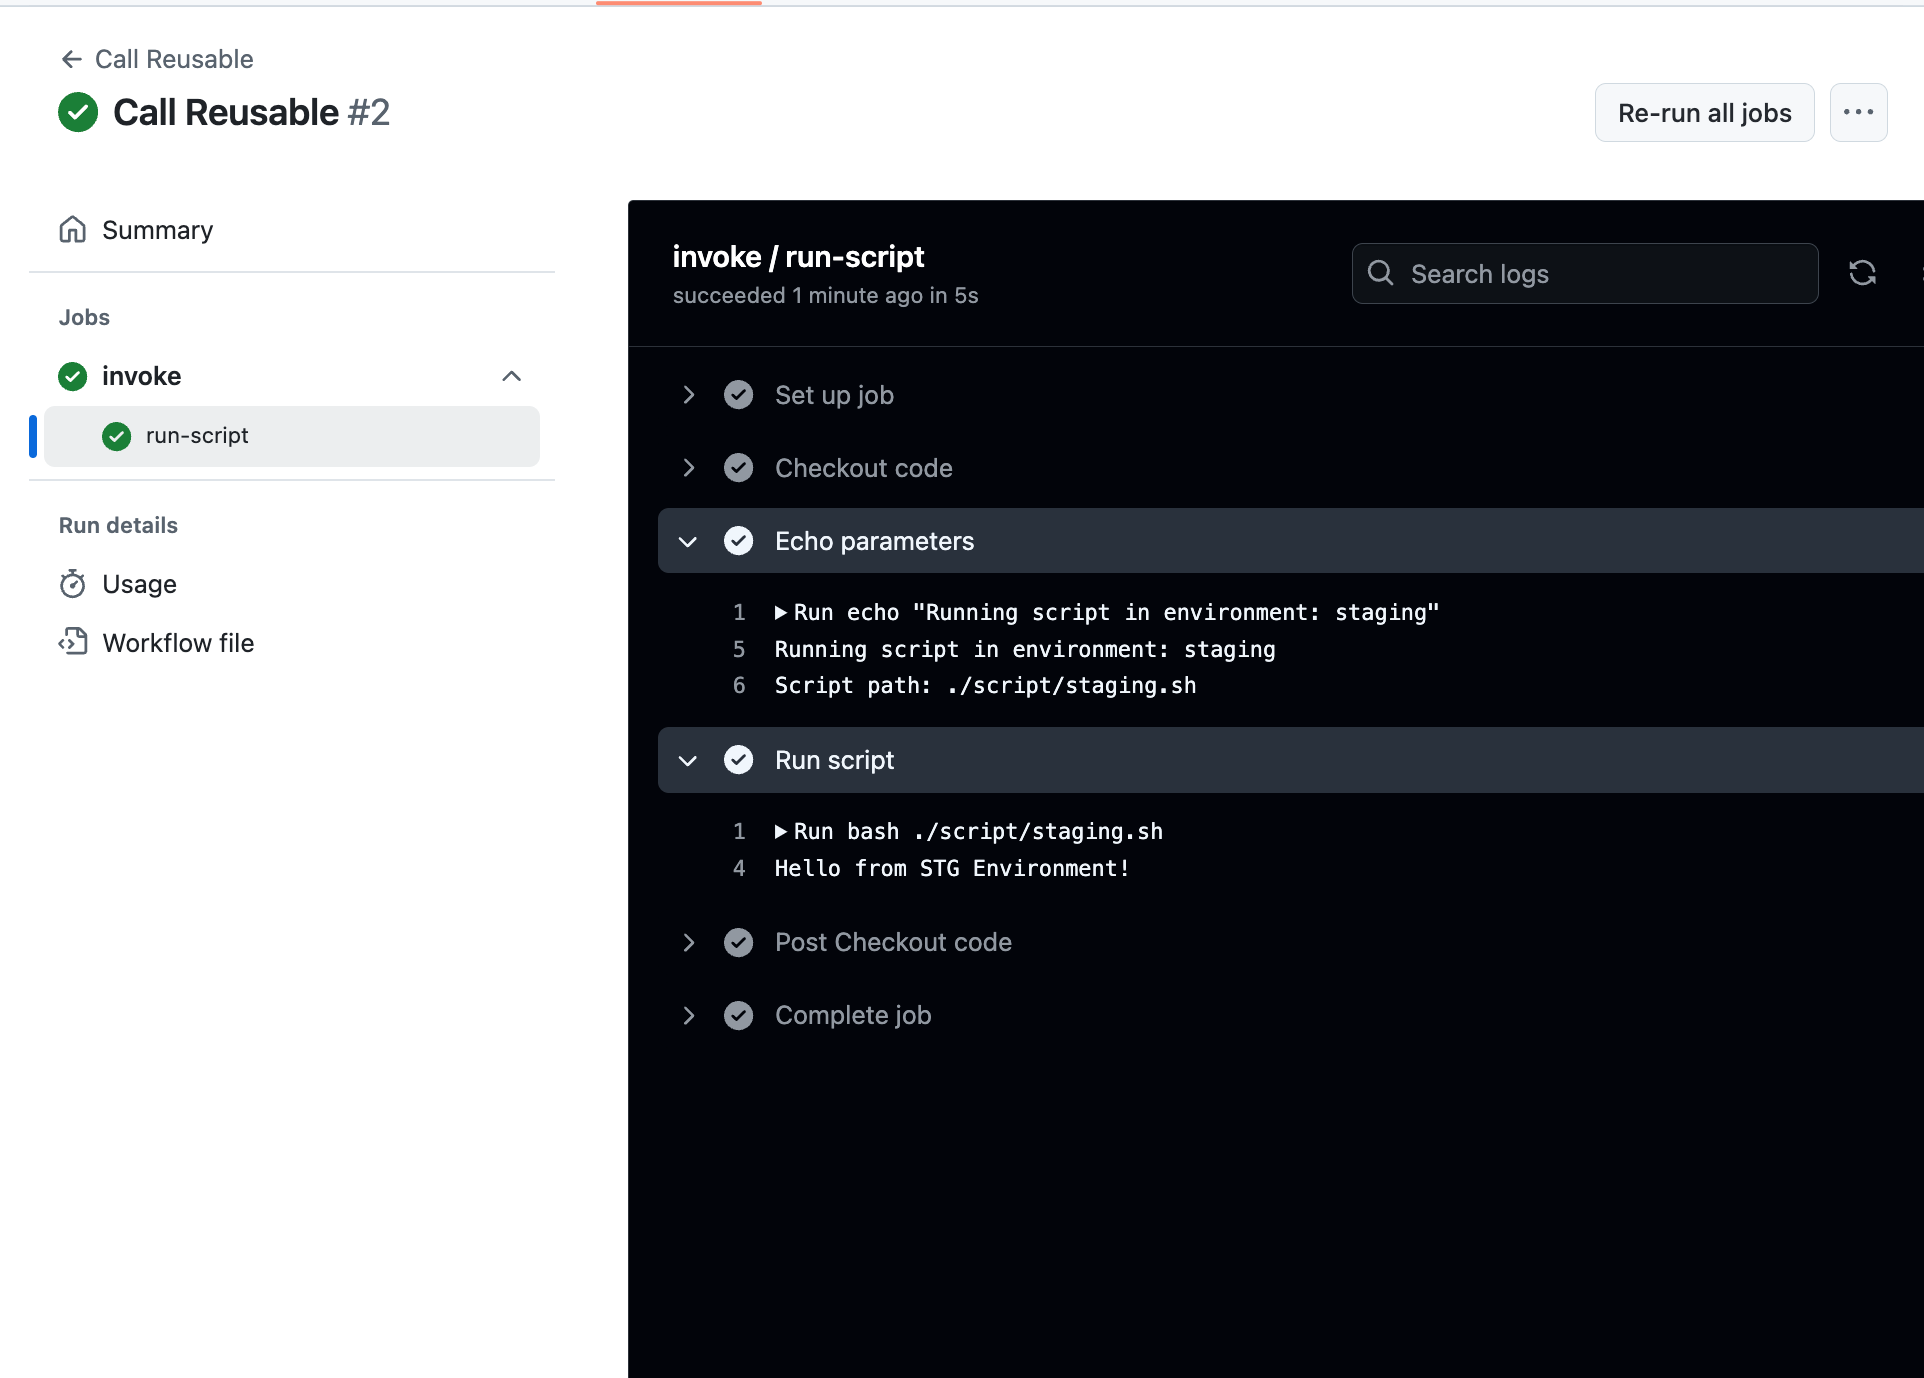
- Create another workflow to call reusable, for this i called reusable to using
stgpath
name: Call Reusable
on:
  workflow_dispatch:

jobs:
  invoke:
    uses: ./.github/workflows/reusable.yaml
    with:
      env_name: staging
      script_path: ./script/staging.sh
- Push and see result

Answer :
- Dengan menggunakan reusable workflow, kita dapat menggunakan satu workflow berkali" tanpa menulis satu workflow di berbagai environment
- Saya tidak akan menggunakan reusable workflows jika hanya menggunakan satu workflows saja.
Daily Quest #9: Conditional Execution
You can use expressions to programmatically set environment variables in workflows files and access contexts. Expression are commonly used with the conditional if keyword in a worflow file to determine whether a step should run. when an if conditional is true, the step will run
Reference :
- https://docs.github.com/en/actions/writing-workflows/choosing-what-your-workflow-does/evaluate-expressions-in-workflows-and-actions
- https://docs.github.com/en/actions/writing-workflows/workflow-syntax-for-github-actions#jobsjob_idif
Using if expression in github action for running spesific job/step when an if conditional matches for saving resources and make pipeline more efficient.
- Create
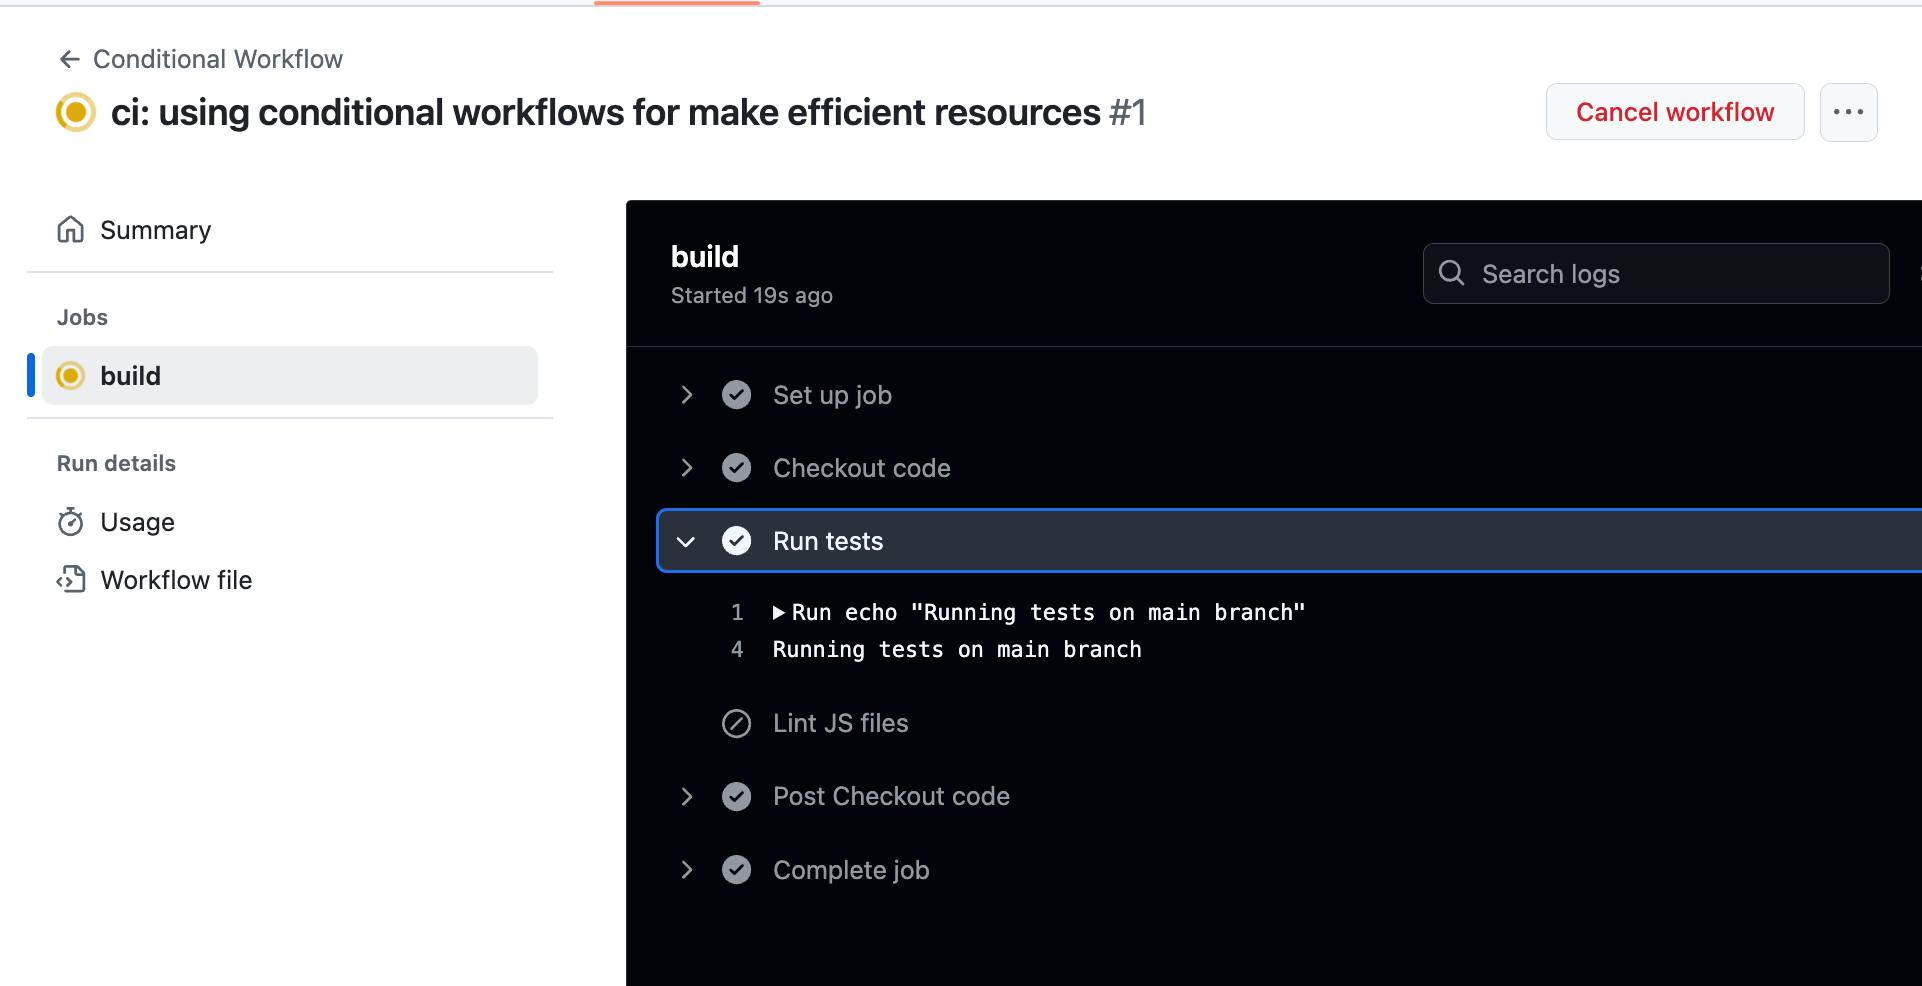
conditional-workflow.yaml
name: Conditional Workflow
on:
  push:
jobs:
  build:
    runs-on: ubuntu-latest
    steps:
      - name: Checkout code
        uses: actions/checkout@v2

      - name: Run tests
        if: github.ref == 'refs/heads/main'
        run: |
          echo "Running tests on main branch"
      - name: Lint JS files
        if: contains(join(github.event.head_commit.modified, ','), '.js')
        run: |
          echo "Linting JavaScript files"
- Push and see result
Makesure lint js skipped (because in repository jo js file found)
Answer
- Kondisi di level jobs diperlukan ketika kondisi tersebut dilakukan untuk berbagai step kedepanya. (tolong jelasin lebih dibagian ini)
- Kondisi terlalu komplex akan menyebabkan kesulitan saat membaca / maintain untuk yaml filesnya. Mitigasinya yaitu mengefisienkan js filesnya.
Reflection answer
- Using
ifstatement in jobs level if all job need to run or skipped based on condition. Example to run all lint or deploy job only on branch main. It will be clean than writing if in every job. - mitigation expresion to complex, first you can split condition to reusable workflows or composite actions to isolate the logic. Second you can using external script (JS/TS) to check condition,then call using
ifstatement on workflows.
Daily Quest #10: Security Scanning
Security is most important when we want to deploy our application to production. In pipeline devops, security scanning help to detect vulnerapility in source code or depedencies before deploy to production. Using tools like trivy (container & image scan), sonarcube, dependabot, can integrate to workflows. It's important so devops team can prevent security issues. Reference :
- http://trivy.dev/latest/docs/
- https://github.com/aquasecurity/trivy-action
Skenario : Creating actions to scan Dockerfile using trivy
- Create workflow
security-scan.yaml
name: Security Scanning
on:
  - push
jobs:
  security-scan:
    runs-on: ubuntu-latest
    steps:
      - name: Checkout code
        uses: actions/checkout@v2
      - name: Build docker
        uses: docker/build-push-action@v2
      - name: Build docker image
        run: |
          echo "Building Docker image..."
          docker build -t ${{github.repository}}:latest .
          echo "Docker image built successfully."
      - name: Run trivy scan scan
        uses: aquasecurity/[email protected]
        with:
          image-ref: ${{github.repository}}:latest
          format: table
          exit-code: 1
          vuln-type: os,library
          severity: CRITICAL,HIGH,MEDIUM
- Create simple dockerfile
FROM ubuntu:20.04
- Push & see results
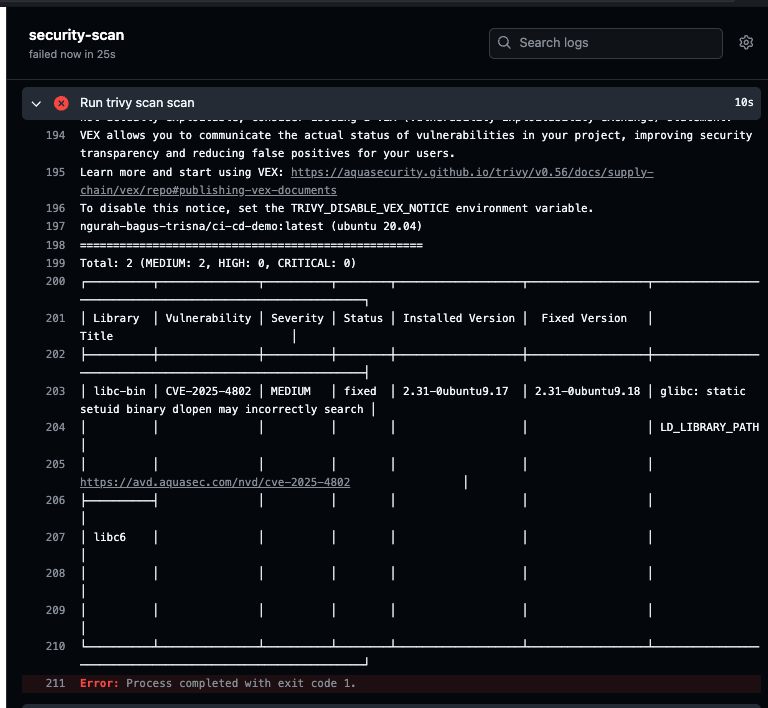
Found medium vulnerablity.
Answer :
- Set to exited code when found critical/high severity vulnerablitiy is for cancel workflows running further and notify dev have a vulnerability in image docker
- We need to makesure severity beetwen production and development can passed for security
Daily Quest #11: Concurrency & Cancellation
In ci/cd, concurrency makesure only one workflow run in group session (like branch/or workflow. Reference :
- https://docs.github.com/en/actions/writing-workflows/workflow-syntax-for-github-actions#concurrency
real world usecase : When all dev repetitivly commit and push hotfix to main branch, if another job or workflow using the same concurrency group in the repository is in progress, the queued job or workflow will be pending
Skenario : Create concurency workflow, only run when latest update. And when another concurency running, just cancel. Only running latest push
- Create
concurrency-workflow.yaml
name: Concurency workflows
on:
  - push
concurrency:
  group: ${{ github.workflow }}-${{ github.ref }}
  cancel-in-progress: true
jobs:
  concurrency-workflow:
    runs-on: ubuntu-latest
    steps:
      - name: Checkout repository
        uses: actions/checkout@v2

      - name: Run concurrency workflow
        run: echo "This is a concurrency workflow that will run only once per branch."

      - name: Show run number
        run: |
          echo "Run number: ${{ github.run_number }} on ref ${{ github.ref }}"
      - name: Simulate work
        run: |
          echo "Simulating work..."
          sleep 30
          echo "Work done!"
- Push, & result.
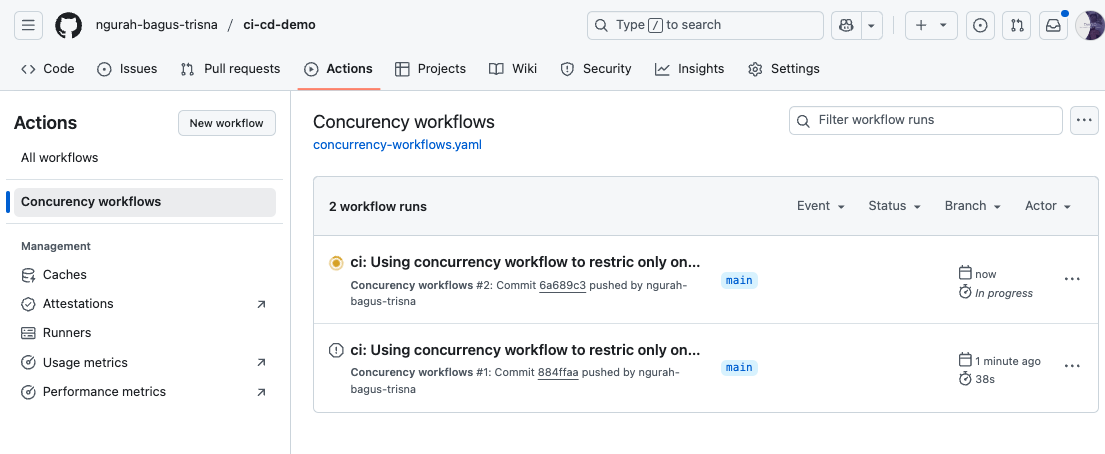
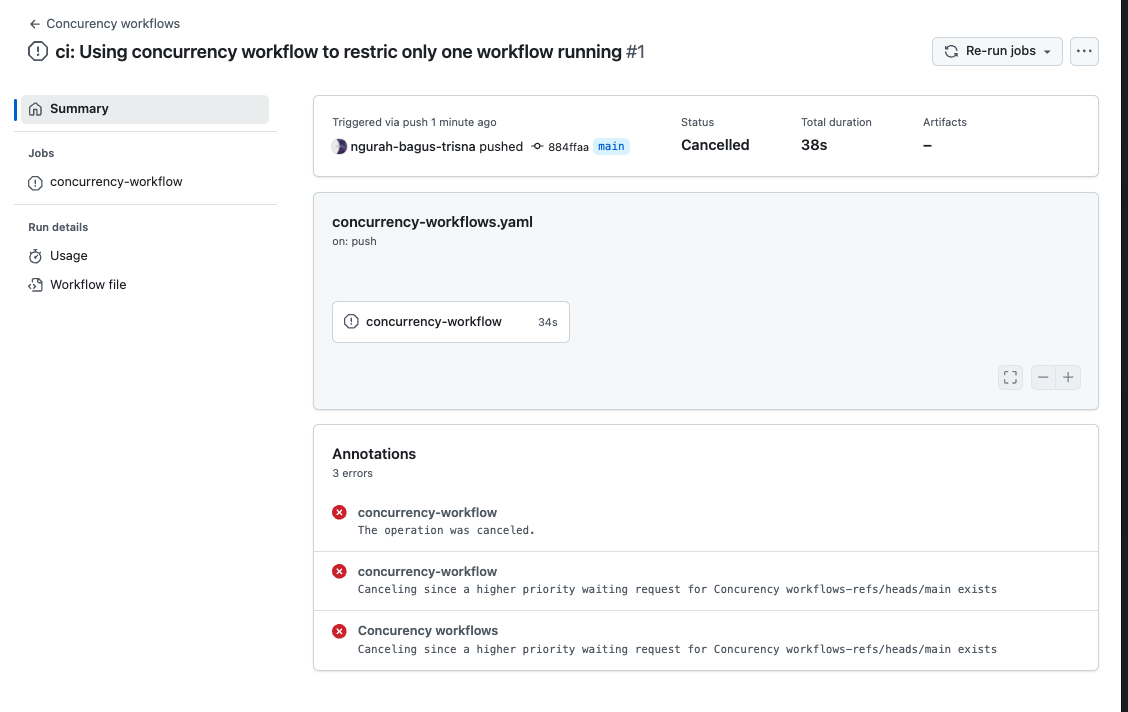
Workflow canceled because have higher priority on latest update on repository.
Answer
groupandcancel-in-progresscan cancle running workflow when have a condiiton same group running workflow with higher priority (like latest update on repository)- Skenario when need to push another version (Tolong jelaskan)

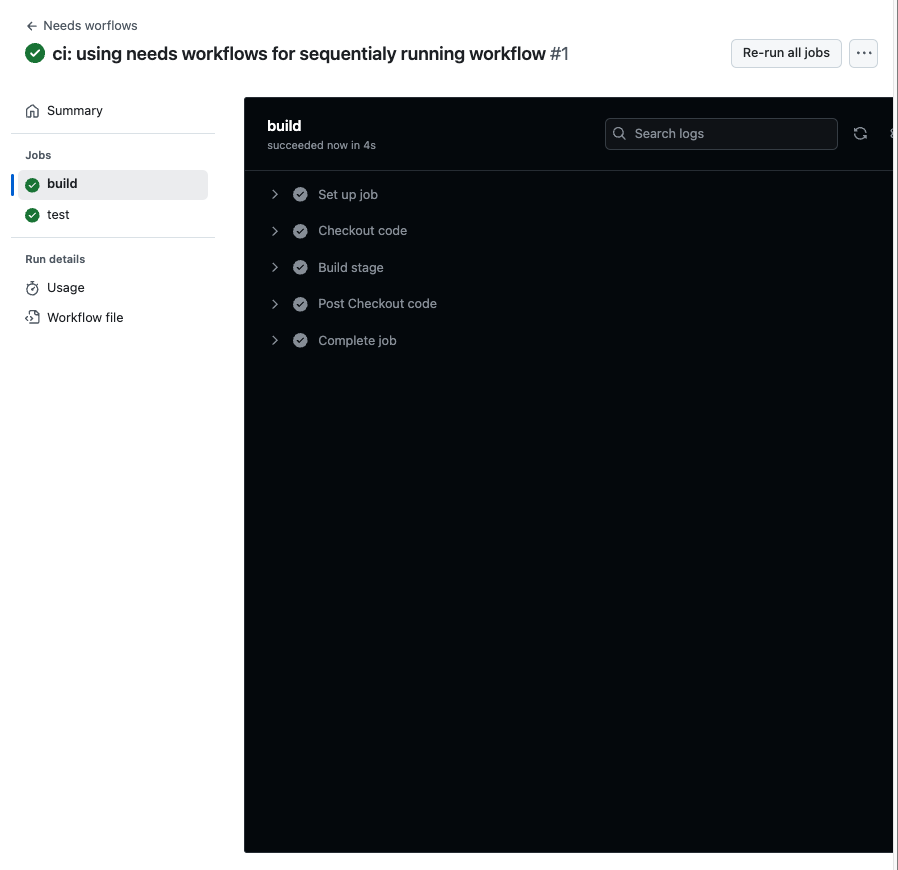
Workflow running jobs parrarel by default. To run jobs sequentially, you need to define other jobs using the jobs.<job_id>.needs keyword
- Add new workflows
needs-workflows.yaml
name: Needs worflows
on:
  workflow_dispatch:
jobs:
  build:
    runs-on: ubuntu-latest
    steps:
        - name: Checkout code
          uses: actions/checkout@v2
        - name: Build stage
          run: |
            echo "Hello from CI/CD!"
            echo "Running on build job"
  test:
    runs-on: ubuntu-latest
    needs: build
    steps:
        - name: Greeting from variable
          run: echo "Hello from ${{ env.GREETING }}"
        - name: Echo secret
          run: echo "Secret is ${{ secrets.SECRET_MSG }}"
        - name: Test stage
          run: |
            echo "Running on test job"
            echo "This job depends on the build job"
Push, and result
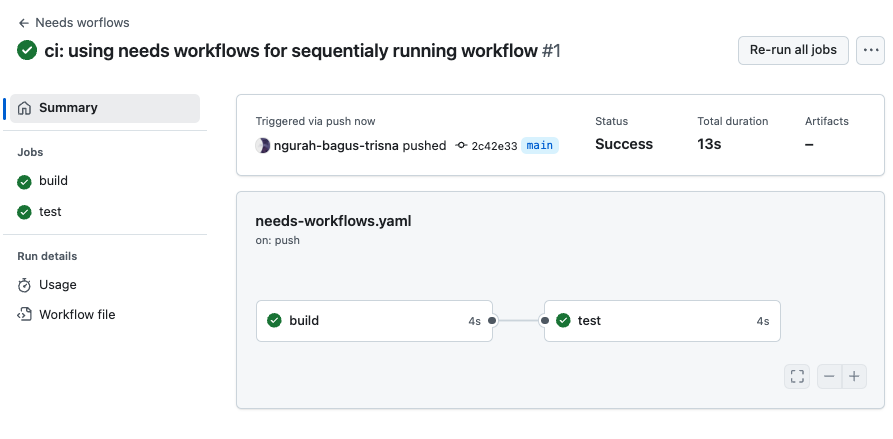
Answer :
- Dengan menjalankan job satu persatu, workflows dapat membuat efisien task hanya di satu jobs terlebih dahulu.
- Job akan gagal dan di skip ke next jobs (jika memenuhi peraturan).
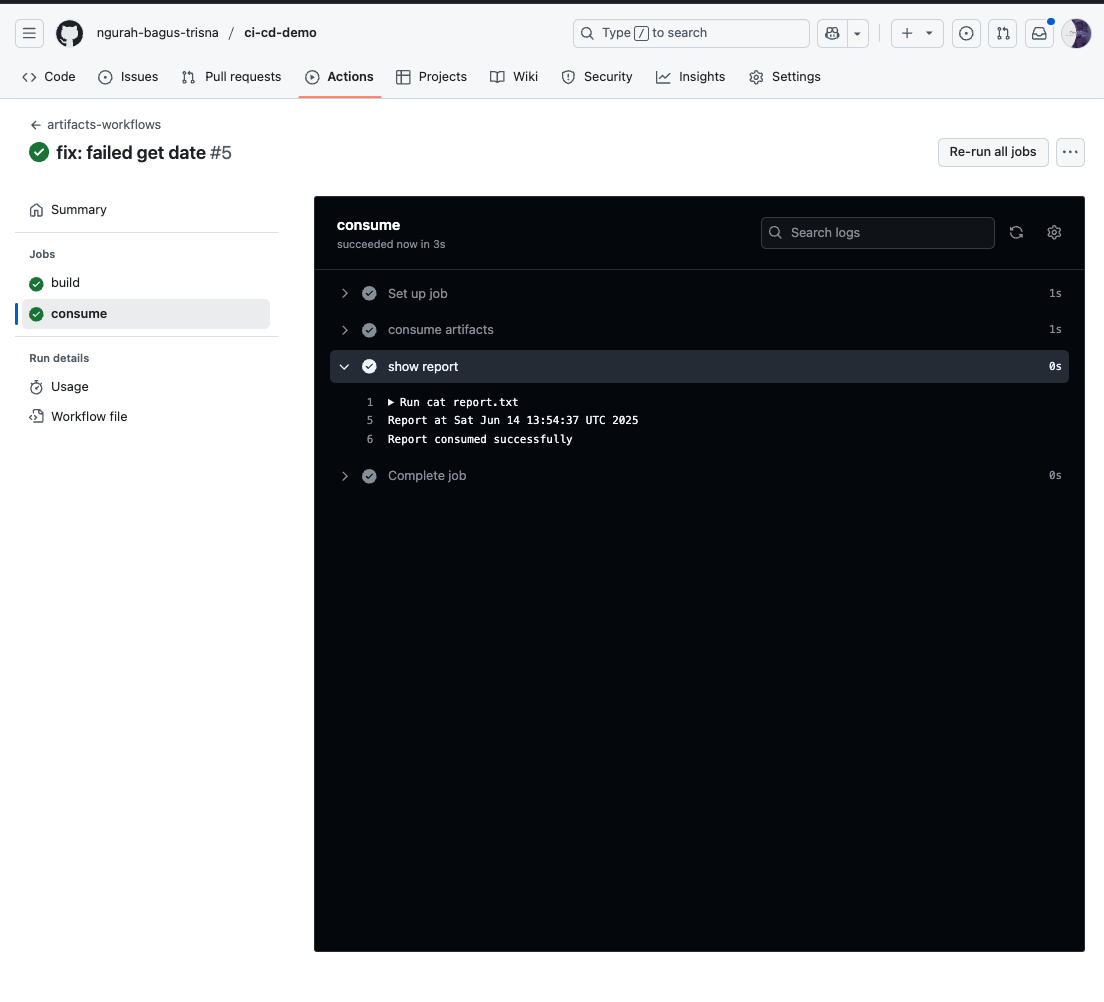
Daily Quest #6: Artifact Management
Referensi : https://docs.github.com/actions/using-workflows/storing-workflow-data-as-artifacts Artifacts allow you to persist data after job has completed, and share that data with another job in the same workflows. Artifacts is file/collection of files produced during workflow run. For example, you can use artifacts to save your build & test output after a workflow run has ended. How to use You can use actions/upload-artifact to save files on artifacts.
      - name: Archive code coverage results
        uses: actions/upload-artifact@v4
        with:
          name: code-coverage-report
          path: output/test/code-coverage.html
Explanation :
name: name artifactspath: path file for upload to artifacts
To download file from artifacts, you can use actions/download-artifact action to download artifacts that were previously uploaded in the same workflow run.
- name: Download a single artifact
  uses: actions/download-artifact@v4
  with:
    name: my-artifact
Explanation :
name: name previously uploaded artifacts
- Create new workflows
artifact-workflow.yml
name: artifacts-workflows
on:
  push:
    branches:
      - main
jobs:
  build:
    runs-on: ubuntu-latest
    steps:
        - name: Checkout code
          uses: actions/checkout@v4
        - name: Create report
          run: |
            echo "Report at $date" > report.txt
        - name: upload artifacts
          uses: actions/upload-artifact@v4
          with:
            name: my-report
            path: report.txt
  consume:
    runs-on: ubuntu-latest
    needs: build
    steps:
      - name: consume artifacts
        uses: actions/download-artifact@v4
        with:
          name: my-report
      - name: show report
        run: |
          cat report.txt
          echo "Report consumed successfully"
Result :
- Saya akan menggunakan artifact ketika ingin export hasil dari job yang sudah running. Sedangkan cache hanya untuk depedencies aplikasi yang digunakan berulang setiap kali jobs running
- Artifacts membantu untuk menggungah/mengunduh file di tiap job yang berjalan.

In CI/CD world, environment variables and secret is key to storing value without writing directly to yaml files. It's possible to manage credentials, versioning, and configure build according to the needs
Skenario : Understand how to use env and secret in github actions for flexible and secure workflow.
- In existing repository, reconfigure
first-workflows.yaml.
name: Hello CI
on:
    - push
jobs:
  build:
    runs-on: ubuntu-latest
    steps:
        - name: Checkout code
          uses: actions/checkout@v2
        - name: say hello
          run: echo "Hello from CI/CD!"
        - name: Greeting from variable
          run: echo "Hello from ${{ env.GREETING }}"
        - name: Echo secret
          run: echo "Secret is ${{ secrets.SECRET_MSG }}"
- Create secrets on github. Navigate to
Settings > Secrets and variables > Actions
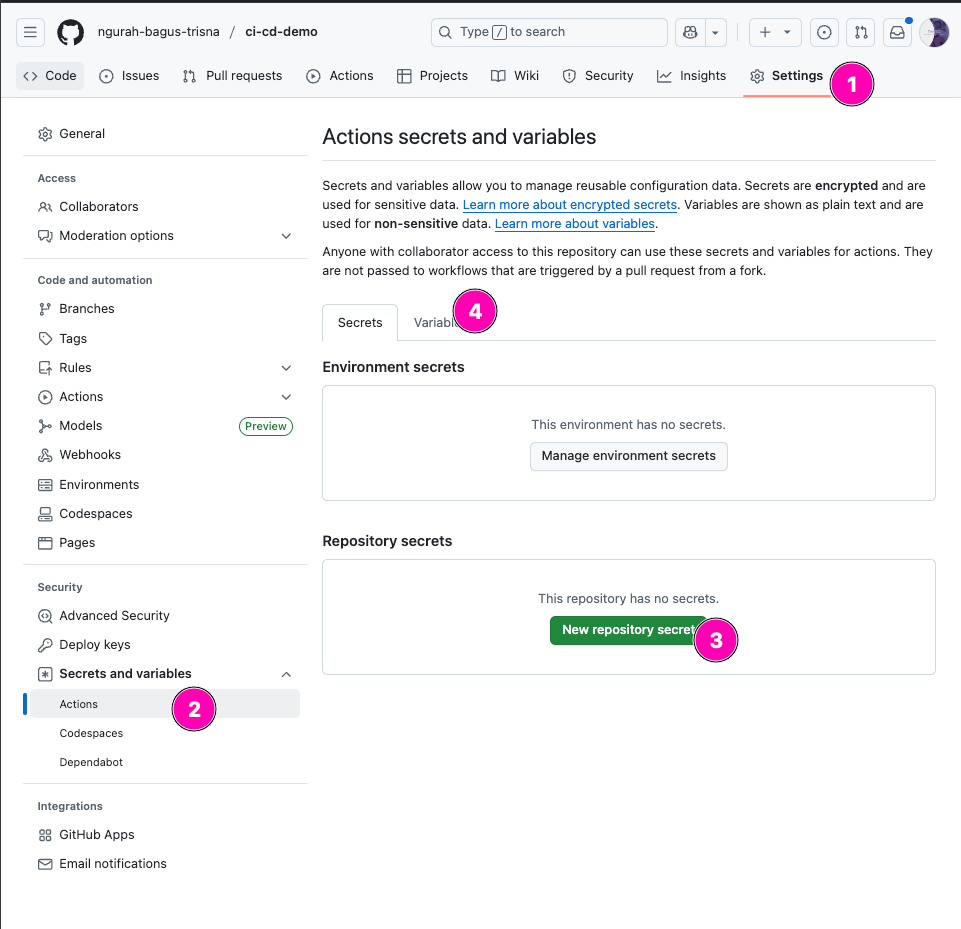
2. Create secrets & variable, makesure name of variable/secret correct
- Result
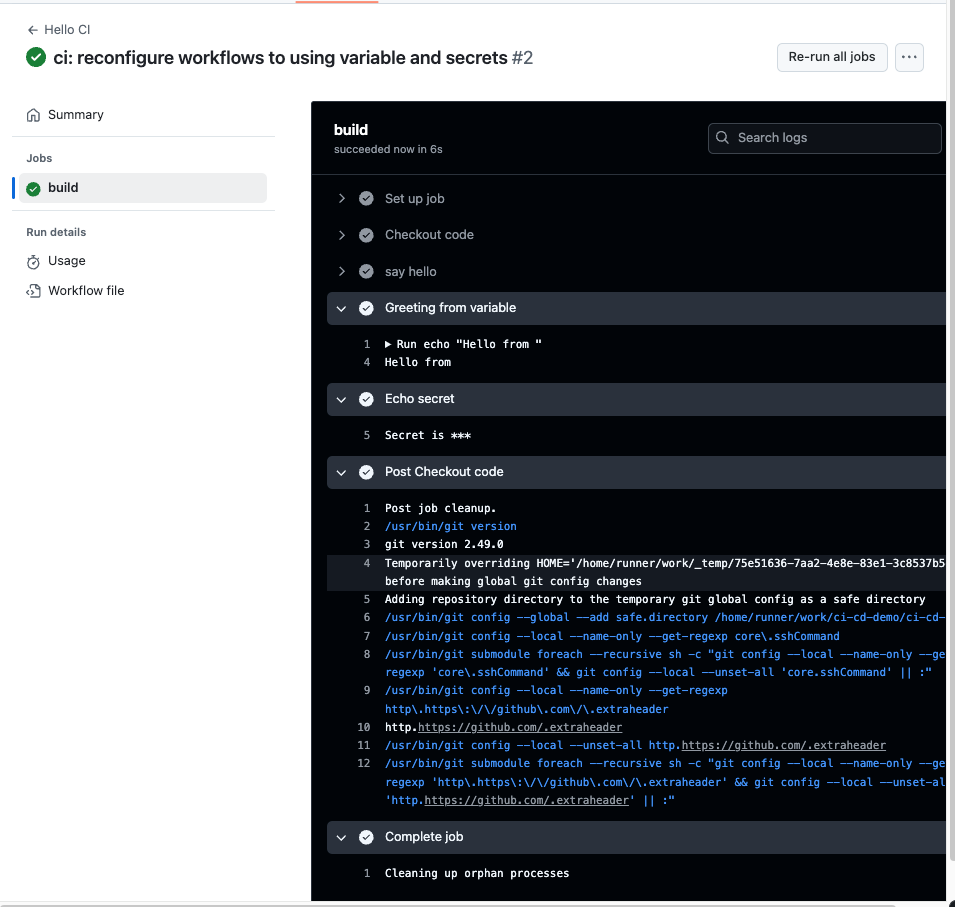
Answer :
- Penggunaan secrets digunakan untuk store data penting seperti password. Ketika digunakan dalam workflows, akan di samarkan dengan
**. Untuk variable, biasanya digunakan untuk menyimpan config, dll. Yang sifatnya general - Github workflow memask secret agar isi dari secret tidak terlihat. Karena biasanya data yang tersimpan dalam secrets adalah data rahasia.
Daily Quest #3: Matrix Mastery
In github workflows, we can use matrix strategies for create multiple job runs using a single jobs variable definition like job running pararalel simultaneously. For example like you can configure your ci to run build in 3 different os/arch
Referensi : https://docs.github.com/en/actions/writing-workflows/choosing-what-your-workflow-does/running-variations-of-jobs-in-a-workflow
To define matrix_strategy simply put in jobs.<job_id>.strategy.matrix with value array.
jobs:
	example_matrix:
		strategy:
			matrix:
				os: [ubuntu-latest, selfhosted]
				version: [10, 11, 12]
By default, GitHub will maximize the number of jobs run in parallel depending on runner availability. The order of the variables in the matrix determines the order in which the jobs are created. The first variable you define will be the first job that is created in your workflow run. For example, the above matrix will create the jobs in the following order:
{version: 10, os: ubuntu-latest}
{version: 10, os: windows-latest}
{version: 12, os: ubuntu-latest}
{version: 12, os: windows-latest}
{version: 14, os: ubuntu-latest}
{version: 14, os: windows-latest}
Single-dimension matrix
jobs:
  example_matrix:
    strategy:
      matrix:
        version: [10, 12, 14]
    steps:
      - uses: actions/setup-node@v4
        with:
          node-version: ${{ matrix.version }}
Explanation : For example, the following workflow defines the variable version with the values [10, 12, 14]. The workflow will run three jobs, one for each value in the variable. Each job will access the version value through the matrix.version context and pass the value as node-version to the actions/setup-node action.
Multi-dimension matrix
jobs:
  example_matrix:
    strategy:
      matrix:
        os: [ubuntu-22.04, ubuntu-20.04]
        version: [10, 12, 14]
    runs-on: ${{ matrix.os }}
    steps:
      - uses: actions/setup-node@v4
        with:
          node-version: ${{ matrix.version }}
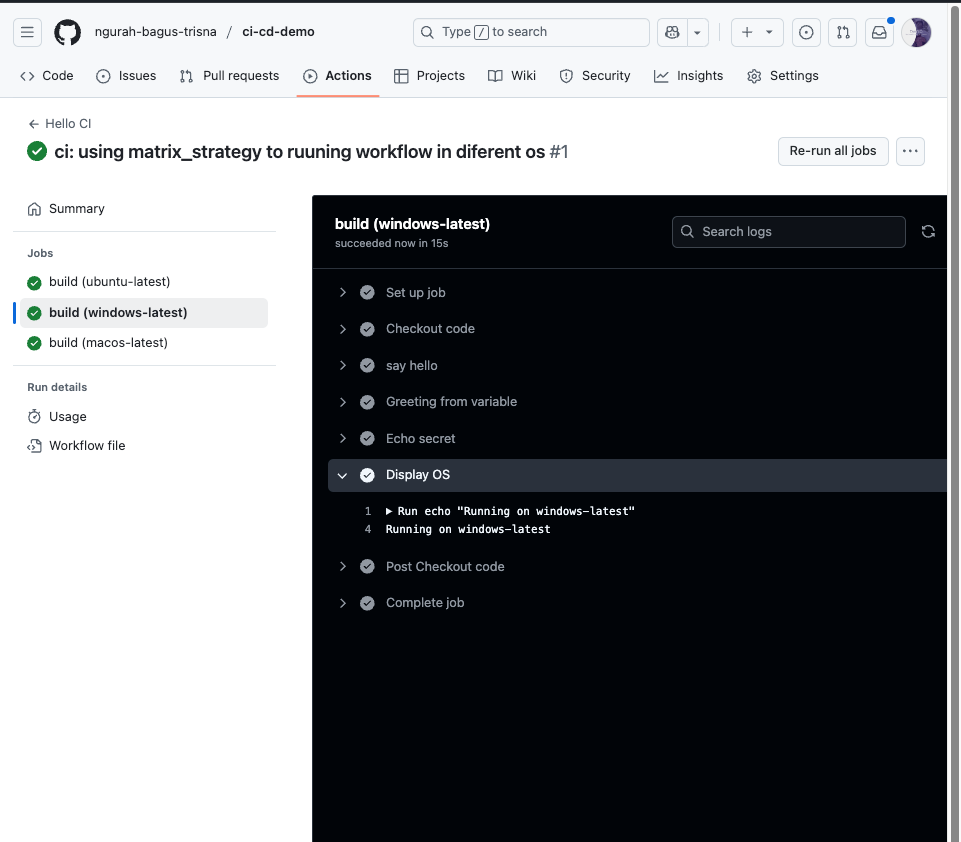
Quest
- Create new job called
matrix-workflow.yaml. Usingmatrix-strategyto run jobs in different os
name: Hello CI
on:
    - push
jobs:
  build:
    strategy:
      matrix:
        os: [ubuntu-latest, windows-latest, macos-latest]
    runs-on: ${{ matrix.os }}
    steps:
        - name: Checkout code
          uses: actions/checkout@v2
        - name: say hello
          run: echo "Hello from CI/CD!"
        - name: Greeting from variable
          run: echo "Hello from ${{ env.GREETING }}"
        - name: Echo secret
          run: echo "Secret is ${{ secrets.SECRET_MSG }}"
        - name: Display OS
          run: echo "Running on ${{ matrix.os }}"
- Push, and see result
Answer :
- Kelebihan utama menggunakan matrix yaitu dapat mempersingkat dan membuat efiisien dari file workflow. Ketika ada perubahan besar di yaml workflow, devops hanya mengubah satu job. Tanpa mengulangi edit yang lain
- Matrix dapat menjadi overkill karena dapat menjalankan secara paralel setiap jobs sesuai dengan variable yang di definisikan dalam array. Untuk membatasinya, kita dapat membatasi sesuai dengan kebutuhan(? coba koreksi)
Daily Quest #4: Dependency Caching
Refrensi : https://docs.github.com/actions/using-workflows/caching-dependencies-to-speed-up-workflows To make workflows faster and efficient, you can cache for depedencies and other commonly reused file. Job in github-hosted runners start a clean runner image, and must download depedencies each time. Causing incerased network utilizaiton, longiger runtime, and incerase cost. To cache depedencies for a job, you can use cache-action. The action create and restores a cache identified by a unique key.
Artifacts vs caching
- Use caching when you want to reuse files that don't change often between jobs/workflows runs. Such a depedencies from package management system (npm, dll)
- Using artifacts when you want to save files produce by a job to view after a workflow run has ended. Such a built binaries/logs.
Using a cache actions
- First search for excat match to your provided
key - if no excact match, it will search for partial matches of the
key - if there is still no match found, and you've provided
restore-keys, these keys wil be checked sequenial for partial matches. Input parameters for the cache action key: Using to search for a cache. It can any combination of variables, context values, static strings, and function.path: The path of the runner to cache/restorerestore-keys: Alternative restore keys.
Is quite hard to understand to using key and restore-key. So first if key not match -> search to restore-keys to list what to restore on path.
       +-------------------------+
       |  Start cache step      |
       +-------------------------+
                 |
                 v
      +---------------------------+
      |  Key match with cache?   |
      +---------------------------+
           |              |
          Yes            No
           |              |
           v              v
  Restore full         Try restore with
    cache              restore-keys prefix
           |              |
         (Hit)         (Partial hit / miss)
           |              |
           v              v
    Run job (npm install, dll)
           |
           v
  +------------------------------+
  |  Save cache at end?         |
  +------------------------------+
           |
  Only if ❌ cache miss
Cache : only run if cache miss.
Skenario : add cache before installing deedencies
- Edit
cache-workflow.yml
name: Cache Workflows
on:
  push:
    branches:
      - main
jobs:
  build:
    runs-on: ubuntu-latest
    steps:
        - name: Checkout code
          uses: actions/checkout@v2
        - name: say hello
          run: echo "Hello from CI/CD!"
        - name: Greeting from variable
          run: echo "Hello from ${{ env.GREETING }}"
        - name: Echo secret
          run: echo "Secret is ${{ secrets.SECRET_MSG }}"
        - name: Cache node modules
          uses: actions/cache@v4
          with:
            path: ~/.npm
            key: ${{ runner.os }}-node-${{ hashFiles('**/package-lock.json') }}
            restore-keys: |
              ${{ runner.os }}-node-
        - name: Install dependencies
          run: npm install
        - if: ${{ steps.cache-npm.outputs.cache-hit != 'true' }}
          name: List the state of node modules
          continue-on-error: true
          run: npm list
- Push, and result

Answer
- Key and restore-keys akan melakukan pengecekan, jika key match maka akan di restore seluruh yang ada di path. Jika tidak, maka akan melakukan general check dengan restore-keys. Jika match maka restore, jika tidak maka hanya akan di cache dan tidak restore
- Tidak menggunakan caching ketika workflow/job yang dijalankan tidak memerlukan depedencies berulang.

Referensi : https://opentofu.org/docs/ OpenTofu is fork from opensource terraform tool for infrastructure as a code. This tool allow to define infrastructure to human readable file .tf so you can manage consistant infrastructure throught lifesycle.
In first daily quest, we learn to create simple file hello.txt using local provider.
OpenTofu relies on plugins called providers to interact with cloud providers, SaaS providers, and other APIs.
Resources are the most important element in the OpenTofu language. Each resource block describes one or more infrastructure objects, such as virtual networks, compute instances, or higher-level components such as DNS records.
Alur init -> plan -> apply diperlukan agar sebelum infrastruktur dijalankan, ops bisa cek.
Hello world
- Makesure tofu installed
- Create
main.tffile
terraform {
  required_providers {
    local = {
      source  = "hashicorp/local"
      version = "~> 2.0"
    }
  }

  required_version = ">= 1.0"
}

provider "local" {
  # No configuration needed for local provider

}

resource "local_file" "hello_world" {
  content  = "Hello, Opentofu!"
  filename = "${path.module}/hello.txt"

}
- Setup provider & apply
tofu init
tofu plan
tofu apply
Result
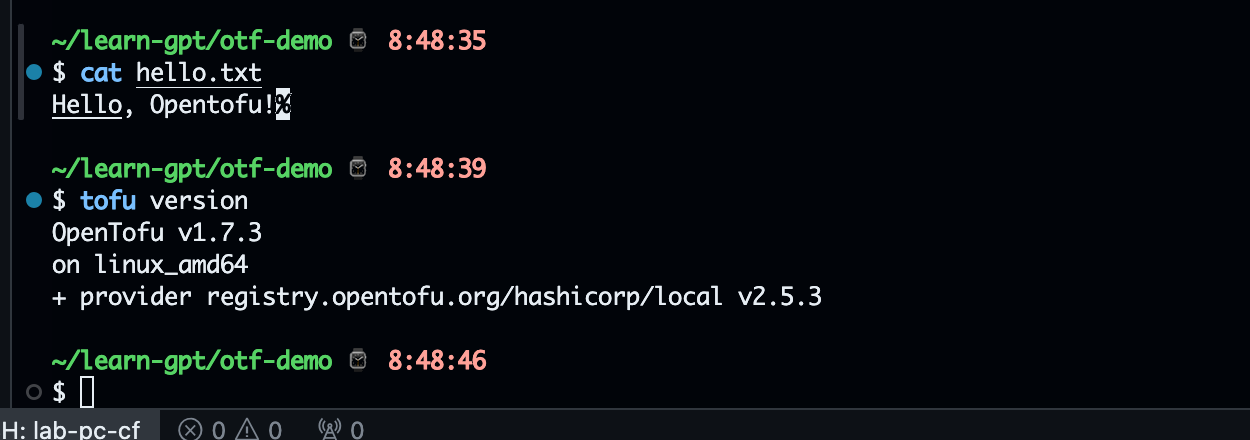
Plan Inception
After init, opentofu create plan without apply anything about main.tf. Its crucial for developer to review things you need to create.
Try : skenario we change value content to Hello, Opentofu! V2
- Run tofu plan with out for check changes before we edit
main.tf
tofu plan -out=plan2.out
---

No changes. Your infrastructure matches the configuration.

OpenTofu has compared your real infrastructure against your configuration and
found no differences, so no changes are needed.

---
# print to text
tofu show plan.out > before.txt
- Edit
main.tf
# before

resource "local_file" "hello_world" {
  content  = "Hello, Opentofu!"
  filename = "${path.module}/hello.txt"
}

# after

resource "local_file" "hello_world" {
  content  = "Hello, Opentofu! V2"
  filename = "${path.module}/hello.txt"
}
- Plan again with different output file
tofu plan -out=plan2.out
---
local_file.hello_world: Refreshing state... [id=38191fd8e74a432bf7ffc42ceee0bb4fb06e658d]

OpenTofu used the selected providers to generate the following execution plan. Resource actions are indicated with the following symbols:
-/+ destroy and then create replacement

OpenTofu will perform the following actions:

  # local_file.hello_world must be replaced
-/+ resource "local_file" "hello_world" {
      ~ content              = "Hello, Opentofu!" -> "Hello, Opentofu! V2" # forces replacement
      ~ content_base64sha256 = "lL/QFDa0wcJiPe1okWxphgQ0/2kax3o2shzTdVu8tTs=" -> (known after apply)
      ~ content_base64sha512 = "6JPryukFlv/rFOyC6tMLea+tQ2ZTJZxFsL57CYa3rXC/a28XaB3JmPerpMUSfWS29PyOr9lyCP2nxmIyqTnHpA==" -> (known after apply)
      ~ content_md5          = "4c66612d6cb3994e929b4ed74c1b7290" -> (known after apply)
      ~ content_sha1         = "38191fd8e74a432bf7ffc42ceee0bb4fb06e658d" -> (known after apply)
      ~ content_sha256       = "94bfd01436b4c1c2623ded68916c69860434ff691ac77a36b21cd3755bbcb53b" -> (known after apply)
      ~ content_sha512       = "e893ebcae90596ffeb14ec82ead30b79afad436653259c45b0be7b0986b7ad70bf6b6f17681dc998f7aba4c5127d64b6f4fc8eafd97208fda7c66232a939c7a4" -> (known after apply)
      ~ id                   = "38191fd8e74a432bf7ffc42ceee0bb4fb06e658d" -> (known after apply)
        # (3 unchanged attributes hidden)
    }

Plan: 1 to add, 0 to change, 1 to destroy.

───────────────────────────────────────────────────────────────────────────────────────────────────────────────────────────────────────────────────────────────────────────────────────────────────────────────────────────────────

Saved the plan to: plan2.out

To perform exactly these actions, run the following command to apply:
    tofu apply "plan2.out"
- Check difference between before.txt and after.txt
diff before.txt after.txt
Result
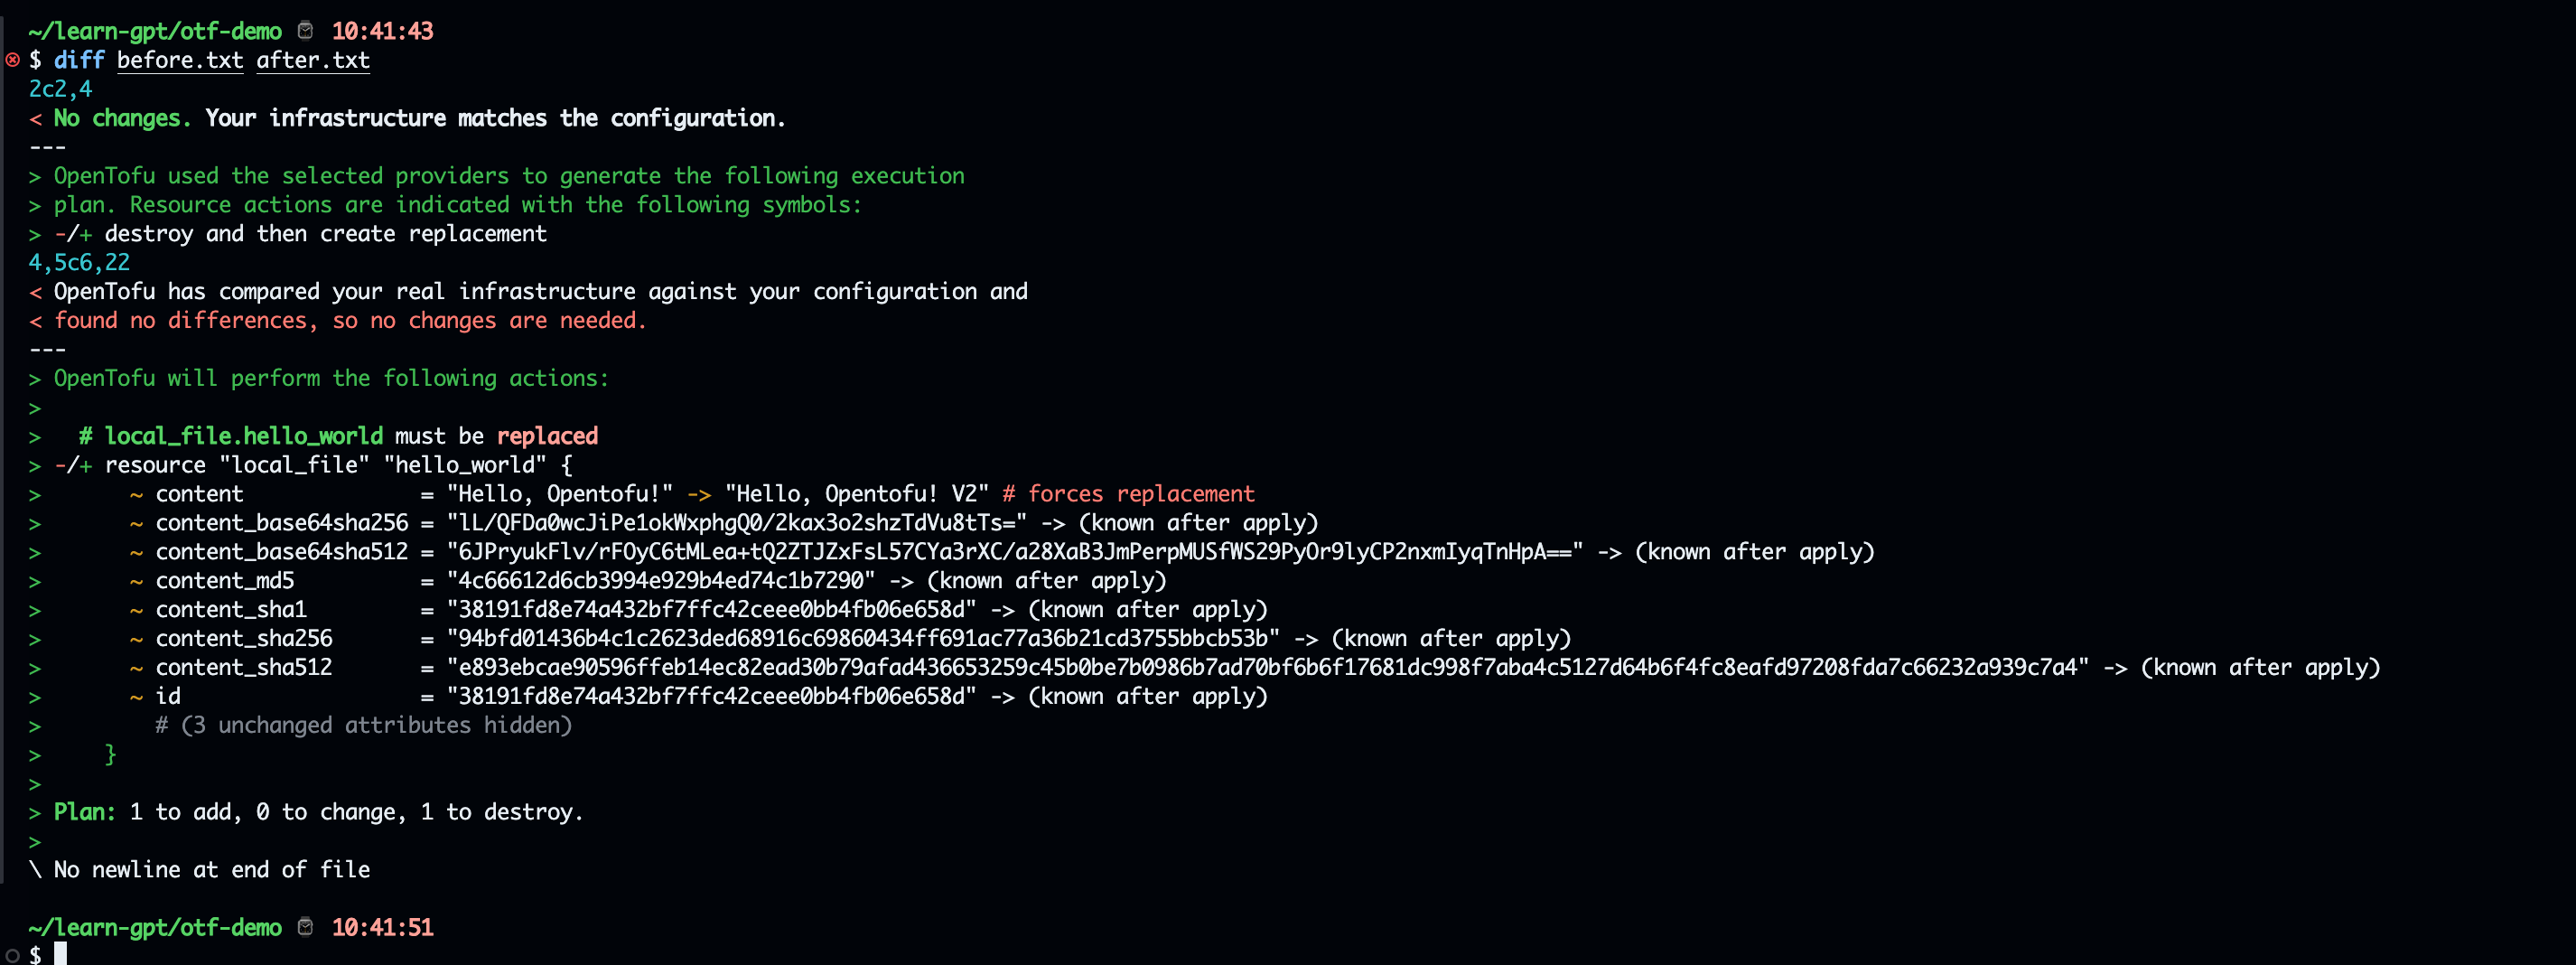
Apply
*After reviewing on plan-stage, next step is apply resources using command tofu apply *
Skenario : Apply plan2.out
In help apply mean Creates or updates infrastructure according to OpenTofu configuration files in the current directory.By default, OpenTofu will generate a new plan and present it for your approval before taking any action. You can optionally provide a plan file created by a previous call to "tofu plan", in which case OpenTofu will take the actions described in that plan without any confirmation prompt.
- Apply
plan2.out
tofu apply plan2.out
- Result
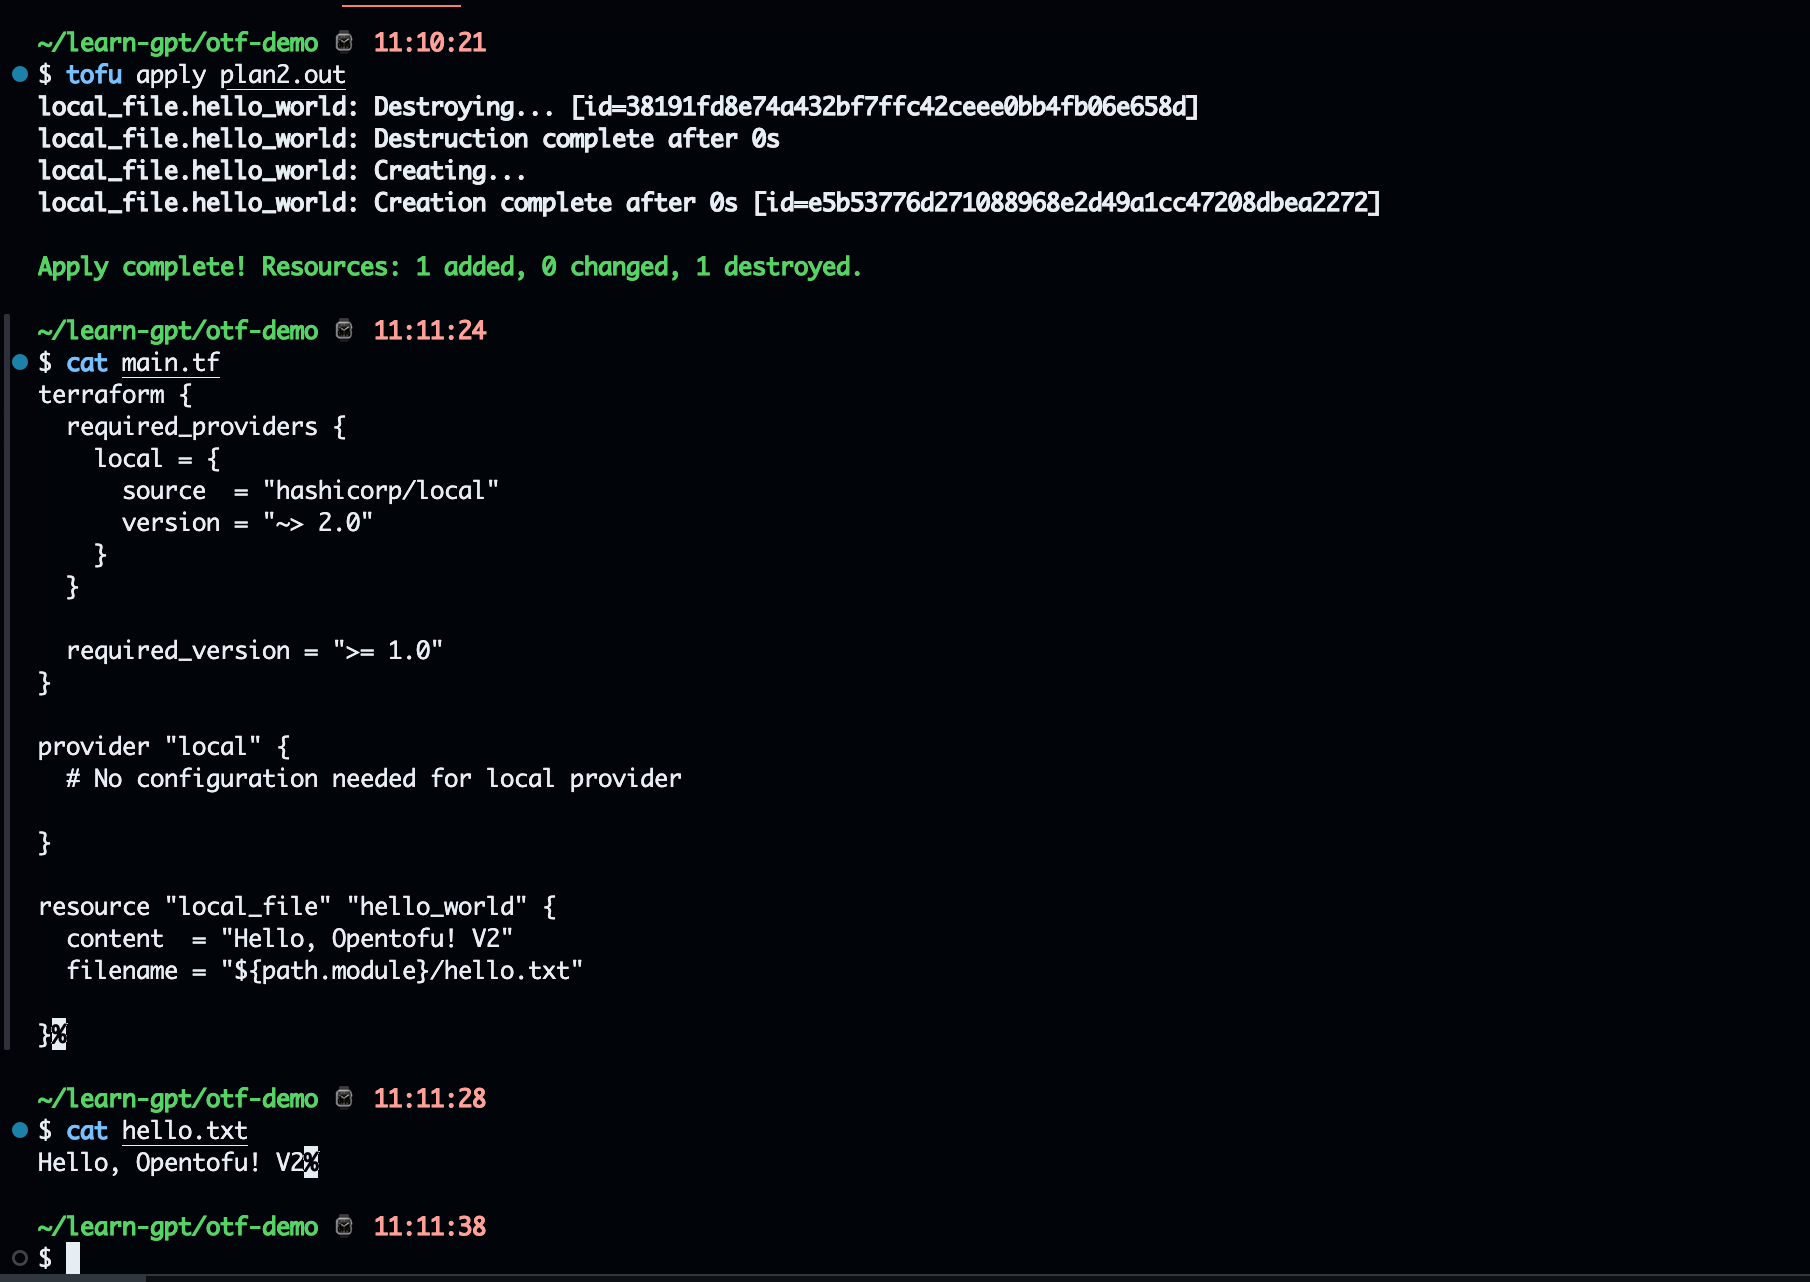
- Destroy for deleting all resources
tofu destroy -auto-approve # !IMPORTANT, dont use in production
Result
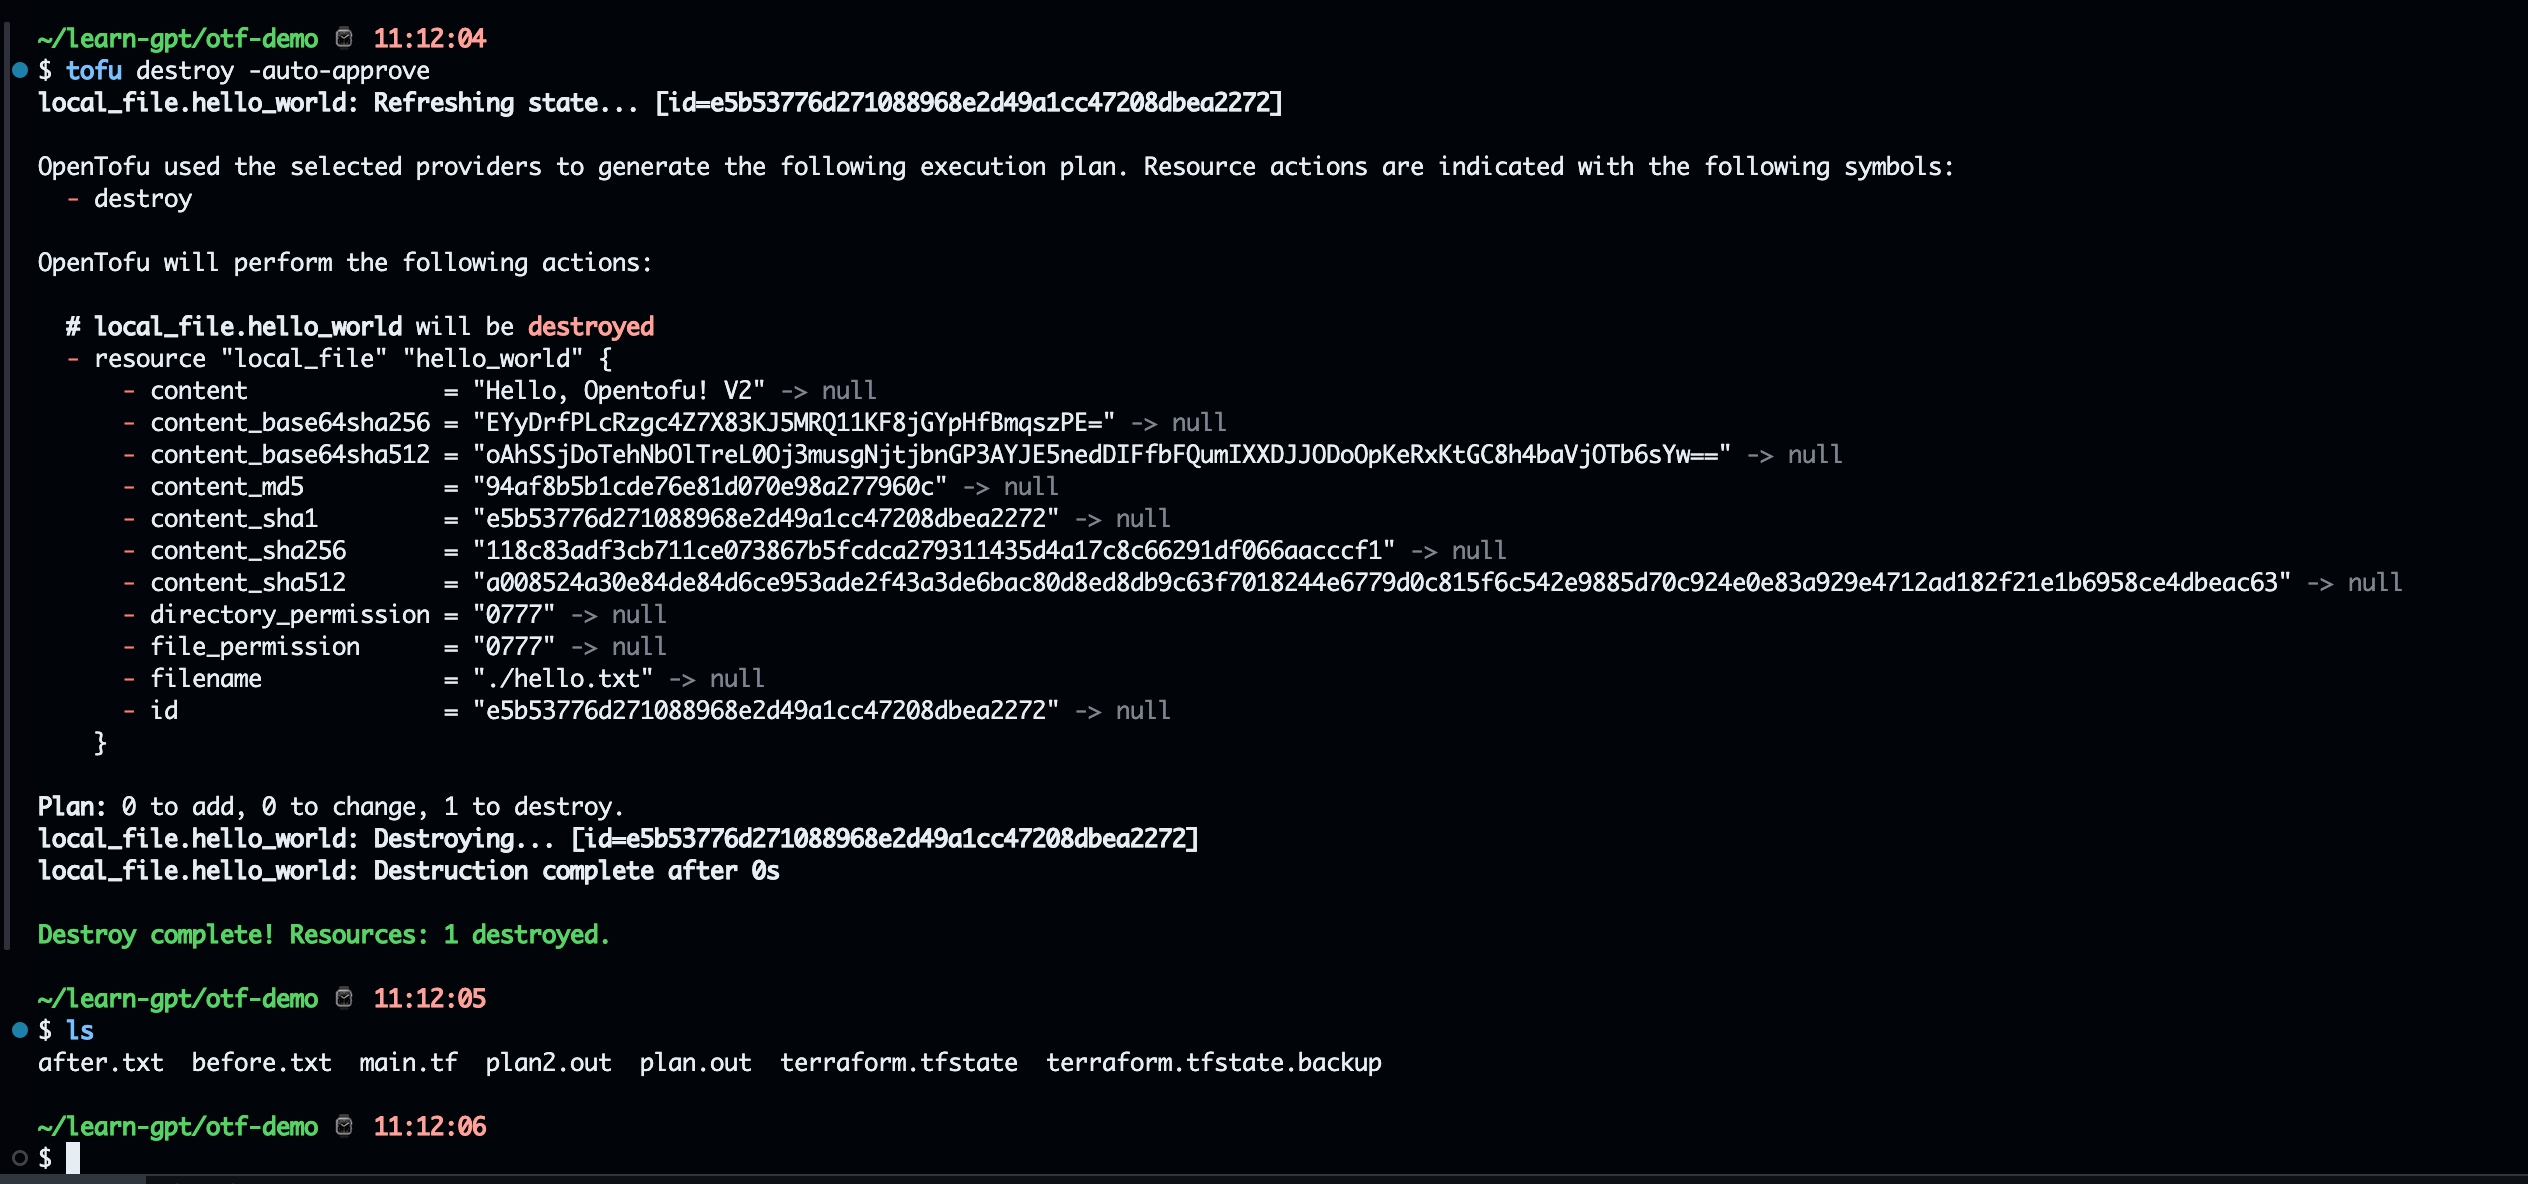
Answer
- Perbedaan apply plan2.out dengan auto approve adalah ketika menggunakan plan2 adalah kondisi ketika tofu itu sudah di cek dalam stage plan. Sedangakan dengfan auto approve, resource langsung dibuat sesuai dengan file
main.tf - Destroy merupakan hal kritikal yang wajib dihindari apalagi dengan
-auto-approveyang langsung menghapus resource tanpa adanya konfirmasi. Diwajibkan dengan mengtiadakan-auto-approve
https://github.com
Bos quest
Archon Quest: The Forge of Foundations
- Buat
main.tf
terraform {
  required_providers {
    local = {
      source  = "hashicorp/local"
      version = "~> 2.0"
    }
  }

  required_version = ">= 1.0"
}

provider "local" {
  # No configuration needed for local provider

}

resource "local_file" "hello_world" {
  content  = "Hello, OpenTofu! V2"
  filename = "${path.module}/otf-local/hello.txt"

}
- Buat
.github/workflows/ci.yaml
name: Apply Tofu to create hello.txt
on:
  push:
    branches:
      - main
jobs:
  apply:
    runs-on: ubuntu-latest
    steps:
      - name: Checkout repository
        uses: actions/checkout@v2

      - name: Set up Tofu
        uses: opentofu/setup-opentofu@v1

      - name: Apply Tofu
        run: |
          tofu init
          tofu plan
          tofu apply -auto-approve

      - name: Verify otf-local/hello.txt value
        run: |
          if ! grep -q "Hello, OpenTofu! V2" otf-local/hello.txt; then
            echo "Validation failed!" && exit 1
          fi

      - name: Upload hello.txt artifact
        uses: actions/upload-artifact@v4
        with:
          name: hello.txt
          path: otf-local/hello.txt
- Pastikan repository sudah di setup + push ke main branch `
git push -u origin main
- Result
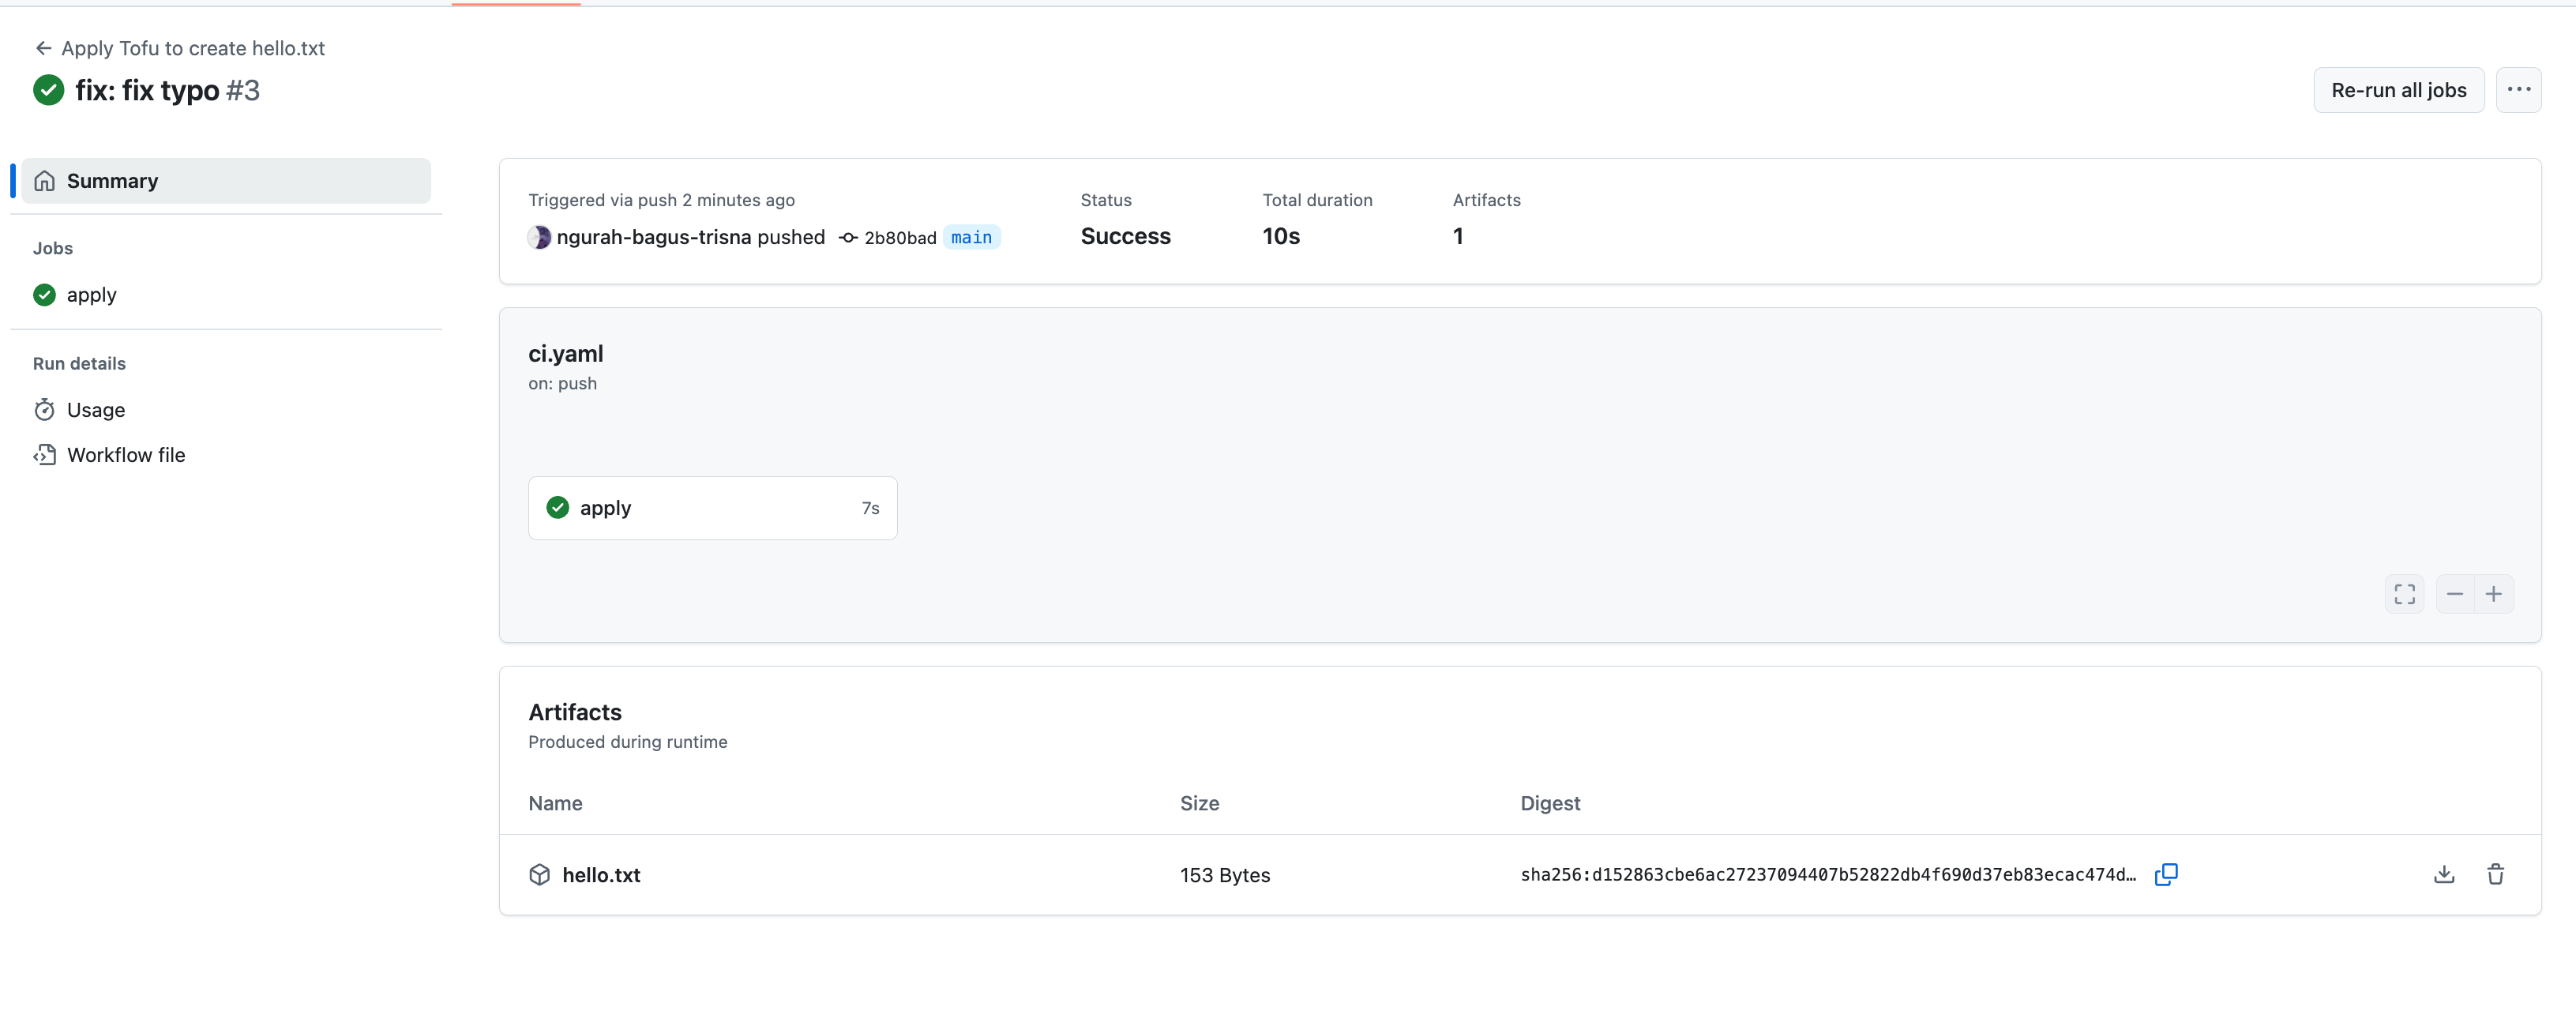
Repository : https://github.com/ngurah-bagus-trisna/boss-land-of-iac
🌟 Side Quest: Shell Scripting Sprint
Refrensi : https://www.gnu.org/software/bash/manual/html_node/Bash-Conditional-Expressions.html
- Buat
backup.sh
#!/usr/bin/env bash

SRC_DIR="$HOME/my-data"
DEST_DIR="$HOME/backup-$(date +%Y%m%d)"

if [ ! -d "$SRC_DIR" ]; then
    echo "Source directory $SRC_DIR does not exist."
    exit 1
else
    echo "Backing up $SRC_DIR to $DEST_DIR"
    mkdir -p "$DEST_DIR"
    cp -r "$SRC_DIR/"* "$DEST_DIR/"
    if [ $? -eq 0 ]; then
        echo "Backup completed successfully."
    else
        echo "Backup failed."
        exit 1
    fi
fi
- Jadikan executable
chmod +x backup.sh
- Coba running
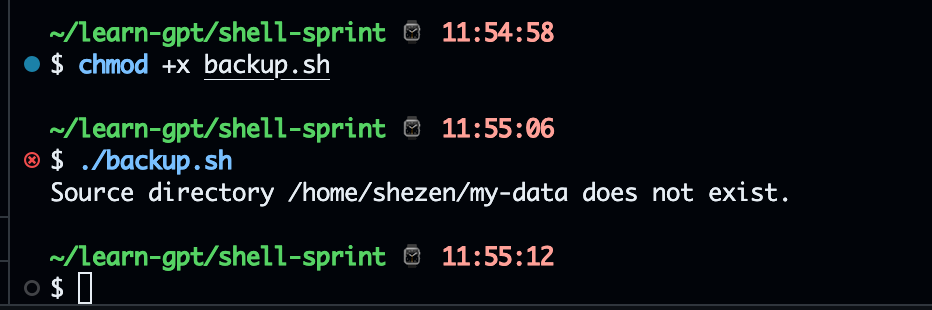
The first workflow | daily-quest
lab : https://vscode.dev/tunnel/nb-ubuntu-desk/home/shezen/learn-gpt/first-workflow
Github action give tools to automation in repository git using github_workflows. It allow to runing task like build, test, deploy and push to production and minimize error/problem.
Skenario : Create new repository, publish on github, add workflows to say "Hello World"
- Create new file
.github/workflows/first-workflows.yaml
name: Hello CI
on:
    - push
jobs:
    build:
        runs-on: ubuntu-latest
        steps:
            - name: Checkout code
              uses: actions/checkout@v2
            - name: say hello
              run: echo "Hello from CI/CD!"
- Create repository
ci-cd-demoon github
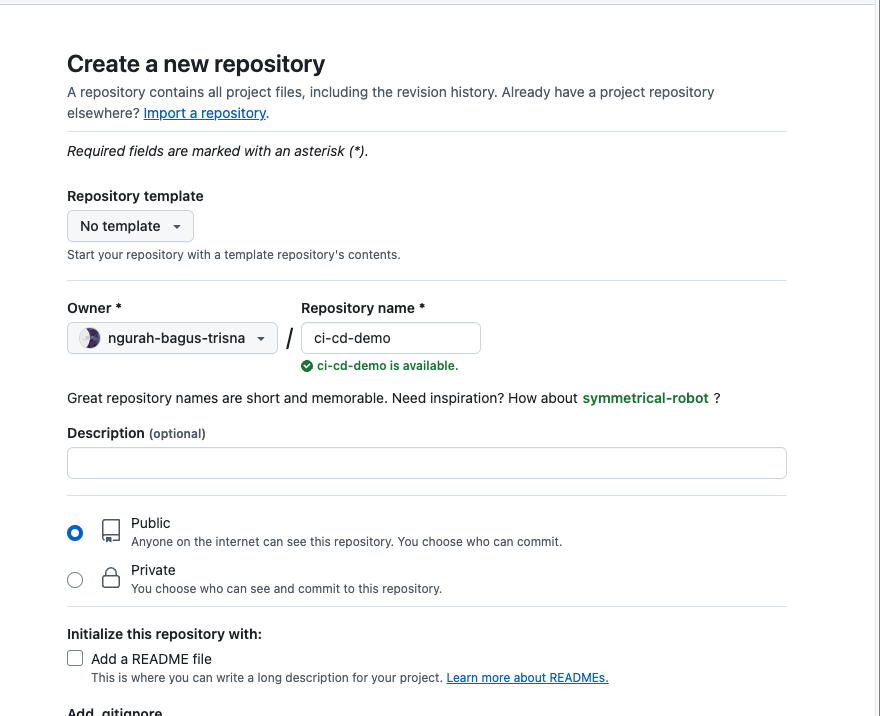
- Git init, add, commit + push to remote repository
git init
git add .
git commit -m "ci: add testing hello-world on gh_workflows"

git remote add origin https://github.com/ngurah-bagus-trisna/ci-cd-demo.git
git branch -M main
git push -u origin main
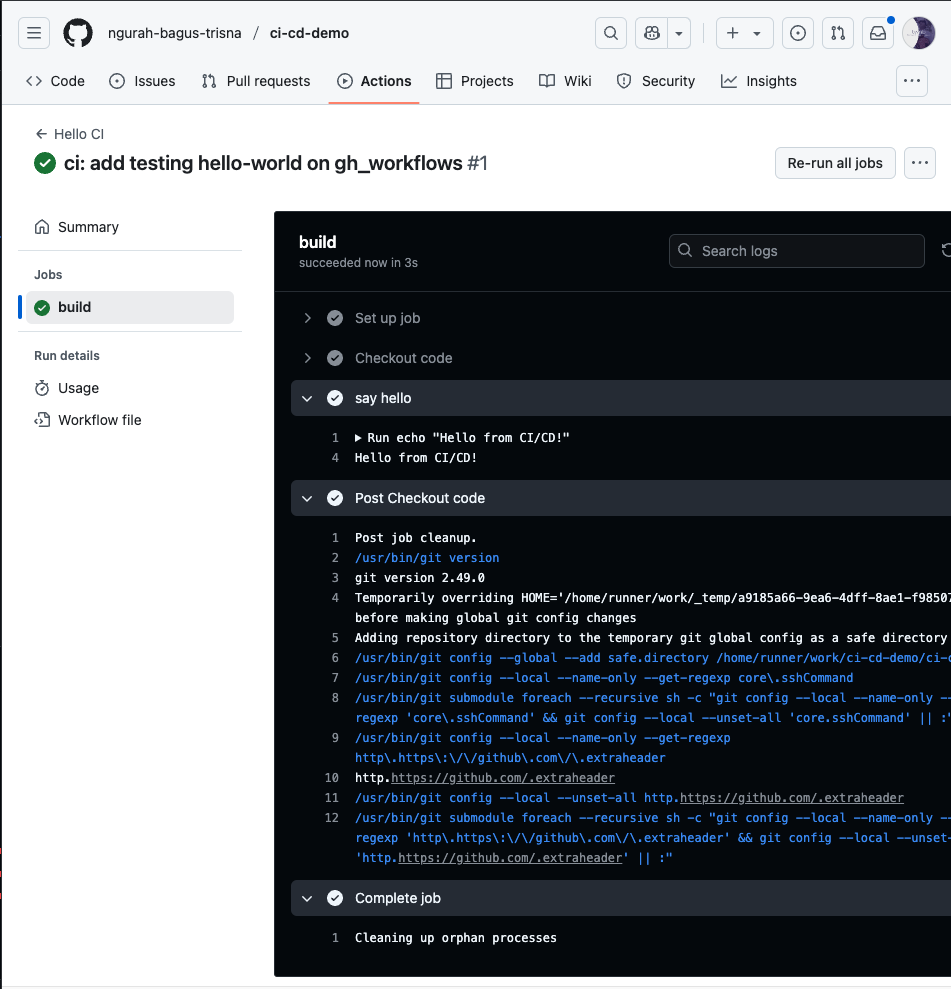
4. Result
Answer :
- Blok on digunakan untuk penentu trigger sebuah action, jobs adalah sekumpulan action yang akan di running, steps adalah serangkaian langkah yang akan di exec dalam runner
- Action checkout digunakan untuk mengambil data dalam repository
Installasi
Refrensi : https://www.kubecost.com/install#show-instructions
Installasi kubecost menggunakan helm, disini ketika melakukan installasi kubecost, secara otomatis akan terinstall prometheus dan grafana.
- Get helm values
helm repo add kubecost https://kubecost.github.io/cost-analyzer/Kubecost merupakan tools yang digunakan untuk tracing, monitoring biaya dari sebuah on-premises kubernetes cluster.
Installasi
Refrensi : https://www.kubecost.com/install#show-instructions
Installasi kubecost menggunakan helm, disini ketika melakukan installasi kubecost, secara otomatis akan terinstall prometheus dan grafana.
- Get helm values
helm repo add kubecost https://kubecost.github.io/cost-analyzer/
helm show values kubecost kubecost/cost-analyzer -n kubecost > values.yaml
- Sesuaikan values
Disini saya menyesuaikan mata uang yang digunakan dalam dashboard Kubecost
kubecostProductConfigs:
    currencyCode: IDR
Untuk service yang sebelumnya ClusterIP, saya set ke NodePort agar dapat mudah diakses.
service:
  type: NodePort
  nodePort: 30003
- Installasi
helm upgrade --install kubecost \
  --repo https://kubecost.github.io/cost-analyzer/ cost-analyzer \
  --namespace kubecost --create-namespace -f values.yaml
Result, pastikan pod running semua.
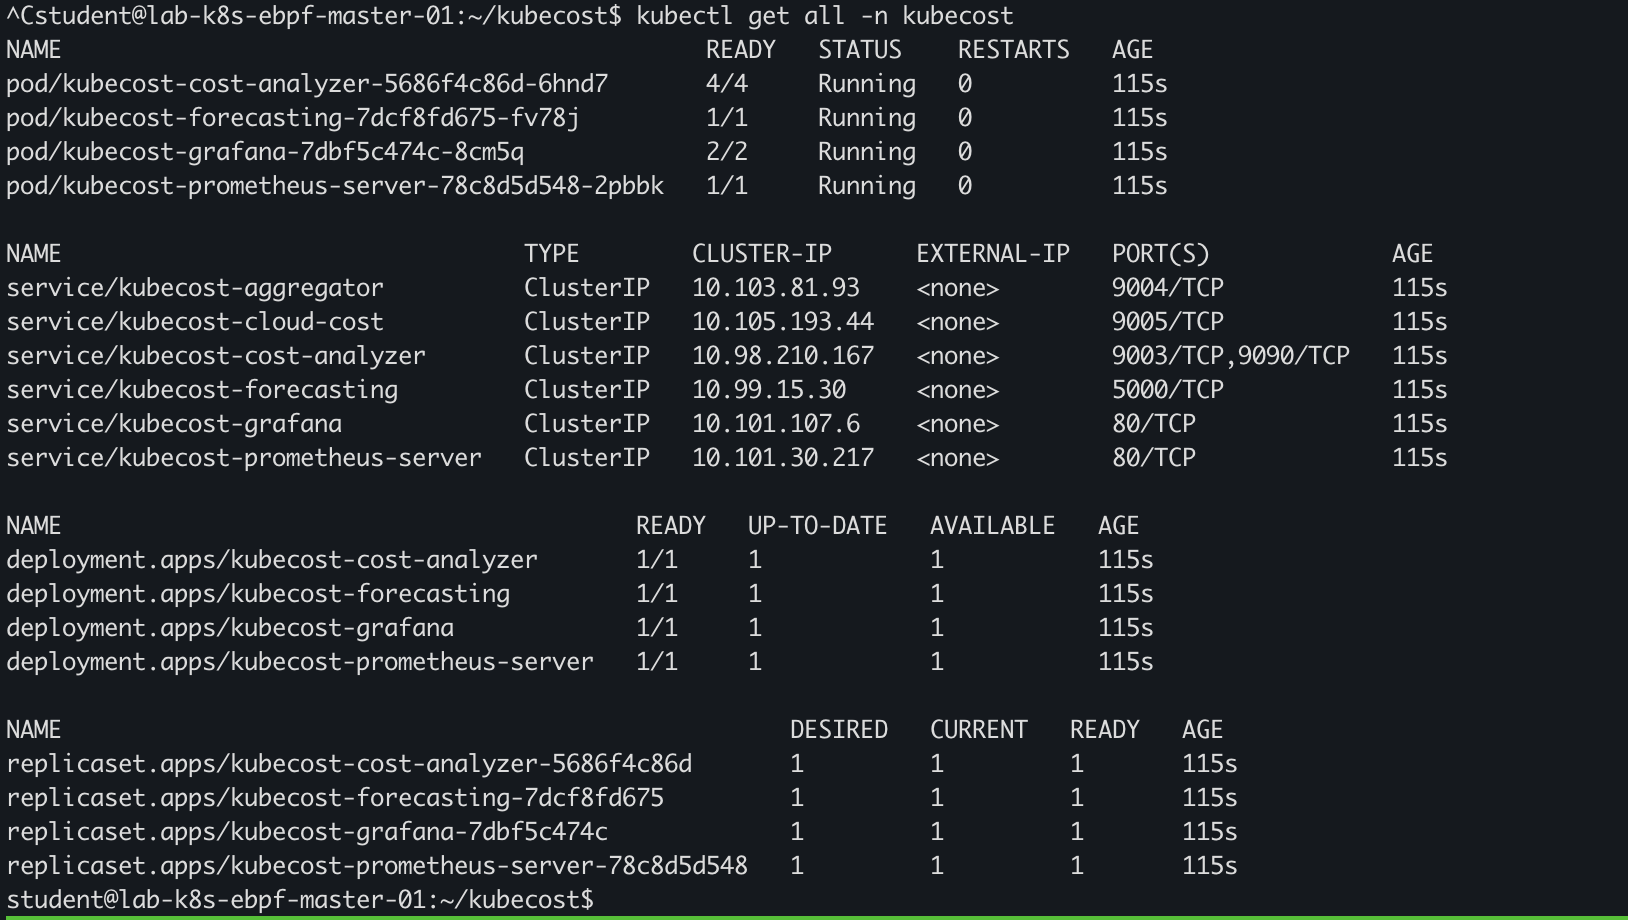
Url dapat diakses dengan nodeport :30003
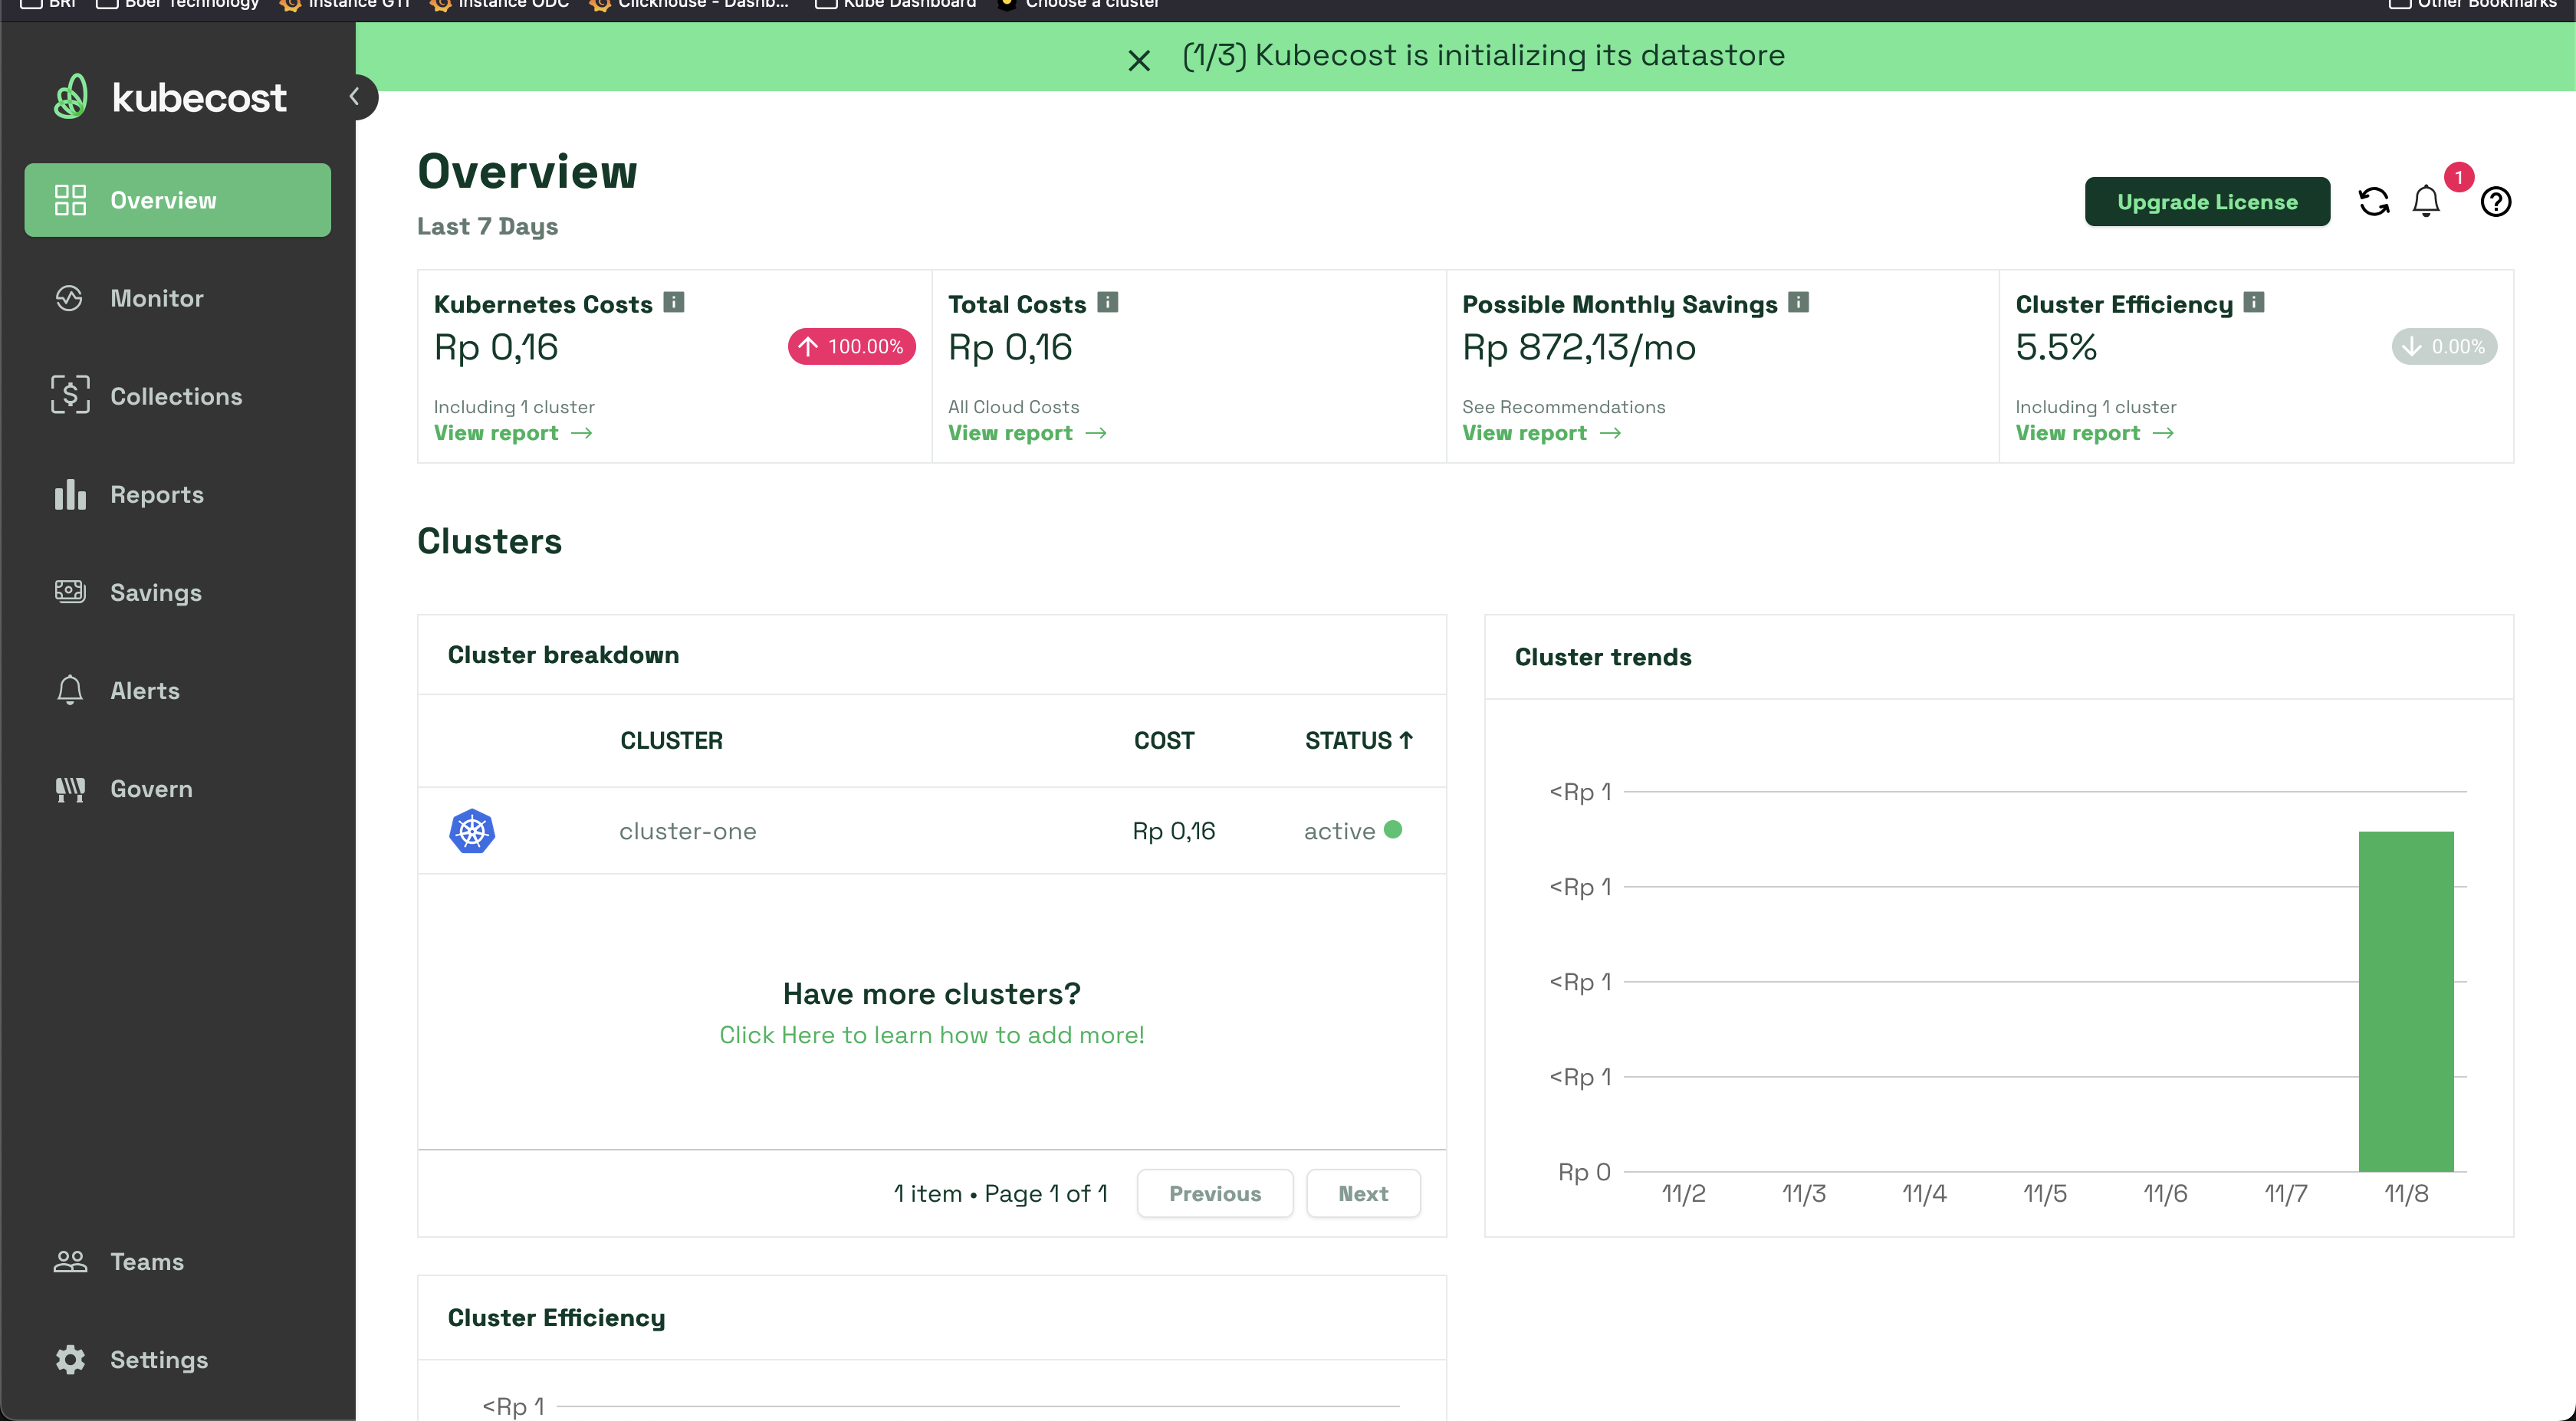
- https://stackoverflow.com/questions/74595635/how-to-configure-containerd-to-use-a-registry-mirror
- https://docs.docker.com/registry/recipes/mirror/
- https://docs.docker.com/registry/deploying/#deploy-your-registry-using-a-compose-file
- https://d7y.io/docs/setup/runtime/containerd/mirror/
Ketika sebuah ip terus"an pull ke registry docker, akan menyebabkan sebuah peringatan limit pull telah terpakai. Biasanya akan reset
]]>- https://stackoverflow.com/questions/74595635/how-to-configure-containerd-to-use-a-registry-mirror
- https://docs.docker.com/registry/recipes/mirror/
- https://docs.docker.com/registry/deploying/#deploy-your-registry-using-a-compose-file
- https://d7y.io/docs/setup/runtime/containerd/mirror/

Ketika sebuah ip terus"an pull ke registry docker, akan menyebabkan sebuah peringatan limit pull telah terpakai. Biasanya akan reset setelah 6 jam. Untuk menyiasati, dicoba riset install registry mirror di gns3.
Common issue
- Tidak bisa login dengan auth htpasswd. syntax docker login bisa, hanya saja ketika pull tidak menggunakan registry-mirror
- Hanya bisa 1 Registry per registry-mirror. Jadi ketika ingin cache image selain docker.io, harus membuat kembali docker-registry dengan port yang berbeda
- Bisa untuk containerd, dan docker
Simple topology
| hostname | IP |
|---|---|
| regis-server | 192.168.122.10/24 |
| docker-client | 192.168.122.11/24 |
Setup registry server
Metode yang dipakai adalah yang paling simple, menggunakan docker compose
Create self-signed certificate (For https)
mkdir -p registry/{cert,auth,data}
cd registry

openssl req \
  -newkey rsa:4096 -nodes -sha256 -keyout certs/domain.key \
  -addext "subjectAltName = DNS:registry.ngurah.local" \
  -x509 -days 365 -out certs/ca.crt

sudo mkdir -p /etc/docker/certs.d/registry.ngurah.local:5000
sudo cp certs/ca.crt /etc/docker/certs.d/registry.ngurah.local:5000/
Or create letsencrypt certificate using dns challange.
certbot certonly --preferred-challenges=dns --dns-cloudflare \
--server https://acme-v02.api.letsencrypt.org/directory \
--dns-cloudflare-credentials ~/.cloudflare.ini \
--agree-tos -d registry.ngurahbagus.my.id
Create User & auth
docker run \
  --entrypoint htpasswd \
  httpd:2 -Bbn ngurah wait > auth/htpasswd
Create docker compose (if self-signed certificate)
version: '2'
services:
  registry:
    restart: always
    image: registry:2
    ports:
      - 5000:5000
    volumes:
      - /home/ubuntu/registry/data:/var/lib/registry
      - /home/ubuntu/registry/certs:/certs
      - /home/ubuntu/registry/auth:/auth
      - ./config.yml:/etc/docker/registry/config.yml
Create docker compose (if using lets-encrypt)
ersion: '2'
services:
  registry:
    restart: always
    image: registry:2
    ports:
      - 5000:5000
    volumes:
      - ./data:/var/lib/registry
      - /etc/letsencrypt/live/example.com/fullchain.pem:/etc/letsencrypt/live/example.com/fullchain.pem
      - /etc/letsencrypt/live/example.com/privkey.pem:/etc/letsencrypt/live/example.com/privkey.pem
      - ./auth:/auth
      - ./config.yml:/etc/docker/registry/config.yml
Create config.yml
version: 0.1
log:
  fields:
    service: registry
storage:
  cache:
    blobdescriptor: inmemory
  filesystem:
    rootdirectory: /var/lib/registry
http:
  addr: :5000
  host: https://example.com
  headers:
    X-Content-Type-Options: [nosniff]
  tls:
    certificate: # your certificate
    key: # your cert key

health:
  storagedriver:
    enabled: true
    interval: 10s
    threshold: 3
proxy:
  remoteurl: https://registry.k8s.io # mirroring k8s.io
Running docker container
docker-compose up -d
Try login
docker login registry.ngurah.local:5000
---
Login Succeeded # Berhasil
Setup mirror registry client Docker
Using Docker-client first
Setup insecure registry
# Skip if you not using self-signed cert
sudo mkdir -p /etc/docker/certs.d/registry.ngurah.local:5000
sudo cp ca.crt /etc/docker/certs.d/registry.ngurah.local:5000/
Configure mirror,
sudo vi /etc/docker/daemon.json
---
{
  "registry-mirrors": ["https://registry.ngurah.local:5000"]
}
Restart docker, & try pull private image using credentials on registry-server
sudo systemctl restart docker
docker pull hello-world

# Check registry catalog
curl https://example.com:5000/v2/_catalog
---
{"repositories":["kube-proxy","library/hello-world"]} # makesure image availible
Sekarang image akan tercache di registry server
Setup mirror registry client containerd
Setup mirror first
mkdir /etc/containerd/certs.d/registry.k8s.io
sudo vi /etc/containerd/certs.d/registry.k8s.io/hosts.toml
---
server = "https://registry.k8s.io"

[host."https://example:5000"]
  capabilities = ["pull", "resolve"]
Konfigurasi /etc/containerd/config.toml untuk membaca registry di certs.d
    [plugins."io.containerd.grpc.v1.cri".registry]
      config_path = "/etc/containerd/certs.d" # enable
Restart containerd & try pull registry.k8s.io
sudo systemctl restart containerd.io
sudo crictl pull registry.k8s.io/kube-proxy:v1.27.2